11 Windows 11 Features That Will Change How You Use Your PC
Windows 11 might just be the most innovative operating system released by Microsoft in recent years. While Microsoft has always strived to be user-friendly and efficient, Windows 11 has taken the platform to new heights with incredible features that prioritize productivity and an overall better viewing experience. From new ways to navigate through apps, to built-in programs that remove the need for third-party software, the operating system continues to improve with each update.
Below, we'll look at 11 Windows 11 features that will change how you use your PC. Some are returning features from Windows 10 that have been revised, while others are original and are still being developed. So, whether you are a working professional, gamer, or casual user, you're bound to learn something new that will streamline and refine your everyday tasks.
It's important to note here that the features and step-by-step instructions provided are based on the latest Windows 11 22H2 version. Therefore, potential changes may apply in future updates. With that said, as the platform continues to stabilize, these features can only get better with time.
Widgets
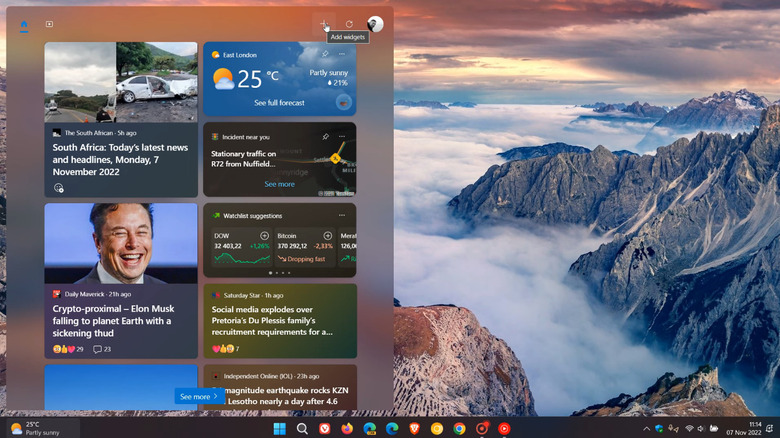
Widgets is a new feature found on Windows 11 that is similar to the "news and interest" feed on Windows 10. In a nutshell, users are provided with access to useful information without needing to open a separate app. For example, the Watchlist can show stock prices and financial news, whereas the To-Do List can create and display your tasks for the day ahead. Since Widgets are powered by Microsoft Edge, whatever you see will be in real-time. Therefore, Widgets like Weather and Traffic will be pretty accurate, removing the need to constantly refresh your web browser.
Like many features on Windows 11, the Widget feature is customizable. You'll be able to adjust the sizes of the Widgets to your preferences and add/remove the content you want to see. As for those who don't like the current range of Widgets on offer, more will likely be added in the future, including support for third-party options.
Here's how to enable and use Widgets on Windows 11:
- On the taskbar, click the Widget icon.
- To add a Widget, select the + icon on the top right of the Widget panel. A list should appear.
- To remove a Widget, click the three-dot menu on the Widget, and select Unpin Widget.
- To change the size of a Widget, click the three-dot menu, and choose between Small, Medium, or Large.
- If you want to rearrange the order of your Widgets, click and drag the top of the Widget and drop it where you'd like.
Dictation with auto punctuation
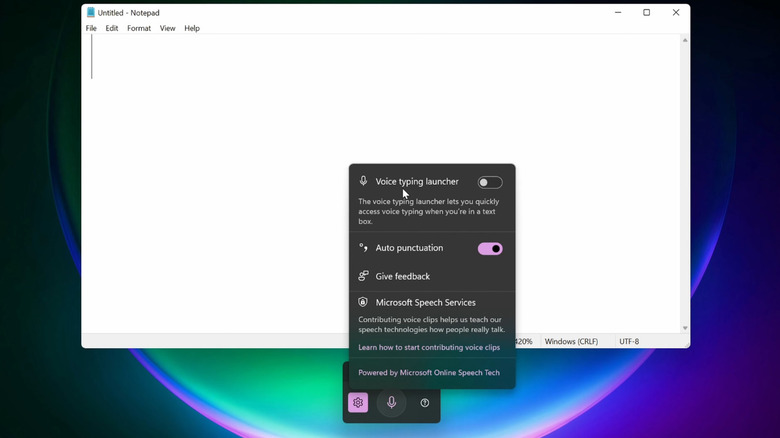
Are you looking for a way to make the writing process faster and more efficient? Well, dictation with auto punctuation is a Windows 11 feature that allows users to turn their voice into text in real-time. While this may sound familiar to Windows 10 users, Microsofts speech recognition technology can now understand natural pauses, adding appropriate punctuation marks along the way.
In addition to basic punctuation, the feature goes a step further and also responds to voice commands, making the editing process easier. When working in Microsoft Word, for example, users can say "new paragraph" or "delete previous sentence" without having to touch their keyboard. It's worth mentioning that although dictation with auto punctuation is fairly accurate, occasionally, the technology might misinterpret the words you say. You'll then have to try again or edit the text manually.
Nevertheless, dictation with auto punctuation is sure to boost workflow and increase productivity. Writers in particular who type for long periods can expect reduced physical strain on their hands and wrists. The feature might even help those who struggle to remember their thoughts while typing, as the output is always instantaneous.
Here's how to enable and use dictation with auto punctuation on Windows 11:
- Open the app you want to write in.
- Press the Windows logo key + the H key.
- When the dictate tool appears, left-click the settings/gear icon.
- Toggle the "Auto punctuation" option.
- Go back to the app you want to write in and left-click the text field.
- Now, select the microphone icon on the dictate tool, and share your thoughts.
Virtual desktops
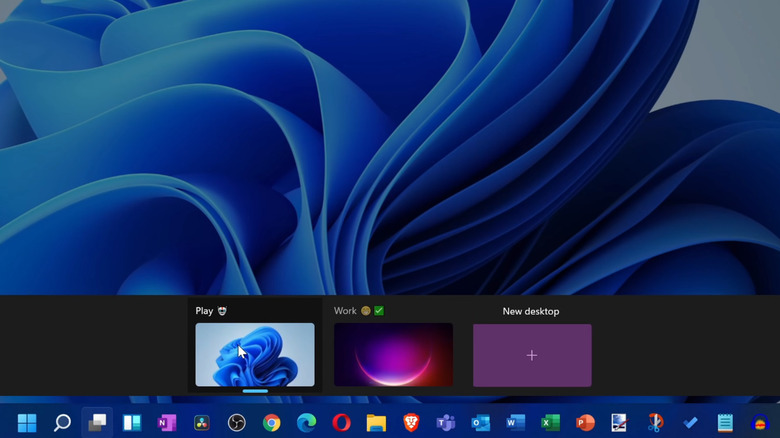
Virtual desktops is a feature that allows Windows 11 users to create multiple desktops on a single computer. Each desktop functions as its own workspace, opening windows and running applications separately. This feature is useful if you need to work on multiple tasks at the same time, as it helps organize apps and reduce clutter on the screen.
While using the virtual desktop feature, you'll also be able to customize what those desktops look like. To help distinguish them apart from each other, you can apply different backgrounds, names, and emojis so that when you access the Task View button, you'll know exactly which virtual desktop you're looking at. Note that depending on the specifications of your PC, virtual desktops can have an effect on system performance. If you're short on processing power and memory, running multiple apps on multiple desktops will consume additional resources.
Here's how to enable and use virtual desktops on Windows 11:
- Click the Task View button located on the taskbar. Alternatively, you can use the Windows key + Tab on your keyboard.
- You should see a preview of your current desktop, in addition to an option that allows you to create a new desktop.
- Select the "New desktop" option and a new desktop will be added. It should appear as "Desktop 2" if this is your first time using the feature.
- You can then right-click on the new desktop, and choose to customize the background or rename it to something else.
- To move between desktops, select them via the Task View button, or use the keyboard shortcut Windows key + arrow.
Focus assist
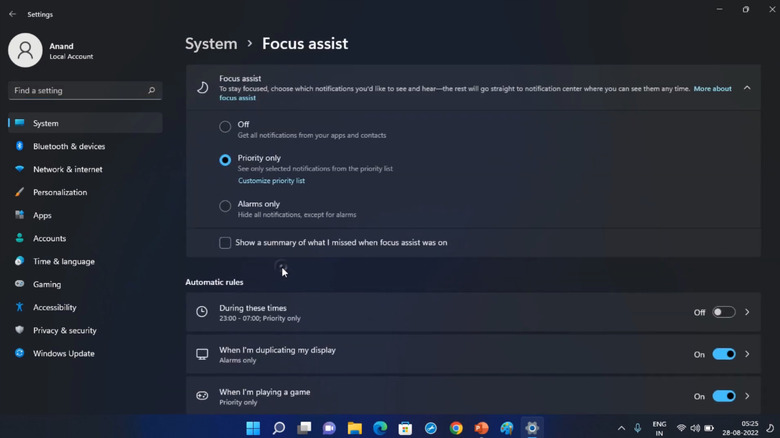
Notifications are a quick way to lead to distractions while working. But with the new focus assist feature, Windows 11 adds a level of customization that allows users to stop notifications entirely, or retain the important ones. In this way, you'll maintain a good level of productivity throughout the day while still knowing when your boss messages you.
Focus assist is available in three different modes: "Off," "Priority only," and "Alarms only." When set to "Off" mode, the system will operate as default, and notifications will come through as they usually do. "Priority only" will hide all system notifications except reminders, calls, texts, people, and apps that you have added to your priority list. Finally, the "Alarm only" mode does exactly what the name suggests — it removes all notifications except for alarms and timers set to ring.
Like many features, focus assist must be turned on manually, but you can apply certain settings so it's always enabled. Within the "Automation rules" section of the focus assist settings, you can set it to activate during certain times, when you're using an app in full-screen mode, or while you're playing a video game.
Here's how to customize and enable focus assist on Windows 11:
- Open Settings, System, and "Focus assist."
- Scroll down and select which focus assist mode you want. If you select "Priority only," you'll need to also choose the "Customize priority" list.
- Further below, you will find the "Automatic rules" heading. Select the times you would like focus assist to activate.
- Depending on your "Automatic rules" settings, you will know if focus assist is on if a moon appears in the far right of your taskbar.
Clipchamp
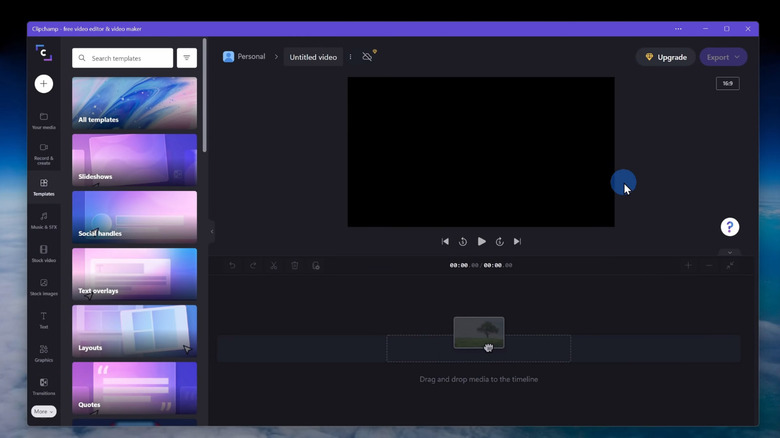
Clipchamp is a free online video editing app that is integrated into Windows 11. It is a somewhat revised version of Windows Movie Maker, offering more tools, features, and customization options. Similar to Movie Maker though, Clipchamp can appeal to any video creator no matter their experience level. Its simplistic and easy-to-understand user interface can create professional-looking projects in no time.
Like many editing apps, Clipchamp allows users to trim, cut, and crop their videos. Additional effects such as filters, transitions, color corrections, and AI voiceovers are also present. What makes the app truly unique though is its curated stock library of more than 1 million royalty-free assets. For example, insert a pre-made template if you're struggling to start your project, or, add stock videos or images to fill in the gaps. There's even an option to record your screen or webcam and upload it directly to your video timeline.
Now, before thinking Clipchamp is the best editing tool, keep in mind that there is a limitation, which comes in the form of a subscription service. While the base version is free, users will need to upgrade to the premium edition to remove watermarks and unlock certain assets and special features.
Here's how to enable and use Clipchamp on Windows 11:
- Open the Microsoft Store app.
- Search for Clipchamp.
- On the Clipchamp store page, left-click the Get button to download Clipchamp.
- Once Clipchamp has been installed, open the app and sign in using your Microsoft account.
- You can now edit in Clipchamp, or upgrade by left-clicking the diamond icon in the top right of the app.
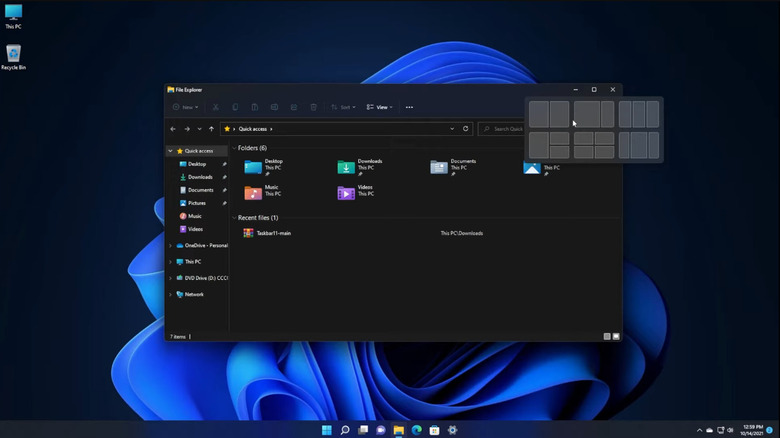
Tabs in File Explorer
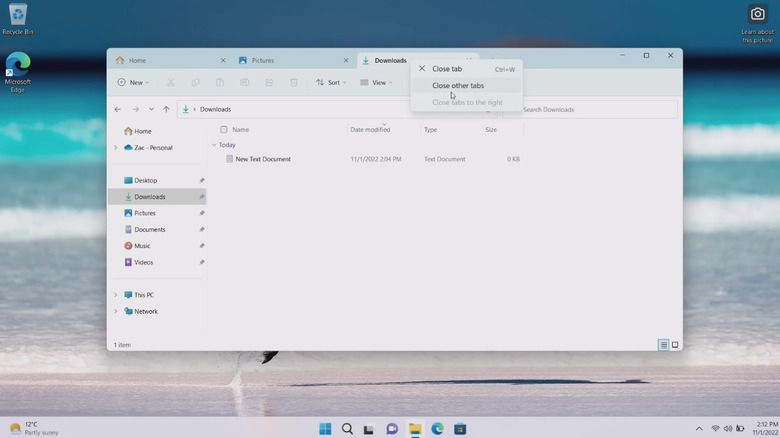
Thanks to a recent Windows 11 update, File Explorer now has a new tabs feature, which lets users open multiple folders within a single window. Similar to a web browser, users will be able to switch between their respective tabs and open new ones using the + option next to an existing tab. The feature also allows users to rearrange and move the tabs around by dragging and dropping them into different positions.
The inclusion of tabs brings an improved viewing experience and a proper means to manage the File Explorer system. As a practical example, you could open File Explorer, add Documents to a new tab, and then add the files within the Documents folder to new tabs as well. With folders and files now placed next to each other, copying, transferring, and viewing content will become much easier to navigate.
Here's how to enable and use tabs in File Explorer on Windows 11:
- Open File Explorer on your Windows Taskbar.
- You should see a + sign at the top of the File Explorer.
- Left-click the + sign to open another File Explorer tab.
- You can then open other file locations in additional tabs. For example, on the Documents file location, right-click, and select "Open in new window."
- The same applies to folders within the file locations. Right-click and select "Open in new window."
- When you want to close a tab, click the X button on the desired window.
Record your screen with the Windows Snipping Tool
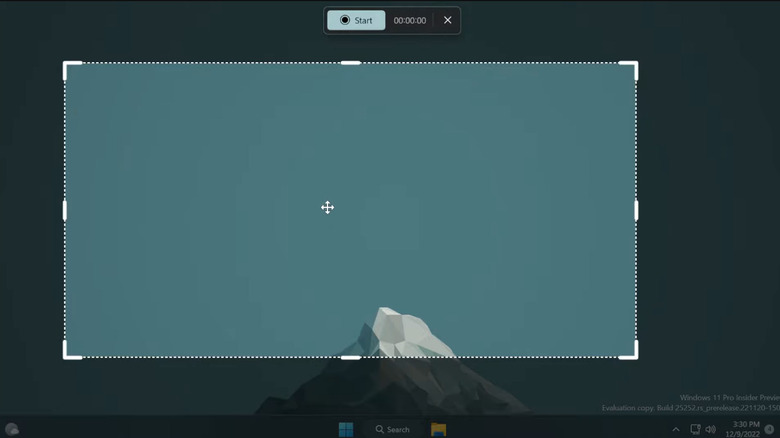
In the past, Windows users had to rely on third-party apps to record their screens. Now, Windows 11 has a built-in screen recorder that works through the Snipping Tool. While this feature is still in development, and cannot record audio as of yet, it's still incredibly useful for those who want to capture and share their desktop with friends, family, or co-workers.
What truly separates the Snipping Tool's screen recorder from other apps though is its simplicity. The basic interface and straightforward controls take a few seconds to master. Additionally, when opening the Snipping Tool app, you'll be given the freedom to choose the portion of the screen you want to record, which lets you emphasize what's on display.
Once the screen recorder activates a countdown timer will begin. You can then pause the recording, or, stop it entirely when you have finished making the video. The Windows Snipping Tool will then let you preview the video, and save it to any location on your computer. At the date of this article, recordings are stored in the MP4 format only. As the Snipping Tool app continues to update and improve, additional settings and formats may be added.
Here's how to enable and use the Snipping Tool's screen recorder on Windows 11:
- Open the Windows Snipping Tool app.
- If it cannot be found, install or update it via the Microsoft Store.
- Once the Snipping Tool is open, left-click the video camera icon.
- Now left-click the + New button, select the area to record, and left-click Start.
- Stop the recording by left-clicking the red box net to the timer.
- You can now save or delete your recording.
Snap
Snap is a feature that builds upon the snapping desktop action found in Windows 10. Users can now arrange multiple open windows on their screen into predefined layouts that make multitasking and app organization much easier. For example, let's say you have three windows open on your desktop; a web browser, a Word document, and a messaging app. Without having to manually resize them so they all fit onto one screen, you can hover over each app's maximize button, which will present several layout options. You can then choose whether to place the apps side by side, within quadrants, or, stacked next to each other.
As one would imagine, with so many configurations, the Snap feature is an excellent option for those looking to optimize the full extent of their screen. In the past, PC users who wanted to utilize multiple apps at once would need to buy an additional monitor to see everything. So, if you've recently run into the same issue, not only will you streamline your workflow and become more efficient, you may just save a few dollars!
Here's how to enable and use Snap on Windows 11:
- Open your Settings and select System.
- Click on Multitasking and toggle "Snap windows."
- Additional checkboxes will now appear below.
- Ensure the "Show snap layouts when I hover over a window's maximize button" checkbox is ticked. You can tick additional checkboxes based on your preferences.
- When a window is open on your desktop, hover over the maximize button and choose the Snap layout options that are available.
- Do the same for the other windows that are open until your screen has been organized.
- To unsnap the window, drag it away from the corner of the screen.
Revamped Task Manager
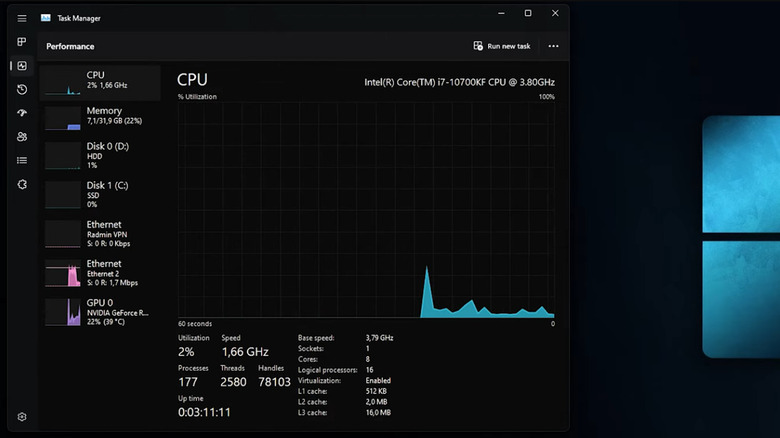
Over the years, the Windows Task Manager has seen little to no changes. However, after a recent Windows 11 update, there have been a few visual upgrades, including section labels, dedicated task buttons, and integrated settings. More intriguing though is the added Efficiency Mode, but we'll get to that after the cosmetics.
When you first open the revamped Task Manager, you'll notice that Windows 11 has removed the tab interface. Instead, your system information will now be located on a panel to the left of your Task Manager. Next, users who often experienced unresponsive processes will be happy to find a dedicated End Task button at the top of their Task Manager, as well as a Run New Task button. The Options and View headings have also been replaced by a single Settings section, clearing up the previous interface and making things less complicated.
While a new layout is a welcomed change, the most exciting feature of the revamped Task Manager is Efficiency Mode. With a click of a button, users can now control an app or process' access to system resources, which can alleviate stress on the CPU and improve battery life for those working on laptops. This makes it a great option for those who have several applications open and want to maintain the best possible system performance.
Here's how to open the revamped Task Manager and enable Efficiency Mode on Windows 11:
- Right-click the Start Menu and select the Task Manager app.
- To enable Efficiency Mode, select an application within the processes section and left-click the Efficiency Mode button in the top right corner of the Task Manager.
- Confirm the pop-up window for Efficiency Mode.
- To turn off Efficiency Mode, click the Efficiency Mode button again.
Windows Spotlight
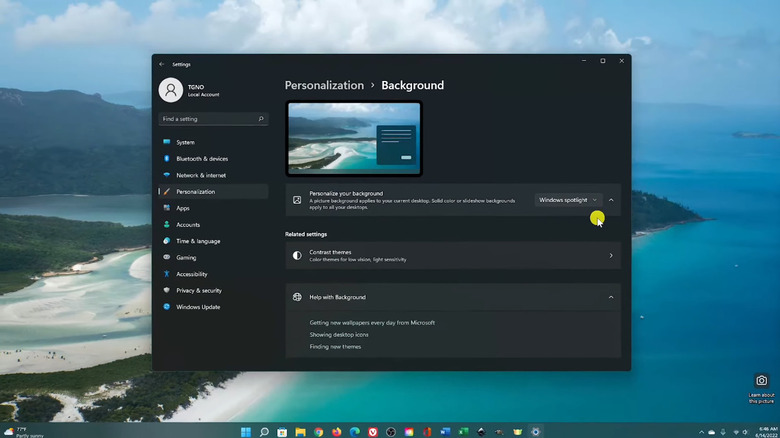
Previous versions of Windows had a Spotlight feature that brought new wallpapers to the lock screen daily. These were usually high-quality photographs of landscapes and nature that added variety to your monitor but disappeared once you logged back in. With many users requesting the feature for backgrounds too, Windows 11 has now added it as an additional personalization option.
Windows Spotlight for your background works more or less the same as the lock screen version. An icon will appear on the desktop that looks like a camera labeled "Learn about this picture." When doubled clicked, the Microsoft Edge browser and Bing search engine will open, displaying information related to the image. Note that this seems to override your default internet browser, but don't worry, it's for Windows Spotlight only.
As expected, the camera icon also has the same tailored options as its lock screen variant. Users can choose to switch to the next picture or like/dislike the current picture. Liking the picture will show you similar images in the future while disliking the picture will change the image immediately. The main reason to use Windows Spotlight for your background would simply be convenience if you tire quickly looking at your wallpaper. Now, you'll no longer have to search the web for interesting backgrounds every day. Windows Spotlight does all the work and research for you!
Here's how to enable Windows Spotlight on Windows 11:
- Open Settings and select Personalization.
- Click Background and find the "Personalize your background" option.
- In the drop-down menu, select Windows Spotlight.
- Your background should immediately change, and the camera icon should appear on your desktop.
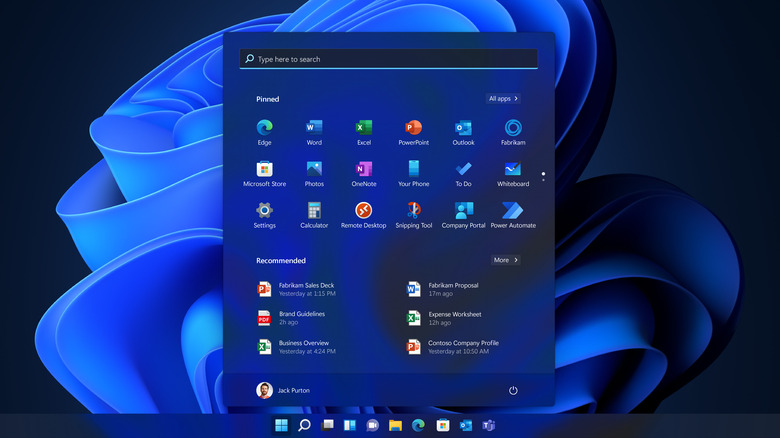
Custom Start menu
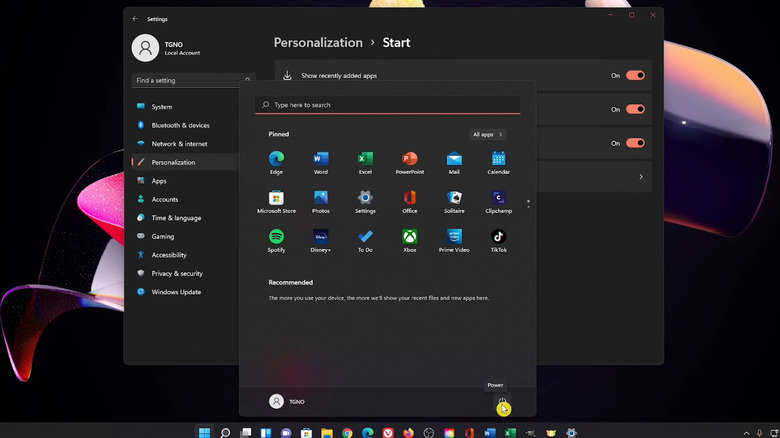
The Start menu on Windows 11 has been overhauled with new features and upgrades that provide a customized user experience. When you click on the Start menu (Windows logo) located in the taskbar, you'll be met by a search field, pinned apps, and files that have been recently opened. At the bottom, you'll find your profile icon and the power button. While this may seem pretty standard, things get interesting once you open the personalization settings.
The Start menu personalization settings allow you to toggle on/off recently added apps, frequently used apps, and, recently added files in the Start Menu. You can also add specific folders to your Start menu, such as Documents, Downloads, Music, Pictures, or Videos. Therefore, the next time you open your Start menu, you'll either find a few new additions or a clearer panel with fewer icons.
Looking at the Start menu again, the apps that are currently pinned are there by default. Windows 11 lets you change these by right-clicking any app and selecting "Unpin from Start." You can then replace it with an app that you want by left-clicking the All Apps option, choosing the app, and selecting "Pin to Start." Once it is on your Start menu, you can then reorder or move the apps around by dragging them with your mouse.
The revamped Start menu on Windows 11 can provide quick access to the apps and files you use regularly. Once you've managed to customize it to fit your needs, things should get a lot easier to navigate, improving your productivity throughout the day. As a bonus, you can even change the Start menu color to fit the theme of your desktop. Simply open the Settings app, select Personalization, Colors, and click "Show accent color on Start and taskbar."