Settings On Mac OS Ventura That Are Ruining Your Apple Experience

The Mac has come a long way from the original Macintosh. Once housed in retro beige plastic, current incarnations are clad in smooth, sandblasted aluminum. It was the computer that popularized both the mouse and the use of a graphical user interface, and while it had some missteps along the way, it has evolved into a force of modern computing.
Your Mac is a finely tuned piece of engineering, ready to handle any task thrown its way. With the release of macOS Ventura, your computer gets a huge laundry list of new features and changes. Some of these are genuinely innovative, some are only designed for a small subset of users, and some feel like change for the sake of change. If you bought a brand new Mac with macOS Ventura already installed, you might have some of these features already enabled. For those of you upgrading from macOS Monterey, you might have some existing issues to iron out or some new features to configure once you do that final reboot.
You might also find that some settings actively reduce your enjoyment of Apple's updated operating system. Those could range from minor annoyances to relearning how to do tasks, adding up to a frustrating experience. For the most part, you'll only have to use a few mouse clicks to get back to peak operating efficiency.
Lockdown Mode
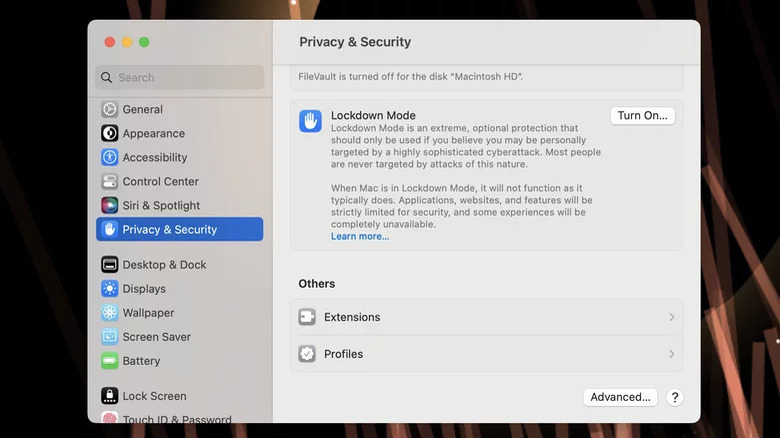
Apple made a big noise about the new security features in macOS Ventura. One of those features is Lockdown Mode, which puts the Mac into a security-hardened state to guard against potentially targeted attacks. Think of it as the Batmobile sprouting armor plating over the tires, windows, and other weak points, but for the operating system on a Mac.
This is a great thing if you happen to be one of the few Mac users that could benefit from it, like government officials, dissidents, activists, or journalists who might have a reason to be targeted. Outside of those groups, Lockdown Mode might make you feel more secure, but it will also severely limit the tasks you can accomplish on your computer.
For example, web browsing will be a struggle, with the mode turning off "complex web technologies," not loading some images, and some web fonts might not load. Incoming FaceTime calls won't work unless the person calling is someone you have called previously. iMessage, arguably one of Apple's best services, won't work normally, with most attachment types being blocked, and any links or link previews won't work. Connections to other devices will need you to approve them, so no more quick switching of your AirPods from your other Apple devices and no more waking up the desktop with Bluetooth mice or keyboards. It's more trouble than it's worth for most macOS Ventura users.
Rapid Security Responses
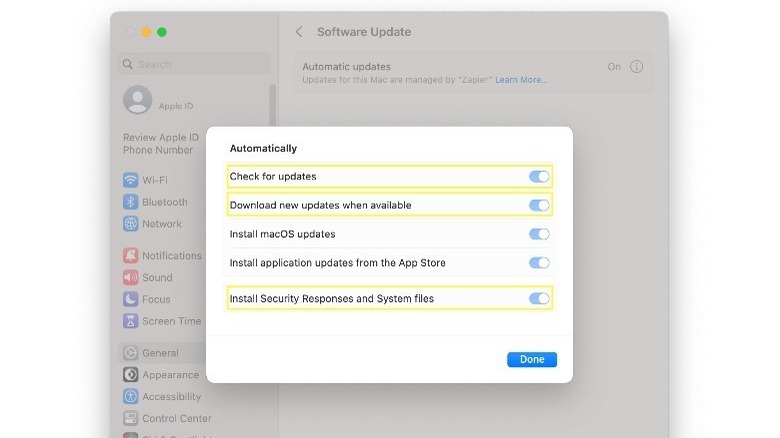
Keeping a computer updated is essential for security and bug fixes. That rings true for Macs and PCs equally. Before macOS Ventura, Apple did what most software makers did and bundled security updates into other bug fixes. This had two issues — sometimes, timely security fixes were delayed to wait for other feature updates, and the Mac needed to be rebooted after every install. That reboot often led to users putting off updates, as they didn't want to be unable to use the Mac while it updated. This required reboot is still present in macOS Ventura, but Apple has introduced a way to get critical security updates without needing to restart your computer.
The new feature, called Rapid Security Responses, decouples two types of security updates from the usual update routine so that they can be downloaded and installed in the background — and crucially, without needing a reboot. These are security-configuration updates that improve security while reducing the ability of malware to install or run, and updates to system data files that upgrade or fix macOS features.
Apple sets these background updates to happen by default on macOS Ventura, but we all know that sometimes settings don't get switched on properly. To check, open System Settings, select General, and then select Software Update. Click on the Info icon next to Automatic updates (the lowercase "i" inside a circle), then make sure the toggle next to Install Security Responses and System files is on.
Hide My Email
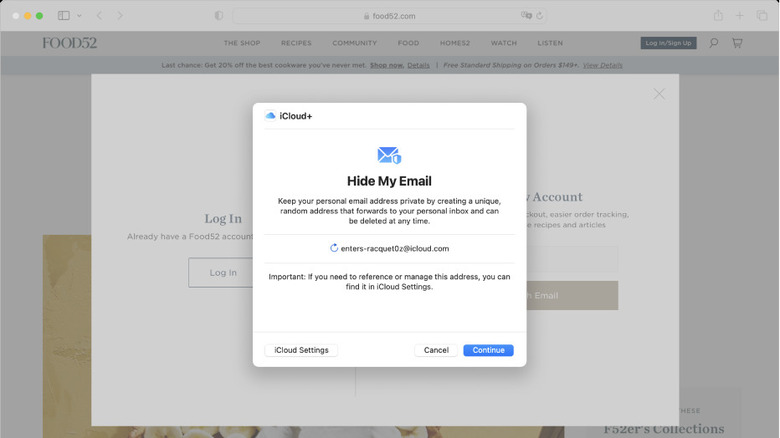
Think about how many times today you used your personal email address to fill out an online form, sign up for a new online account, or sign in to an existing account on a website. Now think about how often the news reports on a website breach or other hack.
Pretty sobering thought, especially if that personal email address is the one that is attached to your Apple ID. Nobody wants their iCloud to be hacked, and getting that email address and any potential password options is a prime place to start for criminals. Your Mac can guard against this by creating unique, randomized email addresses that forward emails to your personal email through Apple's secure servers. Hide My Email works in Safari, Mail, and System Settings and generates randomized email addresses when needed.
The feature isn't always enabled by default, as it requires a subscription to one of the additional storage tiers of iCloud+ or to Apple One. Once subscribed, clicking on the email address field in Safari or Mail and selecting Hide My Email will generate a new email to use. Anonymized email addresses can also be created in System Settings by clicking on your Apple ID name at the top of the sidebar, selecting iCloud, and then Hide My Email. This will either show Create New Address (if you don't have any created) or show a plus sign to add new randomized email addresses (if you already have some in use).
Stage Manager
With how macOS handles open files, folders, and programs, sometimes multitasking becomes more of a chore than it should be. Not that having a cluttered desktop with multiple floating windows is ever not a chore, that is. Other operating systems solve this by letting users cluster programs or putting them on virtual desktops or secondary monitors.
Apple has taken its time to get its own multitasking solution together, which was first released with iPadOS 16. Stage Manager is the new window management feature that makes it so iPad and Mac users can group windows together into functional groups, with a visual indicator of the groups for quick switching between them. These windows can be resized, overlapped, and brought to the front without making them fullscreen.
It's a workable solution for desktop clutter, but it's not enabled by default. To get Stage Manager so you can group in-use apps together, open System Settings, click Desktop & Dock, then on Windows & Apps on the right pane, and finally on Stage Manager. It can also be toggled from Control Center on the menu bar by clicking the Stage Manager icon.
Continuity Camera
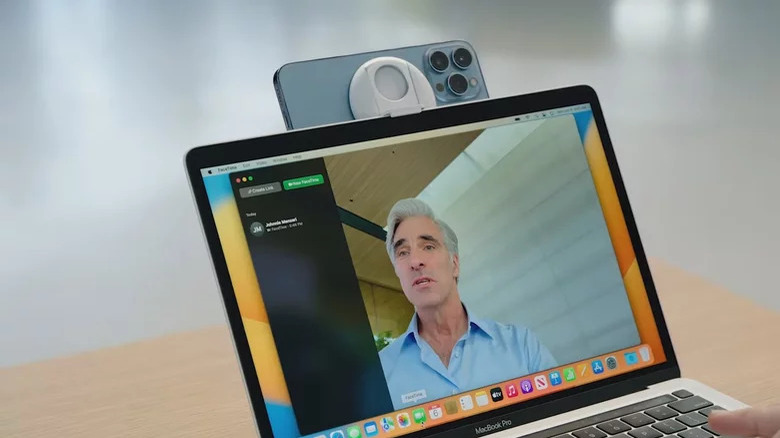
With the rise in remote work comes the need for a quality webcam experience for those video meetings that have become the norm for office workers. The problem with that for MacBook users is that the inbuilt webcam will never get to the level of a standalone camera — it's just an impossibility with physics.
Enter Continuity Camera, which lets a Mac running macOS Ventura use a recent iPhone running iOS 16 as a wired or wireless webcam. The result is a webcam picture that's almost as good as the iPhone's main camera, with video effects like Center Stage, which tracks head movement to keep you in the frame, Studio Light which uses AI to darken your background while lighting up your face, and Portrait Mode that brings digital bokeh to your background.
Apple's solution takes advantage of how most users own multiple devices from the company. A recent CIRP study showed that almost 90 percent of Apple users have an iPhone, and 50 percent own a Mac. With only a small subset of users owning a Mac as their only Apple device, it allowed the company to leverage its existing iPhone camera improvements.
AirPods controls

AirPods are the most user-friendly headphones for Apple users, with a good balance of sound quality, noise-canceling performance, quick pairing, and switching between the currently used devices. Except for Mac users, who could pair them, change the volume levels, and adjust the noise cancellation settings for AirPods Pro. That's an unnecessary annoyance in the usually smooth Apple ecosystem, forcing users to pair to an iOS device to change other settings.
With macOS Ventura, Mac users can change the full range of AirPods settings, with every feature and setting that iOS users could already change. To get to the new menu, connect your AirPods to the Mac, then open System Settings, scroll down to the input devices section and you'll see the name of your AirPods.
The settings menu will show the firmware version, the model number, the name you're calling them, and all of the audio options including ear detection, settings for what the touch sensitive areas activate, and the option to enroll them in Find My.
Live Captions
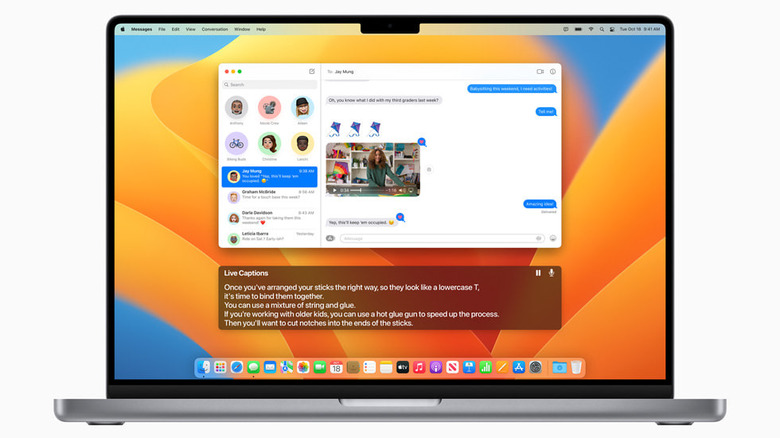
If you watch movies and TV with closed captioning enabled, you know how much it helps to follow the storyline. One of the new features in macOS Ventura, Live Captions, creates AI-transcribed text subtitles from any audio source on an Apple silicon-powered Mac.
Yes, that's any audio source – in real-time. That could be videos, audio recordings, or podcasts. A recent SlashGear poll showed that Live Captions was the best feature added with macOS Ventura, with nearly 25% of the vote. The reason wasn't because of prerecorded audio sources; it was from using the captioning ability in real-time audio from FaceTime. Perfect for every participant on calls to follow along with the conversation, even if they can't hear the audio.
Live Captions isn't enabled by default, as most accessibility settings require manual enabling. To use them, open System Settings, click on Accessibility, then scroll down to Live Captions (Beta) and toggle it to on. The Mac will download the required language pack, and system-wide captioning will be available.
System Settings app
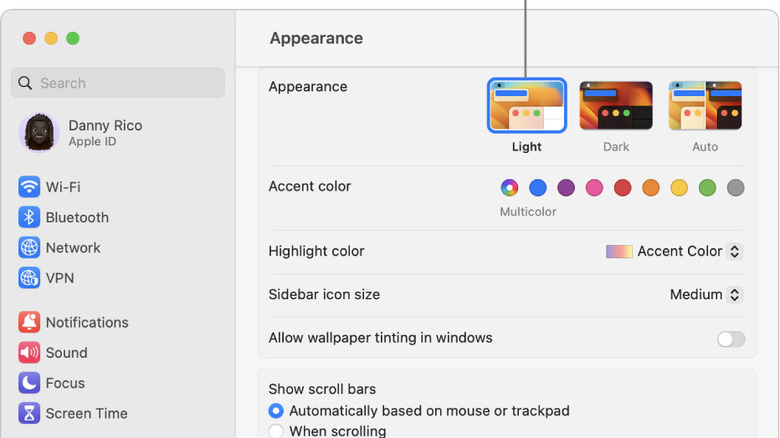
The System Preferences app on macOS was long overdue for an overhaul. It was first designed when Apple was using skeuomorphism for everything and had become cluttered and hard to navigate as more features were added to macOS. In macOS Ventura, System Preferences is no longer. In its place is System Settings, a new vertically-arranged options menu that users of iOS will feel at home in. Anywhere else in first-party apps that mentioned Preferences now displays Settings in its place, and that's a good change.
The overhaul was probably to make the settings app more consistent with those used in iPadOS and iOS. Apple has spent much effort to align the user experience between the three operating systems, and the archaic System Preferences app had to go eventually.
It's slightly ironic that the System Settings app is one of the worst settings on macOS Ventura. The biggest annoyance is that the settings pane has more space to work with, but many settings and options are hidden behind unlabeled dropdown buttons or nested several layers down. This isn't something that the user can fix; it's on Apple to make sense of things and add usable labels.
New sharing menu
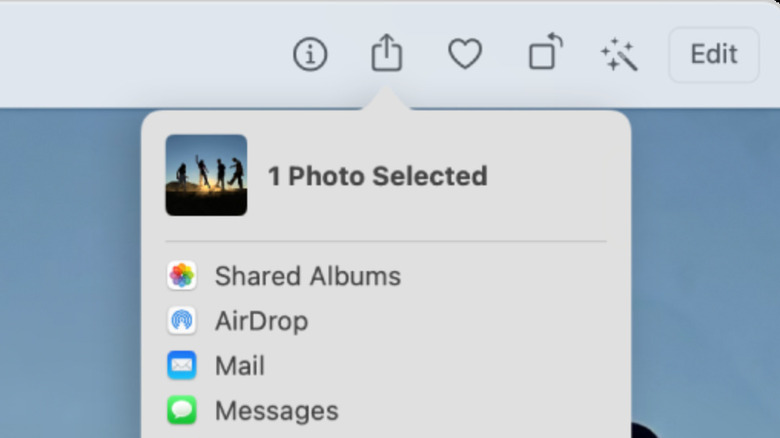
The ability to share the file you've been working on has long been a macOS feature, whether you were sending it to another person or another app. The macOS Ventura version gets an iOS-style bubble design with a few new additions. When sharing files from the iCloud Drive folder, the Share dialog will offer a new choice – send the file or folder as a copy, or send it via iCloud so that it can be collaborated on. Anyone who uses Google Docs will be familiar with how this feature works, with people with the link able to access and edit the document or folder.
The Share menu also now works with Shortcuts. This enables the user to set up chains of actions to handle recurring tasks. Some of our favorites include using it to automatically convert images to another format, or saving formatted PDF versions of a webpage for later reading. Safari also has a new sharing option that works with Tab Groups; the whole tab group can be shared. The feature also has a one-click feature to start a conversation about the content via Messages or voice or video chat.
Passkeys
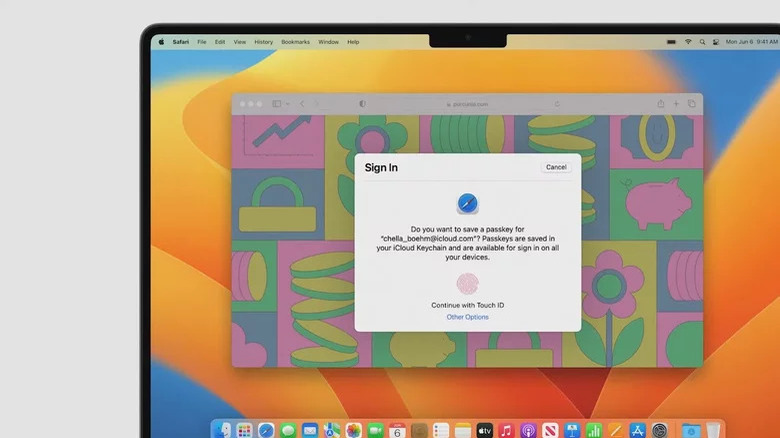
Online account passwords are an imperfect solution to the problem of staying safe online. The accepted wisdom is to use long, unique passwords for every one of your accounts. That's tricky enough, leading to a number of password manager services that keep those credentials safe and secure by saving and then encrypting the database of login details.
Apple devices all have one already built-in — iCloud Keychain, which can generate strong passwords and handle two-factor authentication for those websites that support it. Password managers can be hacked (and have in recent years), reused passwords can be compromised by credential stuffing attacks, and only work if used regularly.
The tech industry has decided enough is enough and has been working towards a passwordless future using Passkeys. This token-based login method creates a Passkey when first used to set up login credentials for an online service. That token is then used with a secondary sign-in method like Touch ID on a Mac whenever the user wants to sign into their account. This system means no passwords to type in, so phishing attacks with faked login pages won't work. Passkeys require two encryption keys, one that's public and one that's privately stored on the local device, or in Apple's case; the private key is stored encrypted in iCloud. Viva la passwordless future.
Spotlight
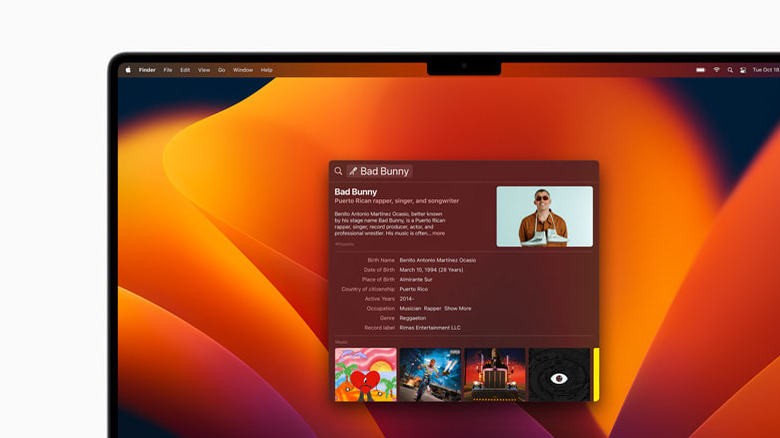
The Spotlight tool on Mac has always been a quick way to search for information, files, or almost anything stored on the device or on the internet. The search results only show a brief excerpt of the website, document, or other results, which usually meant opening the item in its associated app to check if it was the thing you were looking for.
Now Spotlight works with Quick Look, which opens a preview of the result in another window without closing Spotlight or navigating away. Select any result in the list and press the space bar to use it. If it is previewable, another window will pop up; if it isn't, you will hear the dreaded boop noise for something the Mac can't do.
The tool can help find Mac settings, which will come in handy until we all get used to the redesigned System Settings app. Type in what setting you want to change, and it will show up in the search results, which is also how it works on iOS. The tool also returns better web results, so it can replace opening the browser in most quick-question situations. You can also use it to make calculations or perform quick actions like setting timers, searching for images on your Mac, and use Live Text to extract text from images.
Focus
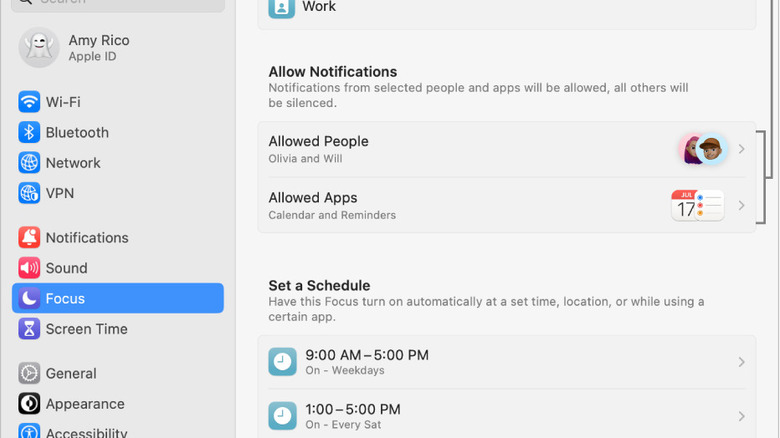
As with the iPhone, one of the worst features of the Mac is the number of distractions that pull us in myriad different ways while we try to get things done. App notifications, messages from work, family and friends, emails, and the allure of content can build up to busy work, which means feeling accomplished while not actually getting any substantive tasks done.
Apple tried to mitigate these competing demands on the iPhone with Focus Modes, which were added in iOS 15. We now have Focus Mode on the Mac, added in macOS Ventura. Open System Settings and find Focus in the left pane to enable it. You can choose the preset options or create your own, which will be synced across all your Apple devices. These modes can be set to operate on a schedule or can be manually enabled if preferred.
With a Focus Mode open, clicking on Allow Notifications will enable specific people from your Contacts or allowed apps to send you messages, calls, or notifications while the mode is active. Specific apps or people can also be silenced when Focus Mode is enabled. To stay reachable in an emergency, toggle the Allow repeated calls option on, which will let the second call within three minutes from the same person notify you.
Apple Mail
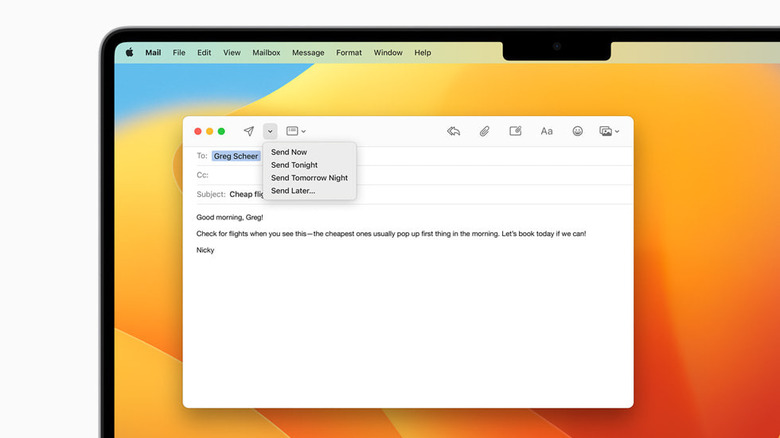
Apple Mail has long been a frustrating experience on macOS, and the main reason was that it stopped feeling like a modern mail client years ago, with almost every other app or web-based service surpassing it in features. It was a handy way to get your email from multiple accounts without using various apps, but that's about as far as it went.
With macOS Ventura, Apple has dragged Mail kicking and screaming into modernity. It now has multiple modern features that users take for granted in other mail clients, like a reminder to check for attachments if the text in the email seems like one should be included. Emails can be unsent from an Undo Send button that appears briefly, with a default time limit of ten seconds after hitting send. This can be extended to 20 or 30 seconds in Mail's Settings.
Email can also be scheduled to be sent later, can be edited before the scheduled send time, and search is more intelligent. Apple also added a neat feature that resurfaces part-read emails later, so you don't miss anything important.