5 Settings You Should Immediately Change On Your MacBook
Just bought a MacBook? Welcome to the best computer purchase of your life. Whether you've got the entry-level MacBook Air M4 or the top-of-the-line MacBook Pro M4 Max, it's an excellent device for everything but gaming with that impressive Apple Silicon. As long as you know before buying a MacBook what you're getting yourself into, it's smooth sailing ahead; even now I have no regrets about making the switch from Windows to Mac. One thing in particular that's great about Macs is that they're very hands-off devices, but this creates an unanticipated problem: Very little is explained to you. Aside from getting notifications from the Tips app, you're often unaware of a lot of what your MacBook can do until you stumble upon it — even if it has been there in front of your face the whole time.
We've gone into great detail on macOS tips new Mac owners should know, but this list could very well be useful for someone who already owns a MacBook, too. We'll keep it short and sweet with five settings you may not have heard of, but that could make a huge difference once you turn them on. None of the options we'll mention here require any third-party software and should work out of the box with the latest version of macOS. Try out these settings and find even more you didn't know your MacBook was capable of.
Set up hot corners
The MacBook's trackpad gestures are in a league of their own simply because the trackpad itself is so amazing. But there's only so much you can do with it before you have to start learning some Mac keyboard shortcuts to get things done. Hot Corners levels up your trackpad and mouse game just a bit more to avoid reaching for the keyboard. It lets you move your cursor to one of your screen's four corners to enable a specific action. Though all quite simple (taking a Quick Note, putting your MacBook to sleep, etc.), the actions turn what would otherwise be a keystroke into a flick of the mouse.
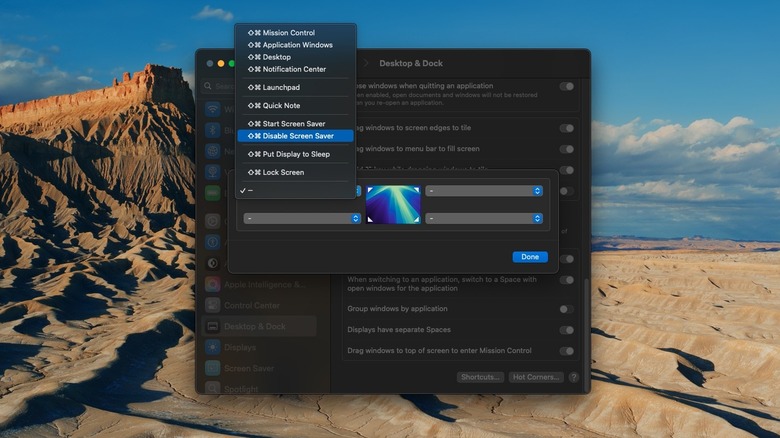
To enable them, go to System Settings > Desktop & Dock, and click on the Hot Corners button at the very bottom. Choose an action for each corner of your screen. Again, options are limited, and several can be done with a click or trackpad gesture. We can only hope Apple will add more Hot Corner options in upcoming versions of macOS, but to be fair, they're limited for good reason — you wouldn't want to do something major by accidentally dragging your mouse to a corner.
If you're looking for more power than your MacBook's gestures and Hot Corners offer, we recommend two apps: BetterTouchTool and Swish. BetterTouchTool lets you program actions into trackpad gestures (and other peripherals), meaning you could replace frequent keyboard shortcuts with multi-finger swipes and taps. Swish transforms simple navigation shortcuts into trackpad gestures; for example, instead of pressing Cmd+M to minimize a window, you swipe down with two fingers on the title bar. We gave Swish high praise in our list of the best Mac apps to improve your Apple experience.
Set your wallpapers to aerials (or a folder of pictures)
Finding good wallpapers is harder than it should be. You often have to trudge through countless sketchy websites and hope their downloads don't infect your computer with malware. Even putting that aside, curating beautiful, clean, high-definition images that fit your aesthetic takes hours of tedious work. Fortunately, Apple supports an incredible catalog of landscape wallpapers and screen savers that can be enabled with a single click.
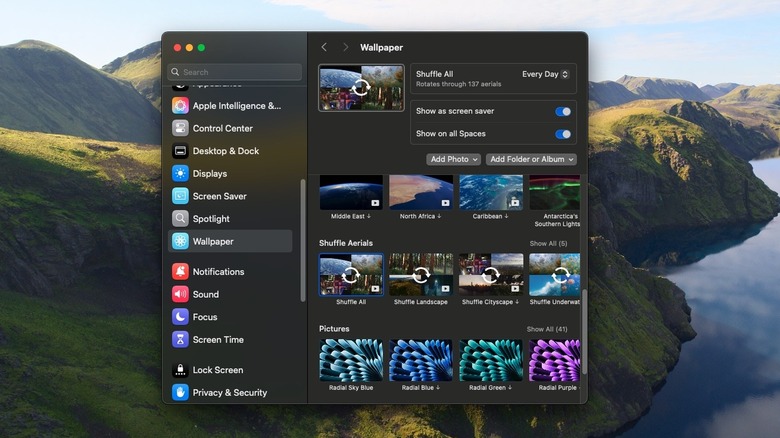
Head to Settings > Wallpaper and treat yourself to a surprisingly large collection of dynamic wallpapers that change throughout the day, and gorgeous HD aerials of landscapes, cityscapes, planet Earth, and the ocean depths. We recommend the "Shuffle All" option, which rotates through the catalog at regular intervals. The pictures are all crowd-pleasers, so choose whichever set suits your fancy and let Apple take care of the rest. The screensavers are equally great and include sweeping aerial flyovers of some of the same landscapes. Just be aware that these wallpapers and screensavers can take up a lot of space; some users report finding dozens of gigabytes' worth.
If you'd rather not trust Apple with your wallpapers, you can instead use your own folder. Click on "Add Folder or Album" to do so. Apple also lets you set your wallpaper to a specific person. Since it uses the Photos app's face detection to automatically identify that person, all subsequent photos should appear in your wallpaper's rotating catalog.
Control your iPhone (and see iPhone-only notifications)
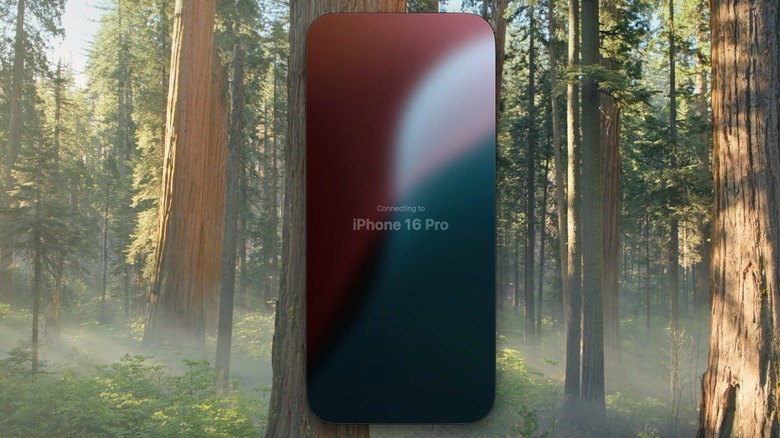
Android users, as is typically the case, have been able to mirror and control their Android phone from a Windows PC for quite some time with Windows Phone Link. Thankfully, Apple finally showed up to the party — late as usual — and introduced iPhone Mirroring. The app gives you almost complete control of your iPhone, a great choice if it's out of reach and you don't feel like getting up to grab it. Once set up, your iPhone notifications appear natively on your Mac, and clicking them takes you straight to the app through iPhone Mirroring. So if there's an iPhone app without a Mac version, you can now use it as if it had one.
Setup only takes about a minute. Click the app and it'll identify your iPhone. Enter the passcode, then choose whether you want notifications to show on your Mac. We recommend enabling "Authenticate automatically" in settings so you can instantly jump into your iPhone every time.
Apple has optimized the app to translate iPhone taps and swipes into mouse clicks and drags. Plus, there are shortcuts for specific gestures, like Cmd + 1 to go to the home screen. Even though your iPhone screen is small, you can blow up the iPhone Mirroring app to better fit your Mac's screen. Audio playing on your iPhone comes through your Mac's default audio device, and you can drag and drop items from iPhone to Mac. The only major limitations: You must be near your iPhone, and you can't control it if it's unlocked and open.
Unlock everything with your Apple Watch
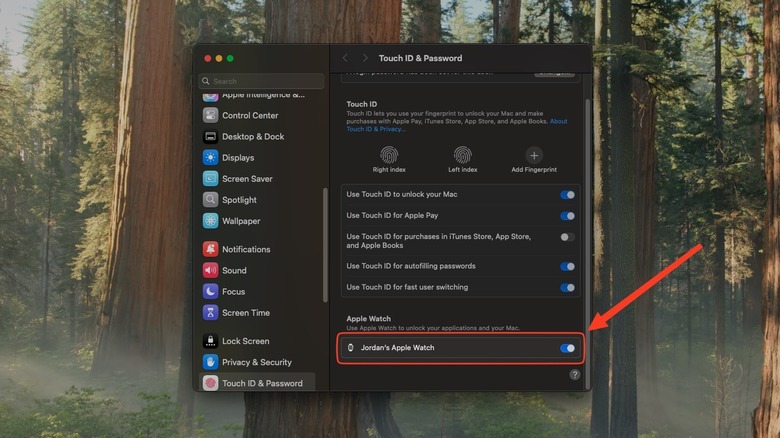
Are you tired of putting in your admin password every time your Mac asks for it, like when making a change to the settings? Let your Apple Watch take care of it. Any model can function as a convenient authenticator that approves administrator password requests. Whenever one of these requests appears, you'll get a tap on your wrist and be asked to double-click the side button to approve it. It also works to unlock your Mac automatically. Your Apple Watch only needs to be on your wrist, unlocked, and nearby.
To set it up, go to Settings > Touch ID & Password, then scroll down to the Apple Watch section. Your watch's name should appear with a toggle to enable it. Turn it on, enter your password, and you're done. It's that simple. The Touch ID unlock option on macOS is already incredibly fast, but this is faster in most cases — like when opening the lid on a sleeping Mac. It's also an excellent choice if you use your MacBook in clamshell mode, where you'd otherwise be forced to use the password for everything.
A few caveats to mention here. First, your Mac must be unlocked with its normal password before the Apple Watch can take over. I've also noticed it doesn't work for all administrator password requests. It seems that the higher-stakes ones, like changing certain system settings, require physically typing in your password. There may also be technical difficulties that require turning the feature on and off again, or restarting your devices — but it works most of the time, and amazingly so.
Set up Time Machine
MacBooks are incredibly resilient, and it's vanishingly rare that your MacBook will suffer a critical error so bad that you'd lose everything. But if that day comes — and you never know if it will — you'll be very, very glad you had a backup. The sad reality is that the most people don't back up their laptops often, despite how incredibly easy it is. Mac's native backup utility, Time Machine, takes minutes to set up and works virtually on autopilot.
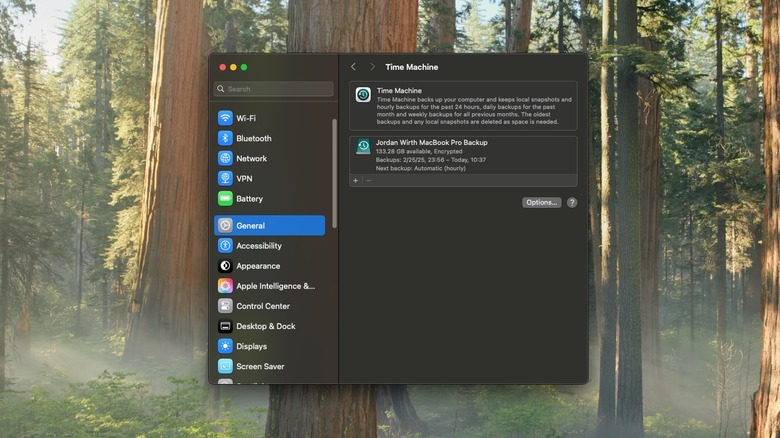
First, make sure the external drive you'll use as a backup has approximately double the storage of your Mac. So if you've got a 500GB MacBook, your drive should be 1TB. Consider turning an old SSD into a portable drive if you'd rather not buy a new one. Apple recommends not using that drive for other storage, so either partition it or use it exclusively for backups. Then go to Settings > General > Time Machine, and add a backup disk. Be extra sure you're selecting the correct device, as it will get wiped. We highly recommend choosing the Encrypt Backup option and saving the password in a secure place that you can access outside your MacBook.
As we've said, Time Machine is a fire-and-forget solution. Once set up, it automatically creates staggered hourly, daily, weekly, and monthly backups. The backups won't impede you from using your Mac, nor are they resource-intensive. I've been using Time Machine for years and forget about it except for the rare times it asks for the password to unlock the drive. Time Machine makes it easy to transfer your MacBook to a new device, too.