Cool Things To 3D Print That You've Probably Never Thought To Try
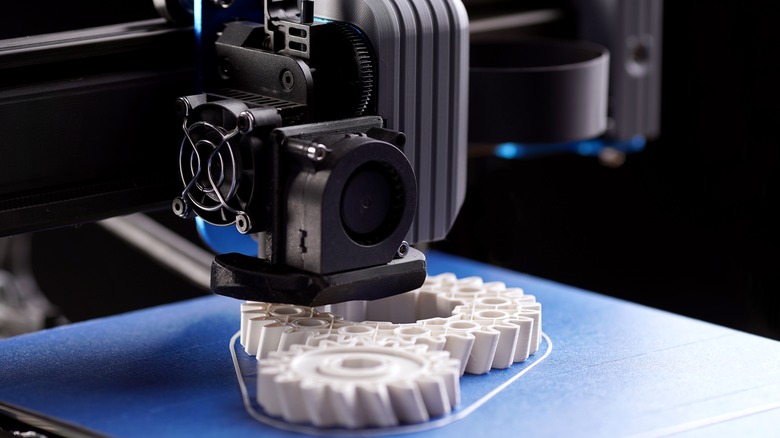
3D printing is a downright futuristic technology. People can use plastic filaments, resin, and other materials to create custom objects. The quality of the print is limited by a user's printer, but the potential items are almost limitless.
Because the term "3D printing" is technically a catch-all, virtually any item within reason can be printed. NASA is experimenting with 3D printing to create durable, lightweight parts that will aid in space exploration, and some clothing designers have traded in their needle and thread for a 3D printer that can make clothes. But that's not all. Some labs are printing buildings out of extruded concrete and even started experimenting with printed foods. However, these results are only possible through large-scale and industrial 3D printers, well outside the price range of most individuals — and even if you could afford one, where would you store it?
While many smaller 3D printers are readily available and somewhat affordable, they restrict hobbyists to smaller items constructed out of resin and plastic, usually acrylonitrile butadiene styrene (ABS) and polylactic acid (PLA). However, these limitations haven't stifled the creativity of 3D print enthusiasts. The internet is full of stereolithography (STL) models that can be translated into a real-world form via a 3D printer. Some are free, and some you have to buy, and while many are fun to try, many more produce items you might never have thought you'd need.
Action figures
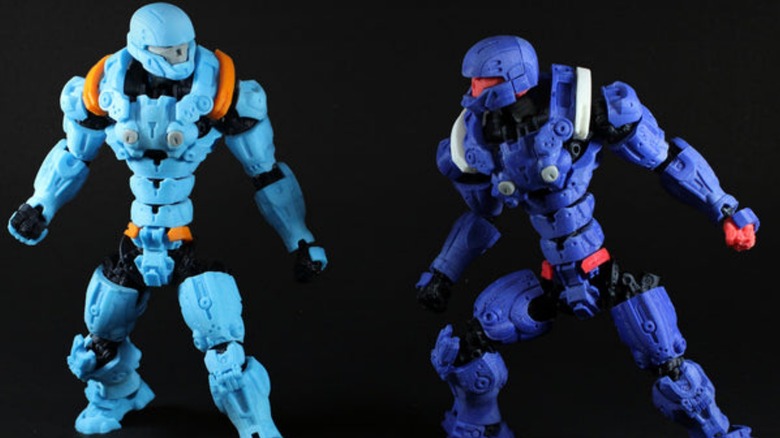
A lot of effort goes into making action figures. Toy designers have to prototype their figures first, and while many stick to resin, plenty of creators 3D-print initial test runs. While the average person doesn't have access to all the machinery required to create most action figures, they can still 3D print their own.
If you know where to look, you will find no shortage of websites that offer or sell STL files to produce action figures in either plastic or resin. Some 3D artists might lock their creations behind Patreon subscriptions, but these recurring fees generally provide monthly accessories and customization options. It's up to you whether you want a one-off file or a steady stream of them.
3D-printed action figures come in two forms. The first utilizes simple articulation, mostly hinges. These toys flop around and can't hold a pose unless oriented in specific ways, but the entire figure fits into one STL file. Just print and play. However, if you want something more robust, you have to use files where each joint and limb is a separate print, and then assemble them when finished. Due to the complexity and potential fragility of these designs, file creators generally recommend higher-quality filaments and resins — and include instructions to help hobbyists get the best results. There are some special exceptions, such as the Robotica Doll, which is printed piece by piece and then assembled by stringing limbs together with elastic cords.
Some online stores sell 3D-printed figures, but if you want to make your own, you easily can. Just make sure to treat it with some acetone vapor if you want the same level of smoothness, durability, and shine.
Cosplay accessories

Cosplay is a common sight at entertainment conventions. Many people love dressing up as their favorite movie, television, or video game characters, and part of the appeal comes from the craft that goes into the costumes. However, it's hard to get every detail and proportion right when working by hand, so many cosplayers use 3D printing to build accessories.
Before we continue, let's clarify the definition of a cosplay "accessory." Simply put, virtually anything in a costume you can't replicate using cloth and felt — weapons, helmets, masks, and artsy hairpins. These items are generally printed in 1:1 scale. Due to this size, many STL files split accessories into multiple parts. The larger and/or more complex a design, the more it has to be divided to fit on a printer bed. Even after the print is finished, your work is just beginning.
3D-printed objects always look rough after completion, and you need to get them presentable for cosplay. You have to sand and treat your accessory to get rid of print lines, glue everything together (and use spot putty to fill in any gaps), and prime and paint it for that finishing touch. But some 3D-printed accessories require even more effort. Particularly large items require interior supports, and depending on the item, you might want to install custom-built lenses or LED lights for an extra burst of presentation; or use screws, nuts, and rubber bands to implement moving parts.
There is no hard and fast rule when it comes to 3D-printing cosplay accessories, especially given the catch-all nature of the term "accessory." Do some research, and most importantly, do your best. In cosplay, effort is prized far more than effect.
Minis
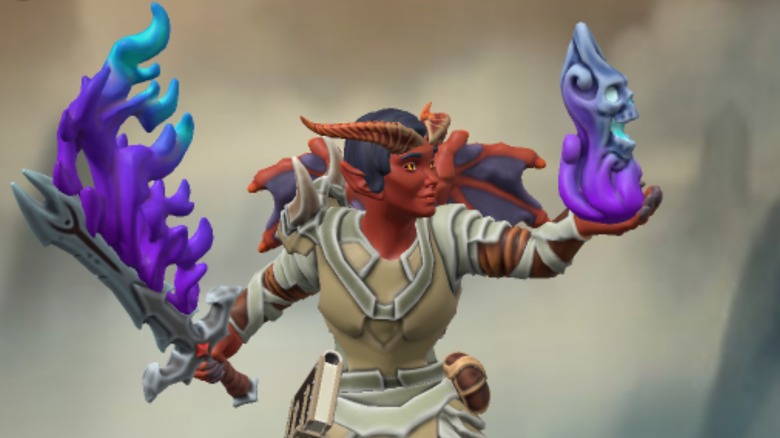
Tabletop gaming is a fun, if expensive, hobby. If you want to host an impressive "Dungeons & Dragons" campaign, you might need to buy a ton of miniatures, and in order to play "Warhammer 40K" competitively, you have to spend a few paycheck's worth of cash on tiny plastic units. Or you can just print your own.
While STL files for action figures are easy to find, files for 3D printed miniatures are even more so. Numerous online stores and subscription services are devoted to selling 3D models compatible with plastic extruder and resin printers. Some have a style all their own, while others ape existing designs so they can fit in seamlessly with official collections.
Files for 3D-printed minis come in two forms: complete models and model parts. The former are usually ready right out of the printer, although any that are printed in resin need to be cured afterwards. Plus, depending on the figure's complexity, you might need to glue some parts together or supply your own base. Printed parts, meanwhile, are designed for conversions and kitbashing (i.e., gluing and customizing parts from different kits together to create unique units). You need to purchase official model kits and glue the 3D pieces onto them. Regardless of what you print, once it's finished, you can paint them as you see fit.
If you don't like the mini designs for sale, you can always craft your own. Some online retailers let you customize a model, buy the STL file, and print it. These stores also ship customized minis to you if you don't have a printer, and can convert your creations into formats compatible with tabletop game apps such as "Talespire" and "Harpy." For a fee, of course.
Lamps and lights
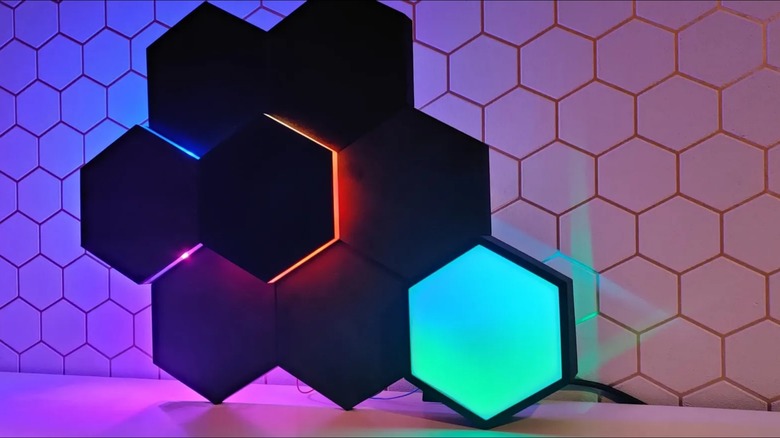
Fire is widely regarded as humanity's greatest discovery, since it gives us warmth and lights up the dark. This led to many inventions, including the lightbulb and the lamps that house them. Thanks to the spread of 3D printing, the average person can now produce their own lamps. Sort of.
3D-printed light sources fall into two camps. The first, lamps, encompasses translucent light sources and shades that utilize light bulbs to throw light around rooms in eccentric patterns. The second category consists primarily of decorations that house light-emitting diodes (LEDs). These don't brighten locations as much, but in the right spots, they can tie a room together with ambient lighting.
When printing a lamp, you have to be careful when constructing them and pay close attention to the creator's instructions. For instance, certain lamps require specific printing modes, and in order to fit lightbulbs, they have to be printed as is — no scaling the models up or down. Moreover, many lamps are designed as standalone light fixtures, which means you have to install and solder LEDs, set up board controllers, and glue the pieces together.
Even if you are a whiz at 3D printing, electrical engineering knowledge is mandatory when setting up 3D-printed lights. Do as much research as you can, and if you don't think you can do it on your own, ask for help from a friend or colleague who can. Out of all the 3D print projects out there, these are by far the most dangerous, so if you really want a unique light source but aren't up for some soldering, you might be better off just purchasing one.
Model kits

There's just something satisfying about clipping pieces out of model kit sprues and either gluing them together or fitting them into each other with a meaty "click." They aren't just toys or statues but 3D puzzles. Usually, you can buy model kits at a hobby shop, or you can print your own.
3D-printed model kits are relatively rare, but you can find them if you know where to look. Each file produces a plastic "card" filled with parts of varying shapes and sizes, similar to store-bought versions produced via injection molding (pouring molten material into a metal mold). After the kit is printed, you can clip out the individual pieces and assemble them into a 3D shape. Technically, many 3D prints are split into multiple parts that have to be assembled later, but unlike the model kit card ones, most don't include the visceral "snap" that comes with clipping the parts out. In fact, if you hear a "snap" when assembling most 3D prints, you probably broke something.
Since 3D printed model kit cards have no standardized design, creators often set up their kits differently. Some use the "clip/glue pieces together after removing them from the card" principle similar to the standard gunpla, while others go with a setup more akin to wooden model kits. Some even work in flexible, foldable pieces that aren't possible in mass produced model kits.
As with most 3D prints, users can customize the final result. They can paint the plastic, leave it as is, or glue it in place. If you don't have the money for a Perfect Grade Gundam kit, consider printing one instead.
Closing coat rack
Coat racks are designed to hold coats (duh), but not all are created equal. Depending on the coat's material and weight, some might slip off rather easily. If you want a coat rack that will never, ever drop a jacket, you either need to win the coat rack lottery or make one yourself.
A closing coat rack, as its name suggests, clamps down on clothes using the power of gravity and a rubber band. When someone places a coat on the middle piece of the rack (its "tongue"), the weight of the coat pushes it down. This forces the far end of the tongue up, which stretches the connected rubber band, in turn making the other parts of the device clamp down on the coat rack's central piece, securing anything hanging off it.
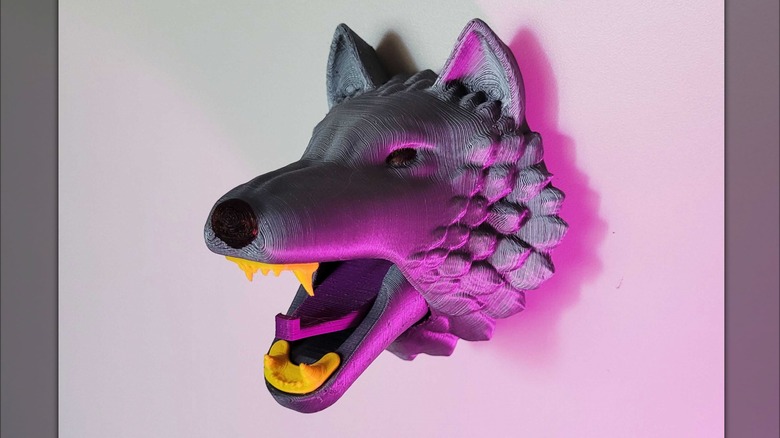
Due to their designs, all closing coat racks come in at least three pieces. Simpler models, such as one designed to look like a parrot's beak, consists of the upper and lower beaks, as well as the aforementioned tongue which can be printed as either one solid piece or two smaller parts that must be glued together. Then just slot the tongue into the interior of the lower beak, followed by the lower beak into the interior of the upper beak. String everything together with a rubber band, and connect the beak to a wall via screws, and you're done. A slightly more complicated model, which looks like a wolf's head, is assembled mostly the same way, but first you have to glue the teeth onto the muzzle parts.
You don't have to paint these coat racks, but doing so makes them look more professional.
Toilet paper rider

Toilet paper has a proud tradition that dates back to Ancient China. When some people buy toilet paper nowadays, its bathroom presentation is a factor. You can purchase toilet paper with special patterns on it, as well as holders that make storage more ergonomic and flashier. And then there are the items that interact with the toilet paper.
For toilet paper riders, the name says it all: They ride atop toilet paper rolls via a unicycle or bicycle and roll along whenever you pull the sheets. While toilet rider STL files aren't common, Effoprints created a Santa rider, a Valentine's Heart rider, and, um, a poop emoji rider. Honestly, where else are poop-shaped items appropriate but a bathroom?
Assembling toilet paper riders is fairly straightforward. After printing is complete — the creator recommends using PLA with a 0.2mm layer height — you plug in the wheel, connect it to the hinged legs via pedal pegs, and secure the main body to the paper toilet holder. After that, you're done...unless you want to customize the bathroom cyclist. If you don't have a printer that lets you use different colors in one print, you might want to paint the final product. Moreover, the Santa version includes different arms that let printing hobbyists customize what Saint Nick will be carrying atop their toilet paper. And of course we can't forget the all-important step of securing your completed project to your bathroom wall.
Because of how the wheel rolls, your 3D-printed rider will pedal backwards whenever you pull on the roll. In order to make them pedal forwards, you have to commit the cardinal sin of making the paper hang behind the roll, right next to the wall.
Kitchen items
Most people like a well-stocked kitchen, but there's more to a kitchen than just food and ingredients. You also need essentials like bowls, utensils, and can openers. You can usually buy these pretty easily, but if you want something a bit more novel (or not so easily obtained), you might have to make it yourself.
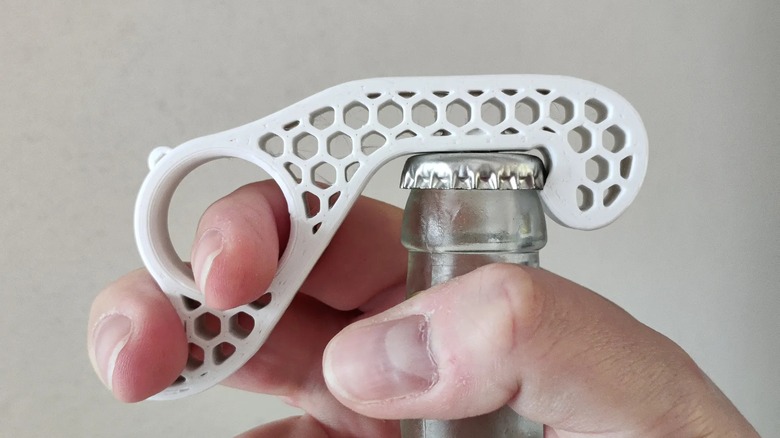
3D-printed kitchen utensils run the entire gamut between "functional" and "stylish," and many fall somewhere between the two. You've got standard items such as measuring spoons, coasters, bread clips, and collapsible cup holders, but you can also craft items you never thought you would need. Ever wanted to open a bottle with one hand? You can with the one-handed bottle opener. And if you're hosting a party and are offering pistachios, break out the double-layered bowl with the cartoon squirrel in the middle. Toss the shells into the squirrel's gaping mouth so you don't lose track of them before you have to throw them out.
For the most part, these prints are straightforward, and you don't have to do much assembling afterward. However, you need to string the measuring cups around their connecting ring, and in order for the bottle opener to function, you have to glue a magnet to its bottom. Because these items are designed to be used and not displayed, PLA is recommended since it is stronger and more rigid. And most importantly, you should never try to resize the measuring cups since they will become inaccurate and therefore worthless.
While printing kitchen items is a great way to marry one's hobby with functionality, keep in mind that because these products are made with PLA, they aren't dishwasher-safe. Hand-wash only, folks.
Phone stands
Smartphones are ubiquitous. Almost everyone owns one, and when a phone isn't in use, it is easily stored in a pocket or purse. But what about when you're home? You could just plop it on a table, or you could turn it into a display piece.
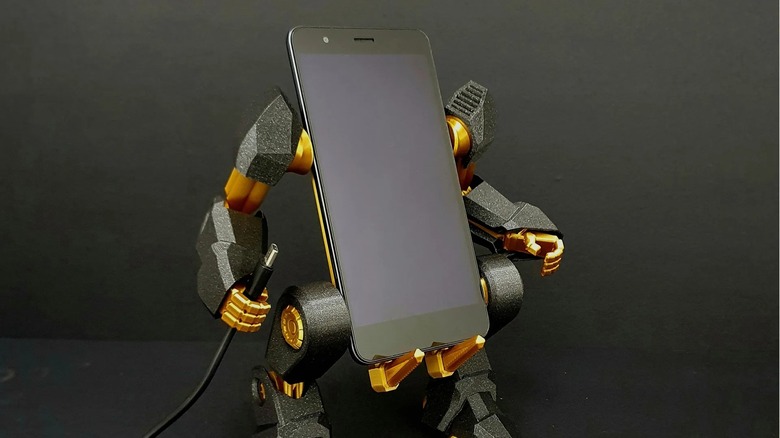
You can easily find 3D-printable phone stand files on the internet, and they generally come in two varieties: simple one-piece devices and more mechanical marvels. There are plain stands and more fanciful versions, but modelers have also created stands that use gears to snugly fit phones of different sizes, which also come in vanilla and eccentric flavors. If you want to display your phone and charge it at the same time, plenty of designers have you covered with 3D prints that implement wireless chargers such as the Magsafe.
Due to the variety of printable phone stands, different projects come with assembly instructions and requirements. The single-object stands, for instance, are usually ready hot off the printing bed and don't require any specific settings, whereas the moving stands need to be assembled before they're ready for phone duty. Moreover, while files such as the gorgeous Exo-Suit print out all the necessary parts, others are designed to spring shut on the phone and require additional parts such as 5mm x 10mm extension springs (sold separately). And of course, the stand/charger hybrids always require the wireless charger regardless of whether you need to glue the extruded parts together.
Quite frankly, you can't get any more eccentric than a 3D-printed phone stand. How else are you going to own something that looks like a robot and also holds your charging cable when not in use?
Shelves
We all need shelves, especially wall-mounted shelves since you can place them above tabletops and dressers to almost double your display space. Purchasing a wall shelf is as easy as walking into a Home Depot or ordering one off Amazon, but if you want a shelf with a sense of style, you might need to print it.
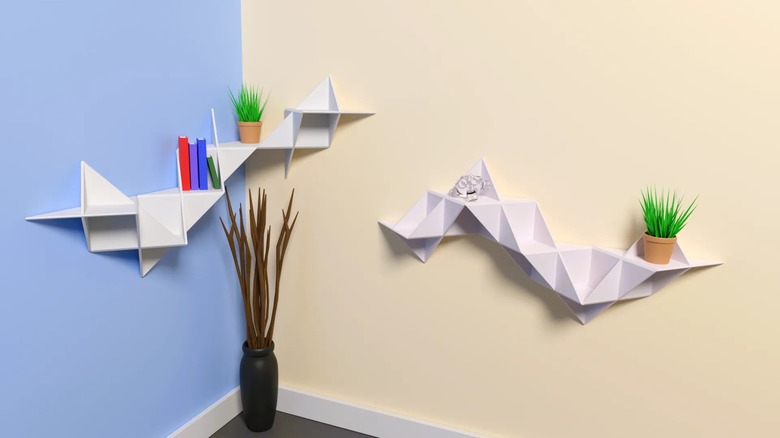
Most people would assume that a 3D-printed shelf wouldn't be very strong due to the relative fragility of extruded plastic. While that is partially true, plenty of designers have created STL files that let printing hobbyists produce functional shelves. Many are designed strictly for display purposes, others store objects while also serving as veritable art pieces.
You can find plenty of models for small shelves that can be printed in one piece, but for the most part, 3D-printed shelves consist of multi-part projects that need to be assembled. However, the exact method of assembly is set by the STL file. Usually, glue is involved, but several ingenious crafters have designed modular shelves you can slide and snap together without bonding material. Some, such as a honeycomb storage wall, are blank canvases that rely on optional parts designed to hold computer peripherals like keyboards and headphones. Regardless of what you pick, though, you need to use PLA since it is stronger than ABS, and you will be limited to lightweight objects, ideally other 3D-printed products. Oh, and you have to secure these shelves to the wall using metal screws.
If you find yourself printing a ton of mini statues and similar objects, you might as well add some shelves to your queue so you can display them.
Fidget toys
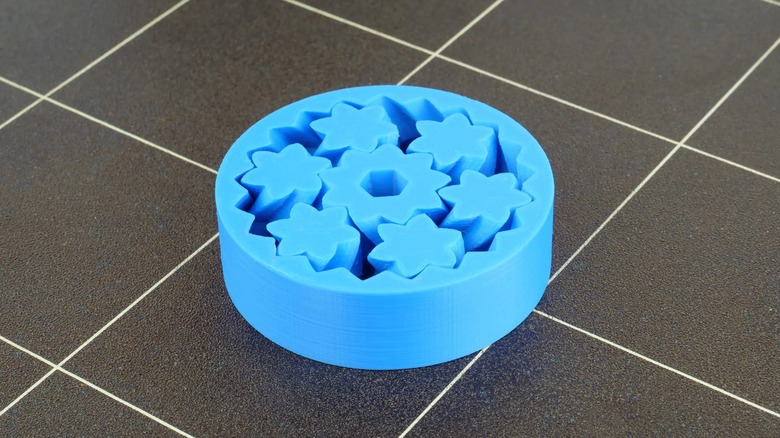
FIdget toys are a dime a dozen, but they aren't as omnipresent as they used to be. You can still find some on the internet, but they might require a few days to ship. Or you could just make your own, especially if you want something more specialized than a simple spinner.
The internet is full of files you can use to print fidget toys of virtually any shape. Ever found yourself spinning a nut around a bolt? There's a file that lets you craft a fidget toy shaped like them. Do you enjoy idly wiggling video game controller analog sticks? Plenty of creators have crafted fidget joysticks. You can even create a fidget toy out of your own name. The possibilities are almost endless.
Because fidget toys come in a myriad of forms, no two builds feature the same instructions. Some, such as fidget balls and planetary gear toys come out of the printer as one complete piece, no assembly required. Meanwhile, the infinity gear and the aforementioned fidget joystick-type prints come in parts that have to be put together, but those are usually simple affairs that involve snapping pieces into place. Every now and then, though, you might come across a print, such as a Death Star-shaped "push & release" fidget that requires a spring and screw (sold separately) because it functions like a stress ball. But even then, you just have to install the spring and then screw the pieces in without glue.
Since all 3D-printed fidget toys need to move, plastic extruders are essential. Resin doesn't provide the same balance of rigidity and flexibility.
Candy dispenser
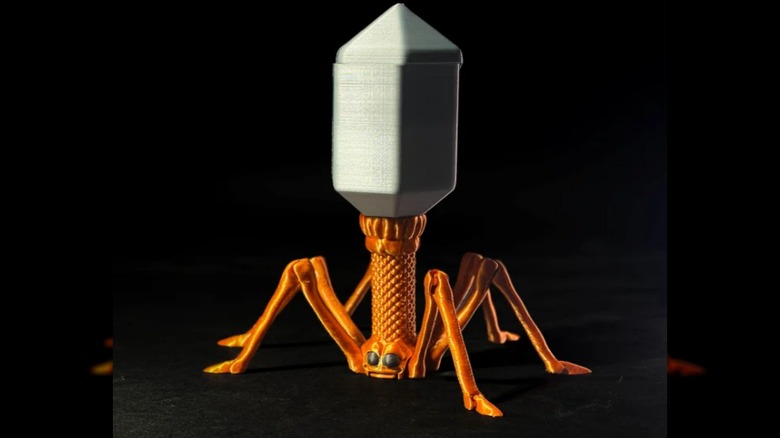
Many people love a good snack or some dessert, but when sugar is involved, self-control tends to take a vacation. It's far too easy to eat more M&Ms than you initially intended. 3D modelers came up with a solution to aid in portion control.
When one thinks of a candy dispenser, vintage gumball machines probably come to mind. While 3D-printed candy dispensers don't perfectly recreate that design, some come close thanks to gear systems. One design even recreates the coin rejection mechanism that only accepts quarters in exchange for candy — you get your money back, though. But not all fabricated candy dispensers aim for nostalgia; some use artistic license and microbiology to create plastic bacteriophages that burp Skittles when they're lifted off the ground.
Since the first candy dispenser is gear-based, you have to print each piece individually and then assemble them, either by clipping them into one another or with glue. And while the STL file includes a jar model you can print out, the design is compatible with standard Mason jars for that authentic glass top look. The bacteriophage dispenser, meanwhile, is much simpler since it relies only on hinges and gravity. Just print the main body, screw the bottom portion of the "jar" onto it, and slip on the top. While optional, you can paint the print to make it look less monochromatic.
Some people might question the logic of owning a candy dispenser when it's quicker to just pour candy out of the bag. Again, because they only shell out a few pieces at a time, 3D-printed ones help with portion control. Plus, they just look cool.
Plant pots
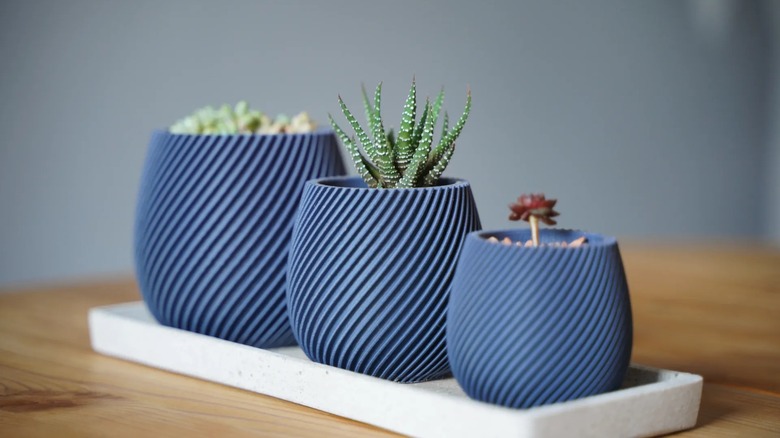
No two people decorate their living spaces the same way. Some use rugs and paintings, others go for statues and bookshelves. Many people also use plants, but what kinds of plants? More importantly, what do you house them in? You can usually buy a terracotta pot at your local Home Depot — or you can print a pot to make a statement just as loud as the plant itself.
STL files for plant pots are fairly common and come in a variety of styles. Most are your standard pot shapes intended for small or medium-sized plants, generally succulents. Usually, 3D-printed pots set themselves apart from garden-variety pots with ornamentation such as spiral patterns. However, some go even further. One amusing pot has legs and looks like it's sitting down, and there's more than a few Bulbasaur-themed pots out there. Oh, and we can't forget the cat-shaped cactus pot that makes its cactus look like a particularly thorny and rigid tail.
For the most part, plant pot prints are simple projects. Just print and follow the nozzle height and layer height instructions provided by the creator, and you're good to go. Even stranger planters designed to hold multiple succulents can be printed in one go, and you can scale up most if not all of these files to hold larger flora. Of course, in order to actually use the pots, you need to fill them with soil, put the plants somewhere with access to plenty of sun, and water them daily, but that goes without saying.
3D printing and horticulture might seem like two diametrically opposed hobbies, but they're not, thanks to the creativity and skill (and green thumbs) of STL file creators.
Digital sundial
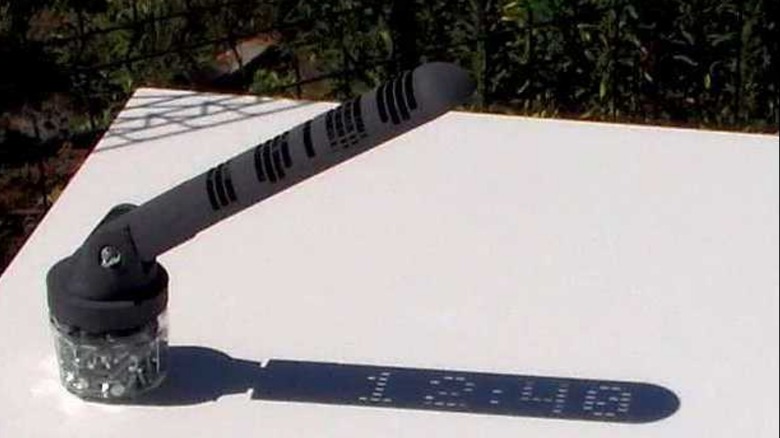
Sundial production is a dying art. Almost nobody builds timepieces that work by shadows anymore. Now it's all digital clocks that display numbers on a screen. Granted, these are beyond indispensable when the sun dips behind a cloud or the horizon, but one can't help but wonder what a marriage of ancient and modern chronometers would look like.
Julien Coyne of Mojoptix designed a digital sundial you can print on your own. This unique device displays digital numbers on the ground in the form of shadows. Due to inherent limitations, this sundial can only track time in twenty-minute intervals. However, it's nothing if not a unique set piece that you can put on your patio. Who wouldn't be fascinated by a plastic sundial that displays actual numbers?
While the sundial is easy to print, your location will determine which file you use: "Gnomon_Northern" for users north of the equator, and "Gnomon_Southern" for users south of the equator. Moreover, ABS plastic is a must since PLA warps in the sun, and the numbers won't show unless you use a 0.1mm resolution. To assemble the print, screw the parts together using three 20mm M6 flat head screws, one 50mm M6 flat head screw, four 14mm diameter M6 washers, and four M6 nuts. Secure the sundial to a weighted jam jar, and you're ready to orient it. Make the print face north, and during the spring and summer, angle it by subtracting 10 degrees from your latitude. During the fall and winter, change the angle by adding 10 degrees to your latitude.
Once you are done printing, you can call yourself a gnomonist and a dialist, which are just fancy ways of saying you design and make sundials, respectively.
Fart accordion
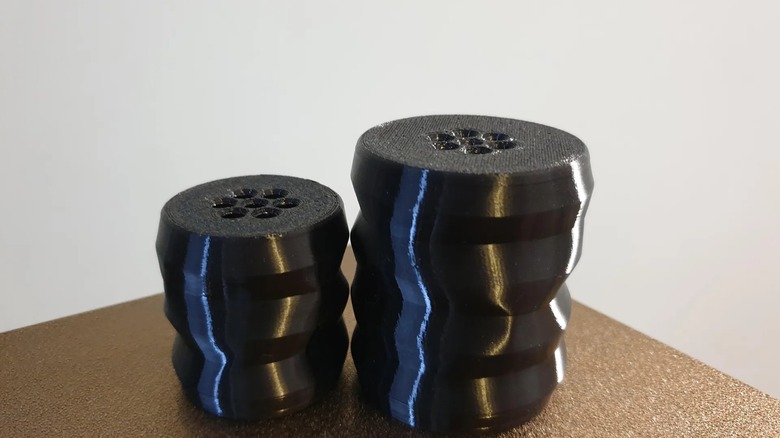
We all need a release from stress every now and then. Squeezing stress balls is a great strategy since they are designed to be punished. If only they also created sounds that catered to your inner child and its love of toilet humor and fart noises.
The "Fart Accordion" (yes, that is its name) is a simple instrument. As its name suggests, you can squeeze the Fart Accordion with one hand, and it will make a fart sound. Change how forcefully and quickly you squeeze it, and you can create a symphony of fake flatulence. The creator developed two versions: a standard-sized accordion and a larger one for deeper gas-passing sounds.
Despite what this article might imply, when printing most objects, you only have to worry about factors such as support and infill, and materials are a secondary concern. For the Fart Accordion, the opposite is true. Since the fartmaker needs to be flexible, you can't use normal 3D printer filaments or any form of printing resin. Instead, you have to use thermoplastic polyurethane (TPU) extruded from a 0.4 or 0.6mm nozzle. And most importantly, when printing, orient the model so the holes rest on the printing bed. The printer and STL file will do the rest.
Once the Fart Accordion is complete, it should be ready to play hot off the printer. Just make sure to squeeze with the holes facing the palm. Oh, and moisten your palms to make the farts extra wet.