5 Hidden Gmail Features You Need To Try Out ASAP
While there are a ton of free Gmail alternatives for every type of user, we'd hazard a guess that the vast majority of people will go to the grave with Gmail as their main provider — assuming Google doesn't send Gmail to the Google graveyard of products it has killed, too. Like many of us, it's the service we grew up with and tied all of our accounts to, for better or worse. Might as well live with it, and if we're going to live with it, make the most out of it. Lucky for us, Google continues to roll out intuitive features that will probably keep it as the dominant email service for years to come, despite being a completely free service with a generous amount of storage for emails. Unlucky for us, a lot of those features hide just an inch under the surface and thus don't get the appreciation they deserve. Turning them on takes a few seconds and could completely change your experience for the better.
We've previously covered other hidden Gmail features like how to unsubscribe from emails or how to recover deleted emails. Here we take a quick look at a handful of hidden features that most people can benefit from. We're going to go in assuming you're using the browser version of Gmail rather than an email client or the app; these same settings will need to be activated differently in your client and on Android and iOS. Try these five features and make your Gmail just a bit more useful.
Turn on the reading pane
For years, most email clients like Microsoft Outlook and Thunderbird have shown the email list on one side and the current open email on the other. The browser version of Gmail, for whatever reason, only shows the email list by default. Clicking on an email then takes you to that email full screen, forcing you to press the back button if you want to look at the list again and choose another email. Naturally, this is not a productivity-friendly way to manage correspondence. Changing one setting gets you a reading pane just like in almost any other email client or app.
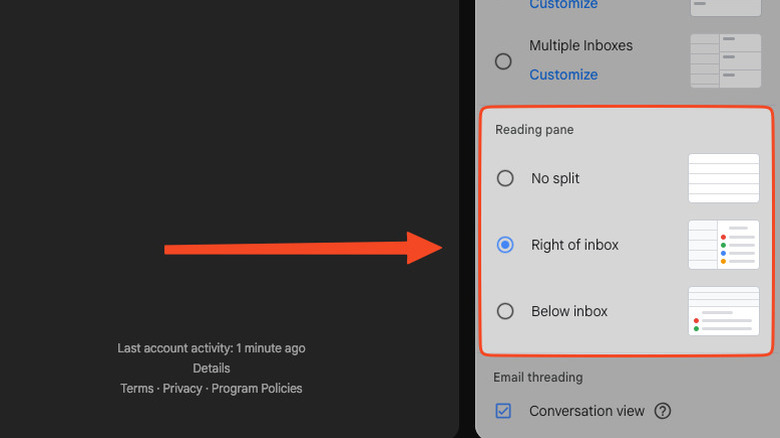
Look for the gear icon to open the Settings sidebar and scroll down to the section labeled "Reading pane." Most people will want to enable "Right of inbox," which puts the current open email on the right half of the screen. Otherwise, "Below inbox" splits it horizontally. And, voila. You can drag the center bar to give more space to the email or the email list.
While you're still in the Quick settings sidebar, we recommend making a few extra changes to further customize this new email reading view to taste. Consider changing the density from "default" to "compact" so you can pack more emails onto your screen. Inbox type can show you only important, unread, starred, or priority emails at the top, or you can set up multiple inboxes in the same space. Lastly, you can make the bland email view a bit more chipper with the theme settings, including your own personal photos if you like. In the same section, look for "View all," then "My photos," then find a Featured photo or add one that's stored in your Google Drive.
Schedule sent emails (and snooze incoming ones)
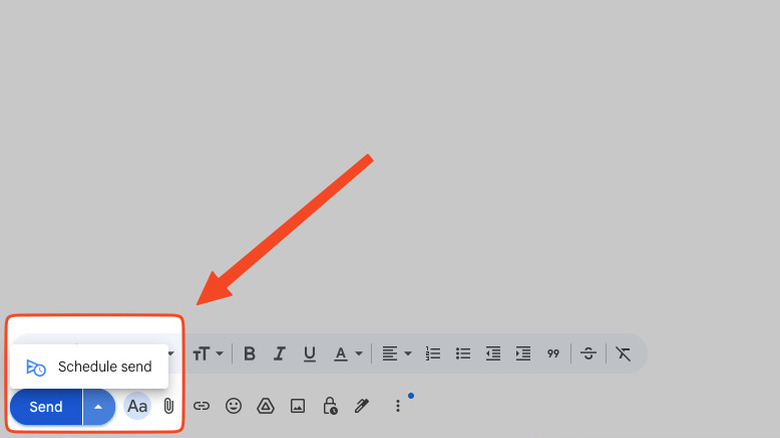
Scheduling emails is one of those features that once you start to use it, you can't live without. You can no doubt think of a million situations where this would be a game changer, such as wanting someone to see it first thing in the morning or not wanting someone to know you were working late. Before sending an email, simply click on the arrow next to the Send button and choose "Schedule send." It'll offer you a few general time windows when you might want to send it, like tomorrow morning, tomorrow afternoon, or the Monday of the following week — or you can just schedule your own specific time, so it doesn't look scheduled. Gmail will list all your scheduled emails in the "Scheduled" section on the left panel so you can cancel or reschedule them. Note that you can schedule your Gmail emails on your phone too.
Another highly useful feature for those who get inundated with emails is the option to snooze them. Look for the Snooze option (a clock icon) and the email will disappear temporarily. You choose exactly when it will reappear, be that later in the day or the next day. Same as with scheduled emails, you can find snoozed ones on the left side or search for them with the filter "in:snoozed."
There's also the Nudge feature. If you've noticed Gmail gently urging you to reply to an email that you left on read (or follow up on an email that got no response), that's a nudge. It can be incredibly helpful or extremely annoying. If you're in the latter camp, go to Settings > See all settings > General > Nudges and uncheck both boxes.
Send self-destructing messages
Google has never exactly had a reputation for privacy, and there are a bunch of Google privacy settings you should change immediately. That said, the self-destructing messages option is one exception to this rule. Known as confidential mode, these are self-expiring messages that heavily restrict what recipients can do with them. They'll be unable to forward, copy, print, or download them, according to Google. Even if you already set the email to expire at a certain time, you can have it expire immediately. Further, you can make it so it only opens with an SMS passcode from a specific phone number, limiting who can open it. Included attachments will also be confidential.
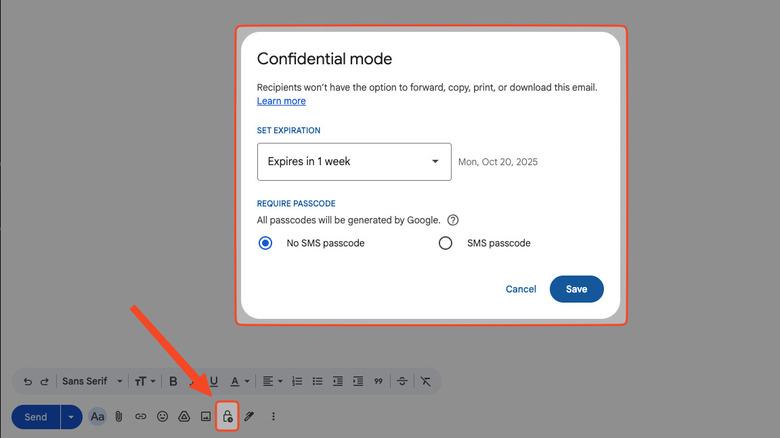
Creating a confidential email is extremely easy. Look for the padlock and clock icon under the email formatting settings. You'll be prompted to choose when the email expires and whether it requires an SMS passcode to open. Once you hit save, you can finish and send the email, and Gmail takes care of the rest. Go to the "Sent" section if you want to remove access right away, open that specific email, and choose "Remove Access." Easy to create, easy to destroy.
To be clear, confidential mode is not foolproof. Nothing stops your recipient from taking a picture of the screen with their phone or screenshotting it. It goes without saying that you shouldn't send something via confidential mode if it's imperative that no one save it in any way whatsoever. It's not hidden from Google, either, so consider waiting for Google's upcoming encrypted email option. Nonetheless, it gives you more control over emails that need to be kept in the right hands for a limited time.
Have your email available offline
Google Docs, like Gmail, has become the de facto free, online word processor and document collaboration/sharing hub. One of the many game-changing Google Docs hacks is the ability to store your documents offline. As luck would have it, you can do the same with Gmail. You don't need to download any extensions for this to work like you do with Google Docs. Make sure you're using Chrome and that it's not in incognito mode. Note that you won't be able to preview attachments offline, and you'll have to repeat this process individually for any other Gmail accounts you want to use.
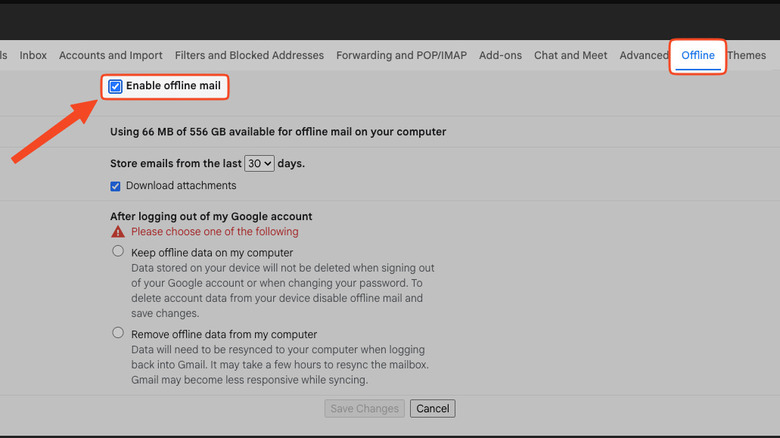
Open the settings and go to the offline tab. Check "Enable offline mail." Gmail tells you how much space you have available on your drive and lets you choose how many emails you want to store. You can't keep all of them, but you can include all emails from the past 90 days, plus their attachments. There's currently no way to limit emails by storage, so if you're running low or get a lot of email, consider setting it to the last 7 days. This feature won't enable until you choose one of the security settings below: "Keep offline data on my computer" or "Remove offline data from my computer." We recommend choosing the second option since this ensures those emails are deleted from your computer should you sign out.
Another pro tip is to add attachments you want to work on later to your Google Drive. This is extremely easy. Simply rest your mouse on a file in your email and choose "Add to Drive." Provided your Google Drive saves all your files offline, it'll be ready when you lose internet.
Give yourself a more generous undo-send window
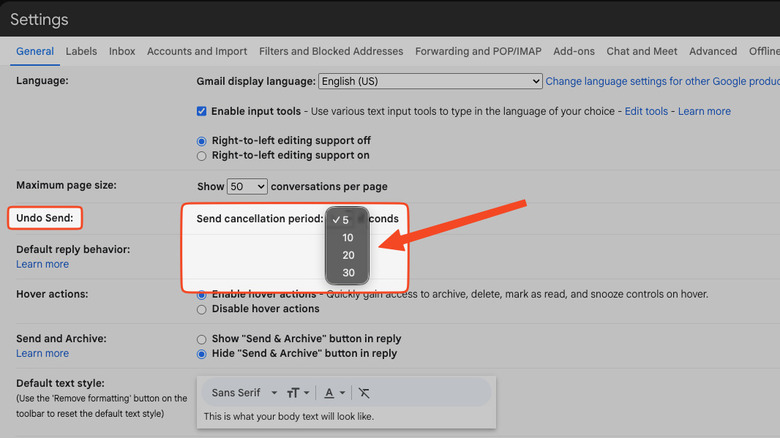
We've all sent an email we later regretted. Gmail understands this and lets you undo sent emails on desktop and mobile. The undo-send feature holds the email for five seconds, letting you reconsider any potentially bad decision rather than shooting it off immediately. Clicking "Undo" on the prompt near the bottom of the screen gives you a chance to rewrite it. But what if five seconds isn't enough? Gmail lets you change that, too.
Head back to Settings, and in the General section scroll down to Undo Send. At its most generous, Gmail gives you 30 seconds to stop an email from going out. We'd say that's more than enough time for most situations. If there's an email you want to send with the option to reclaim it later, use the confidential email option with a tight viewing window — or revoke it as soon as they've seen it. Having said that, this undo feature is more often for clerical errors, not an angry letter that you regret after a good night's sleep.
If you want even more control over sent messages, we wouldn't recommend using Gmail (or any email provider at all). One of these iPhone apps that lets you hide messages and chat privately will do the job. Telegram, for instance, allows you to delete any message at any time, even if you've sent it weeks, months, or years ago. But if you're that paranoid, maybe it's time to start using payphones and in-person meetups at Satriale's Pork Store like Tony Soprano.