13 Settings To Turn Off Or On In Your Android Phone
Android phones are lauded for being feature-rich and highly customizable. However, most of them have a lot of baked-in features that are enabled by default. This is often done to offer a smooth and consistent experience for the average user, but it doesn't provide the best value. Thankfully, you can configure these features per your requirements to get the most out of your device.
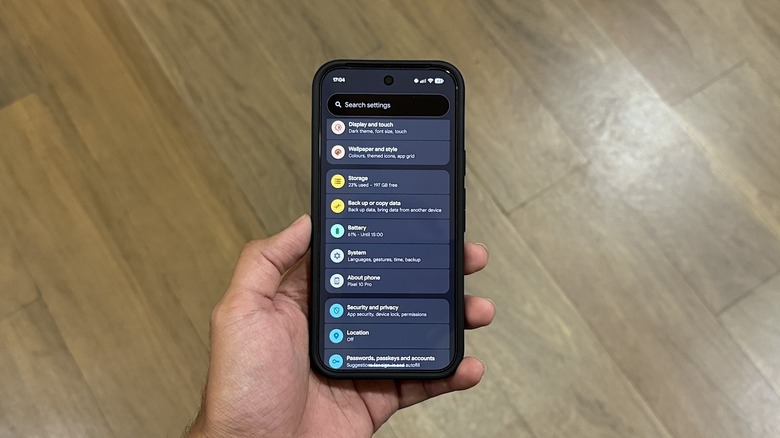
From unlocking your phone faster to accessing missed notifications and making your screen easier to read, your Android phone offers plenty of customization options that everyone can use with a bit of work. While the exact menu and setting names you need to tweak vary from manufacturer to manufacturer, the process looks largely the same. We're going to use a Pixel phone for images and specific examples in this article, but we've also highlighted menu names and navigation differences for other phones where applicable, so you can follow along.
Turn on face unlock
Chances are that you have already registered your fingerprint to open the screen lock on your Android phone. While more convenient and faster than traditional unlocking methods, the fingerprint lock has a shortcoming: it doesn't work if you're wearing gloves. This is where the Face Unlock feature comes to the rescue.
Face Unlock is one of the easiest ways to unlock your Android phone without using a password. To set up this function, you'll need to capture images of your face at different angles. Your phone will analyze them to create a facial model, after which it will start to compare the live image of your face on the internal camera with the stored model, granting access if there's a match.
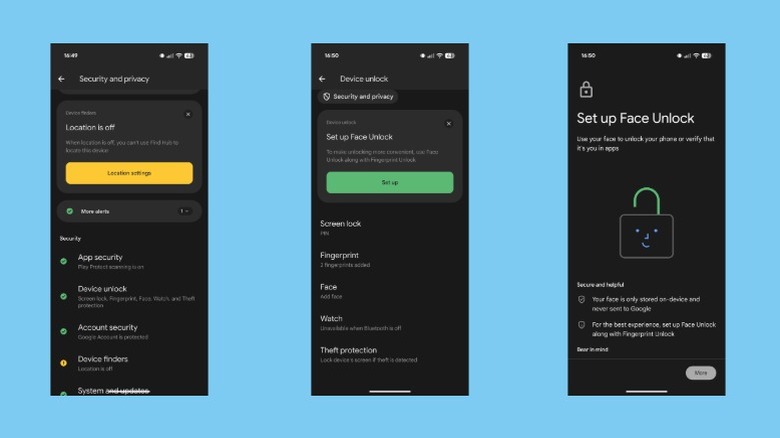
To set up Face Unlock, go to Settings > Security and privacy > Device unlock. Tap "Face" and authenticate using the screen lock. Agree to Google's disclosure, then hit "Start" and follow the on-screen instructions to register your face. The steps are similar for OnePlus phones. On a Samsung phone, select "Screen lock and biometrics" on the "Security and privacy" page, and tap "Face recognition." Do note that Face Unlock isn't reliable in low-light conditions, since it relies on the front camera, which usually doesn't have a flash.
Enable adaptive battery
Battery life can be a huge concern, especially on phones with smaller batteries. To that end, Android offers the Adaptive Battery feature, which learns from your usage habits and optimizes how apps work in the background to extend battery life. It also puts the apps you rarely use to sleep or restricts their background activity — delaying their notifications if needed — to reduce idle drain. At times, Adaptive Battery may even slightly reduce performance to save power, but you shouldn't notice any difference in regular use.
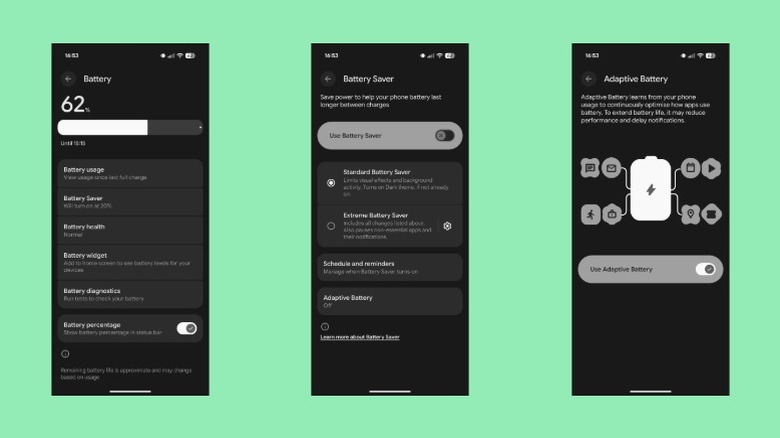
To enable Adaptive Battery on your phone, navigate to Settings > Battery and tap on "Battery Saver." Select "Adaptive Battery" and flip the "Use Adaptive Battery" toggle on. If you use a Samsung phone, go to Settings > Battery > Battery usage limits, tap the three-dot menu in the top-right corner, select "Adaptive battery," and flip the switch on the following page. To find the feature on OnePlus, head to Settings > Battery > Battery app usage > Optimize battery usage.
It's important to note that enabling Adaptive Battery won't immediately result in battery life improvements on your phone. You need to give the feature a few days to learn your usage habits, so it can optimize the performance accordingly and help you squeeze out more screen-on time.
Turn on notification history
The more apps you install on your Android phone, the more notifications you're likely to get bombarded with every day. Not only is this distracting, but it also increases the likelihood of missing important alerts. Notification history is a handy feature that helps you get around this. It records all notifications you received within the past 24 hours, including those you dismissed accidentally, so you can revisit them later. It can also help identify which apps send you the most notifications in a day. That way, you can disable their notifications or tweak them to show only important alerts.
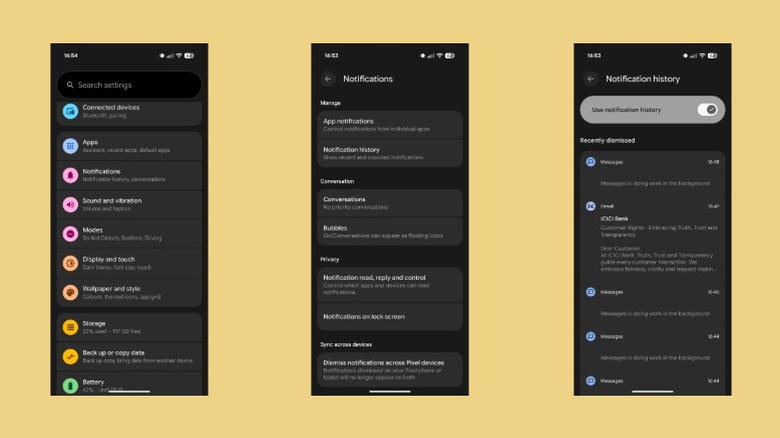
To enable Notification history, open Settings and select "Notifications." Tap "Notification history" under "Manage" and turn on the "Use notification history" toggle. If you use a Samsung phone, select "Notifications" in the Settings app, go to Advanced settings > Notification history, and flip the switch on. On OnePlus phones, go to Settings > Notifications and Quick Settings > More settings, tap "Notification history," and flip the "Notification history" button. Your phone will now begin logging all incoming notifications. To check for a missed or dismissed notification, revisit the Notification history page and scroll through the list until you find it. Tap on the notification to open it in its app.
Turn on one-handed mode
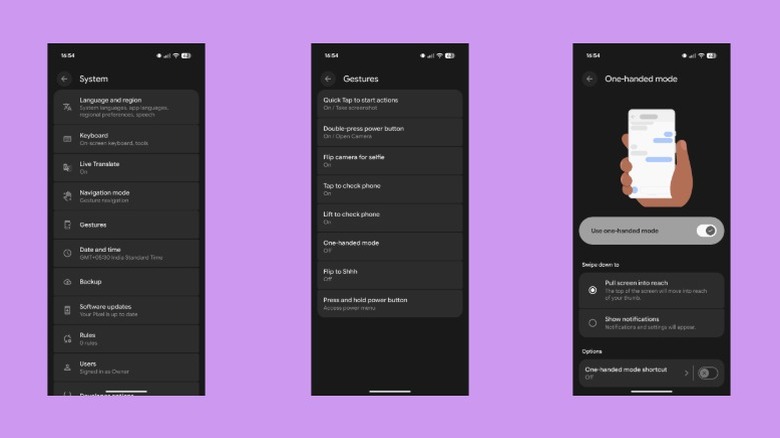
Phones with bigger screens offer the best media consumption and gaming experience. However, they aren't easy to use with one hand, often requiring finger gymnastics to interact with contents at the screen corners. Thankfully, Android has long been offering a one-handed mode to improve multitasking. It works by temporarily bringing the top half of the screen down (on Pixel and OnePlus phones) or shrinking the screen closer to one of the edges (on Samsung phones), so you can interact with it easily.
Enabling one-handed mode is easy. Head to Settings > System > Gestures, tap on "One-handed mode," and click on the "Use one-handed mode" option. Be sure the "Swipe down to" option is set to "Pull screen into reach." On Samsung phones, go to Settings > Advanced features and flip the "One-handed mode" toggle. If you use a OnePlus phone, you can do this by heading to Settings > Accessibility and convenience > One-handed mode and toggling on the "One-handed mode" switch. Now, whenever you're using your phone one-handed, you can swipe down on the bottom edge of the screen to activate one-handed mode. Perform the same gesture or tap on the empty space on the screen to exit.
Turn on adaptive tone
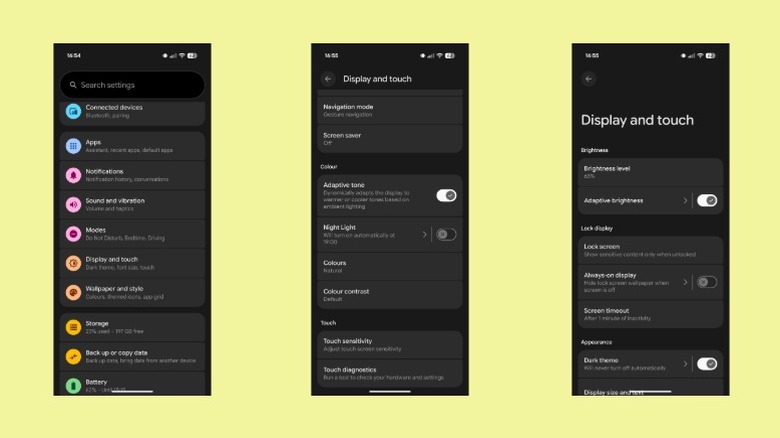
By default, your Android phone's screen has the same white balance setting for all lighting conditions, meaning its appearance doesn't change whether you're using it in broad daylight or complete darkness. This isn't ideal, especially in low-light conditions, as the cool tone of the display can strain your eyes and make the viewing experience uncomfortable. To help avoid this, some Android phones — especially flagship models — come with an adaptive tone feature that automatically adjusts the display's white balance to match the ambient lighting conditions.
Adaptive tone uses onboard sensors on your Android phone to detect ambient light and then tweaks the display settings accordingly to suit the environment. So, if it's dim indoors, it'll make the display warmer, whereas if you're using the phone under the sun, the display will turn cooler for better visibility. To turn it on, head to Settings > Display and touch, scroll to the "Color" section, and toggle on the "Adaptive tone" switch. On OnePlus and Samsung phones, you can find it under the "Display and brightness" and "Display" settings, respectively.
Turn off precise location access
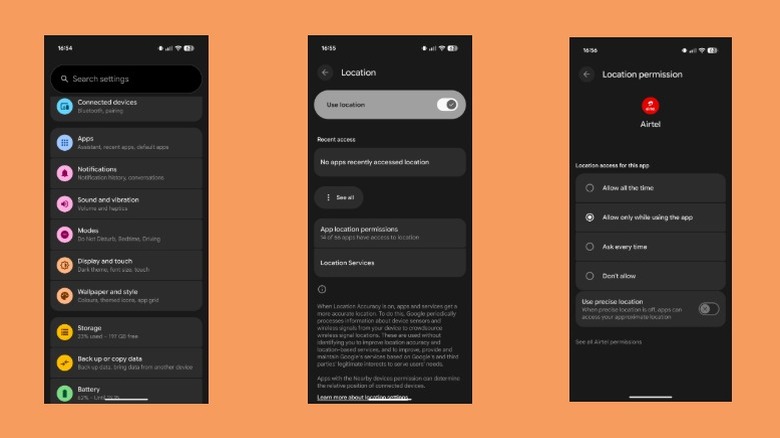
Android uses two types of location access, approximate and precise, which are pretty self-explanatory. Certain software, such as popular navigation apps or ride-hailing apps, requires precise location for the best experience, while others can function properly with just your approximate location. While apps don't get to choose the kind of location access they have, you may have accidentally granted them precise location access when they prompted for permission.
It's best to check the kind of location access you've granted to the apps installed on your phone, and change it from precise to approximate for non-essential apps. To do this, open "Settings," go to "Location," and tap "App location permissions." You'll now see a list of apps. Tap on the app whose permission you want to check and, on the next screen, toggle off the "Use precise location" option if it's enabled. Do this for all the apps you think don't need precise access to your location. These apps should continue to function normally after you change their location access.
Enable quick tap
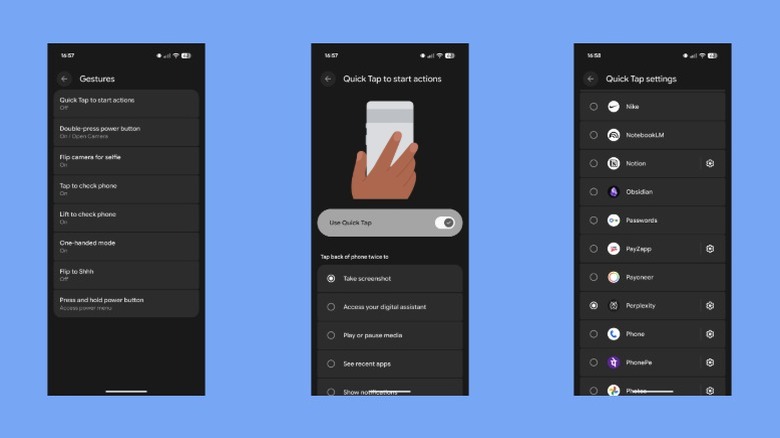
Quick tap is a Pixel-exclusive feature that transforms the back of your phone into a virtual button, so you can double-tap it to take a screenshot, toggle the flashlight, or open an app, among other things. However, Google keeps quick tap disabled by default. To set it up, go to Settings > System > Gestures. Select "Quick Tap to start actions" and toggle on the "Use Quick Tap" option on the following screen. Then, select your preferred action under the "Tap back of phone twice to" section. You can also launch an app with quick tap. To do this, select the "Open app" action, tap the gear icon next to it, and select the app. You can open an app in a specific menu, too.
If you use a Samsung phone, you can get a similar functionality using the Registar Good Lock module. First, download Good Lock from the Galaxy Store, then look up Registar, and download it. Then, enable Registar, choose "Back-Tap action," and turn it on. Next, set up the actions for "Double Tap" and "Triple Tap" gestures. If you own any other Android phone, you can use Tap, Tap to get the quick tap functionality. This app is free to use, supports both double-tap and triple-tap gestures, and offers access to over 50 actions.
Disable notifications from unwanted apps
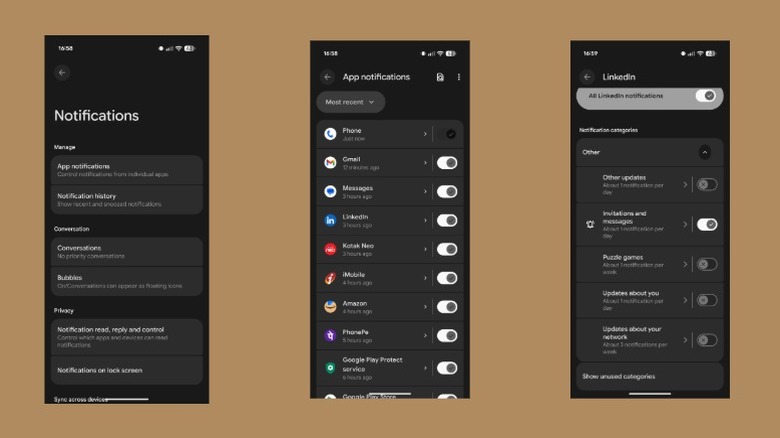
Not all apps on your Android phone send important notifications at all times. Many use push notifications to send marketing and promotional content, which can be highly distracting, especially while you're working. Those are the kind of notifications you should turn off. Once you identified which apps send unwanted notifications, head to Settings > Notifications > App notifications and toggle off the apps you no longer want to receive notifications from. This will stop all notifications from that app. On a OnePlus phone, go to "Notifications and Quick Settings" in Settings and tap the app whose notifications you want to disable.
Alternatively, if you don't want to stop all notifications, you can disable only some of them. On the "App notifications" page, tap on an app and hit "Other" under "Notification categories." This will reveal the complete list of kinds of system messages the app can send. Toggle the switches next to the categories you want to disable notifications for. On a OnePlus phone, the process is a little different. Go to Settings > Apps > App management and tap the app whose notification categories you want to configure. Tap "Manage notifications," scroll down, and you'll see headers for notification categories. Tap on one and toggle off the "Allow notifications" option on the next page.
Turn on Authenticate with biometrics for passwords
If you use one of the many third-party password manager apps such as Bitwarden on your Android phone, you'll be prompted to authenticate every time you try to use it to fill a login form on an app or website. This ensures that even if someone gets access to your phone in an unlocked state, they can't log in to your accounts. However, if you use Google Password Manager, the authentication option isn't enabled by default. This issue can be fixed by using Authenticate with biometrics.
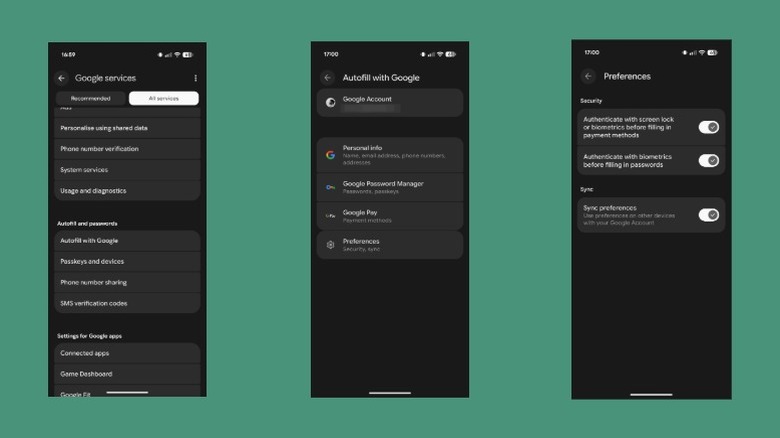
To turn it on, open Settings and tap your profile name at the top. Go to the "All services" tab, scroll down to the "Autofill and passwords" section, and select "Autofill with Google." Tap "Preferences" and authenticate yourself when prompted. Finally, toggle the "Authenticate with biometrics before filling in passwords" option on. On a Samsung or OnePlus phone, go to Settings > Google to access the Google services page, then follow the steps shown above. Once enabled, whenever you or someone else tries to use the Google Password Manager to autofill your username and password on an app or website, it'll require authenticating to proceed.
Enable automatically archived apps

If you use an Android phone and you've almost filled up the entire storage, there's a clever way to free up some space that involves archiving the apps you use less frequently. Archiving simply means removing most of an app's files — except for the icon and essential user data, such as account data and settings — from the device. Your phone continues to show the app's icon, though it's usually dimmed or has a cloud symbol next to it. You can tap this icon any time you need to use the app again, and it'll restore it by downloading all the missing files.
You can archive apps manually or have the Google Play Store archive unused apps automatically when you're running low on storage space. To do it manually, go to Settings > Apps, tap on the app, and hit the "Archive" button. Alternatively, to set up auto-app archiving, head to the Play Store, tap the profile icon in the top-right corner, and select "Settings." Tap "General" and toggle on "Automatically archive apps". On a Samsung phone, you'll need to tap the "i" button in the context menu to access an app's info page. At the time of writing, app archiving isn't available on OnePlus phones. To restore an archived app, you can tap its icon or tap "Restore" on the app's info page.
Disable Show passwords
Password managers minimize the time spent writing and remembering passwords, but there are still times when you need to type data like your email address and password manually. The problem with this is that the password field displays the characters briefly as you type them in. As a result, when you're in a crowded place, people can look over your shoulder and see your password as you try to log in to your account. Most Android phones offer a setting that helps prevent this.
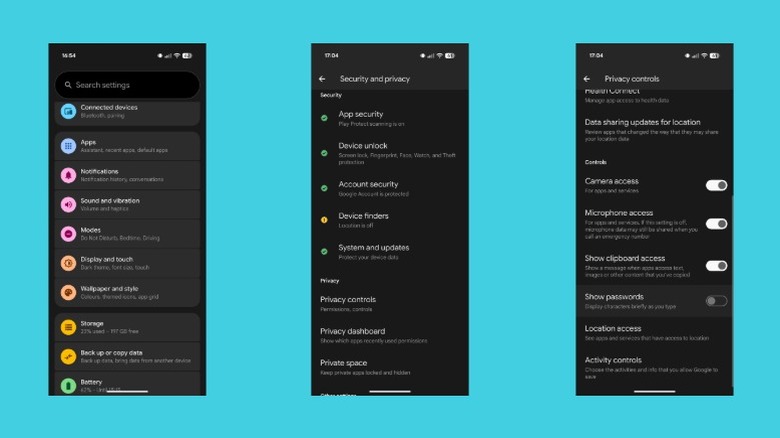
On Pixel phones, it's called Show passwords. To disable it, go to the Settings app and select "Security and privacy." Scroll to the "Privacy" section and tap "Privacy controls." In the "Controls" section, find and toggle off the "Show passwords" option. The steps are the same on OnePlus phones. On a Samsung phone, select "More security settings" on the Security and privacy page and turn off "Make passwords visible". Alongside disabling password preview, you can also make your screen lock more secure. To do this, head to Security and privacy > Device unlock > Screen unlock. You can toggle on "Enhance PIN Privacy" to disable animations on number keys, or toggle off the "Make pattern visible" option to hide the trails of the unlock pattern as you draw it.
Turn off ad topics
Google has long relied on users' personal data and advertising IDs to serve relevant ads. However, as part of its Privacy Sandbox initiative for Android, it has taken a new approach, wherein it shows personalized ads using broad interest topics inferred from users' app usage. While this approach improves privacy, it now profiles you based on your app usage. Google lets you change this behavior by turning off ad topics.
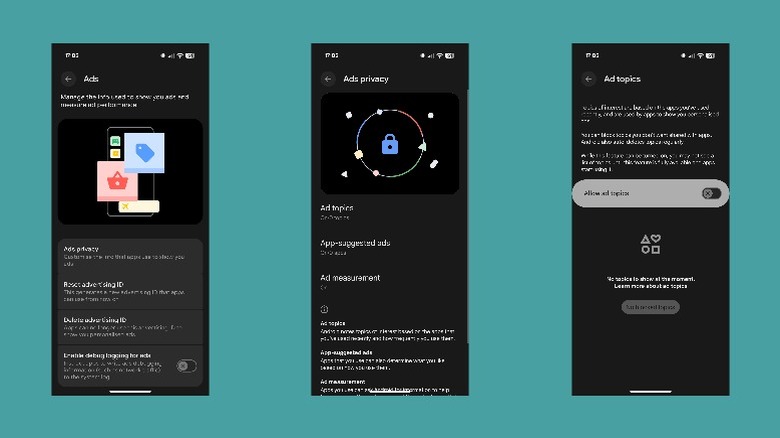
Disabling ad topics is easy. Open Settings and go to Security and privacy > Privacy controls > Ads. Select "Ads privacy," tap on "Ad topics," and you'll see a list of ad topics based on the information that Google has inferred about you so far. Toggle off the "Allow ad topics" switch. The steps are the same for OnePlus phones. On a Samsung phone, head to Settings > Security and privacy > More privacy settings > Ads. Follow the same steps for Pixel devices.
While you're here, you should also consider deleting your advertising ID. Doing so will prevent apps from using your current advertising ID to show personalized ads, while also making it harder for them to profile you going forward. On the "Ads" page, select "Delete advertising ID" and tap the "Delete advertising ID" button on the following screen.
Disable usage and diagnostics
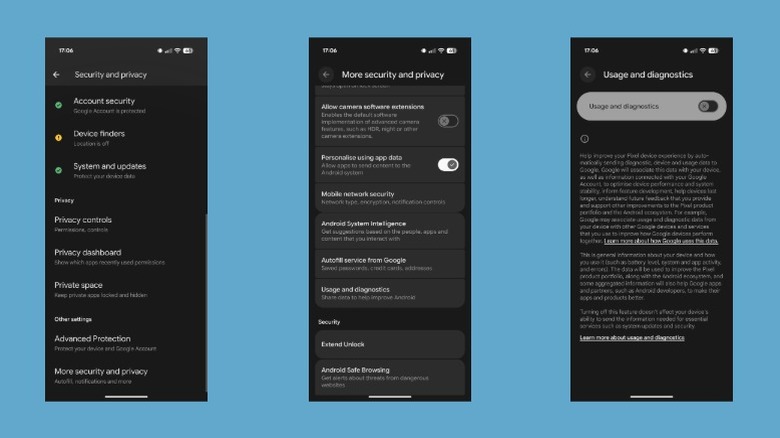
Besides tracking app usage, your Android phone also collects a bunch of other information about how you use it and how it performs. This typically includes details such as battery level, error reports, and software stability, which are sent to Google or the device manufacturer to help them improve their products and services. You can opt out of sharing usage and diagnostics data for a more private experience on your phone.
To turn off usage and diagnostics, head to Settings > Security and privacy > More security and privacy. Select "Usage and diagnostics" under the "Privacy" section and toggle "Usage and diagnostics" off on the next screen. You can follow the same steps if you have a OnePlus phone. On Samsung phones, go to Settings > Security and privacy. Scroll down, select "More privacy settings," tap on "Usage and diagnostics," and turn "Usage and diagnostics" off.