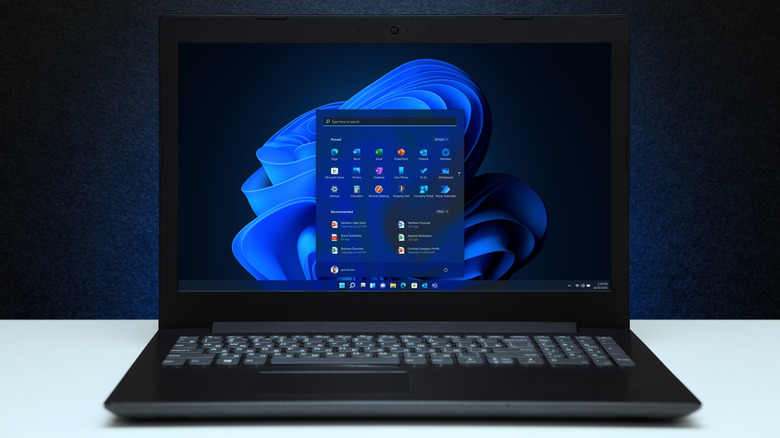
5 Settings To Disable On Your New Windows 11 Laptop
If you're in the market for a new laptop, you'll most likely end up buying one that runs on Windows 11 Home or Pro. However, regardless of the edition, the feature set will mostly be the same. You get a host of features on both editions, and almost all of them come enabled by default to deliver a full-fledged experience. That said, not all of these features are useful to everyone. Additionally, certain features consume significant system resources, which can hinder overall performance, especially on low- or medium-spec computers. Turning these features off thus becomes an essential step during the setup.
Thankfully, Microsoft makes disabling the features you don't need straightforward; all you need to do is find the settings and turn them off. But which ones should you disable first and why? While there are many Windows 11 settings you should consider changing on a new laptop, there are a few you must disable right away. We've curated a list of five such settings you turn off safely to make Windows 11 run faster on your new laptop, without breaking other system functionality. You can also disable these settings after upgrading to Windows 11 or installing a fresh copy of Windows 11 on your computer. Once you've done so, you'll end up with improved privacy, fewer annoying notifications to deal with, and more system resources for other processes on your computer.
Diagnostic data
Windows 11 collects a significant amount of information about your computer and sends it to Microsoft to improve its services. This is called diagnostic data or telemetry, and Microsoft classifies it into two types: required and optional. The required data includes everything — from basic device details to settings, app compatibility, and configuration — needed to keep the system functioning reliably. Meanwhile, additional information, such as device health, usage, websites visited, and memory dumps, falls under optional data.
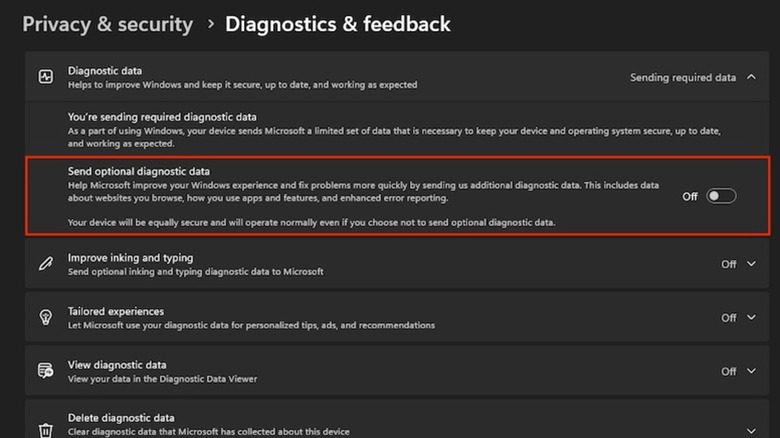
Your computer sends both kinds of data to Microsoft by default. While Microsoft doesn't allow you to stop this completely, you can opt to share only the required data. In fact, it's one of the essential privacy settings you should change on Windows 11. To do this, open Settings and select "Privacy & Security" from the left sidebar. Choose "Diagnostics & feedback" under "Windows permissions," expand the "Diagnostics data" card, and toggle off the "Send optional diagnostic data" option. Similarly, you can prevent Microsoft from using diagnostic data to offer personalized tips, ads, and recommendations. Scroll down, click the "Tailored experiences" card, and flip the toggle off.
Further, you can delete the diagnostic data Microsoft has collected so far. Click the "Delete diagnostic data" card and hit "Delete." Microsoft will begin removing copies of your data from its systems. Besides collecting diagnostic data, Windows 11 also prompts for feedback from time to time, which can be quite annoying. You can disable this by scrolling down to the "Feedback" section, clicking the "Automatically (Recommended)" dropdown button next to "Feedback frequency," and choosing "Never."
Targeted ads
Disabling the Tailored experiences settings will limit personalized ads that are based on diagnostic data. However, you'll still see targeted ads on your computer. These are ads that leverage an Advertising ID. For the uninitiated, an Advertising ID is a unique identifier that app developers and advertising networks use to build your profile based on in-app activities and serve relevant ads across their apps and websites accordingly. You can prevent apps from using your Advertising ID to stop seeing such ads.
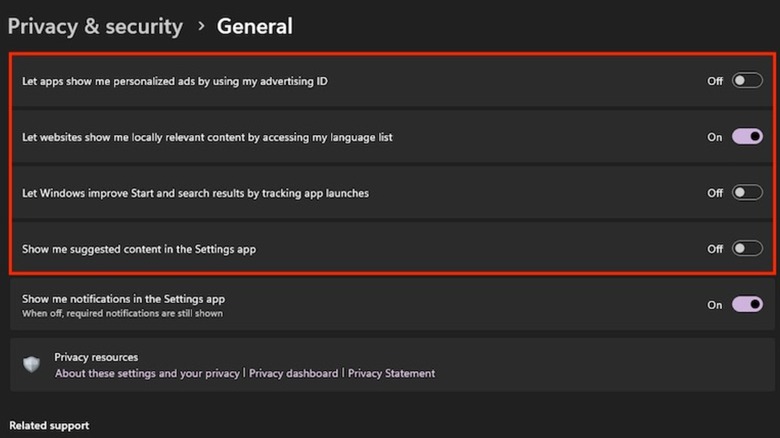
To disable targeted ads in Windows 11, head to the Settings app, select "Privacy & security," and click on "General" under "Windows permissions." Toggle off the switch next to 'Let apps show me personalized ads by using advertising ID." While here, you can also disable a few other options to ensure a more private experience on your computer. For instance, you can the "Let Windows improve Start and search results by tracking app launches" option to stop Windows from tracking your app launches to improve the Start and search results by disabling. Similarly, you can hide suggested content — new features, apps, and more — within the Settings app by flipping the "Show me suggested content in the Settings app" toggle off. You should also consider removing Start Menu ads in Windows 11 to eliminate distractions and clean up the view.
Annoying notifications
Windows 11 sends a host of notifications to keep you informed about everything from pending system updates and other system alerts to calendar reminders and new emails. These notifications appear as banners on your screen as well as in the notification center. Although some of these are helpful, many — especially system notifications or those about tips and suggestions about using Windows — can be distracting while working.
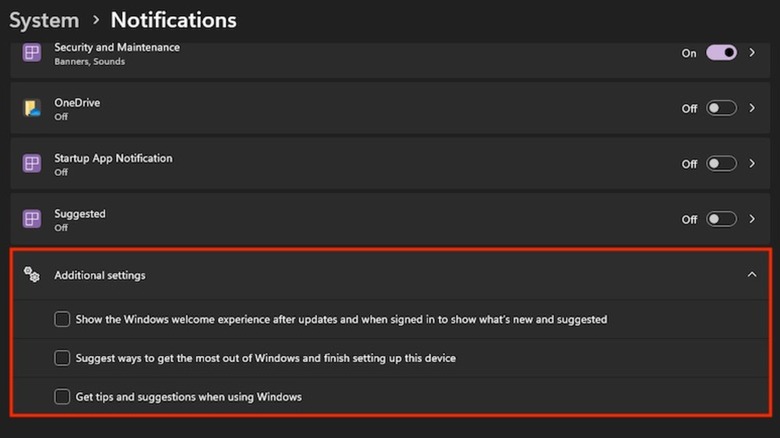
Microsoft includes plenty of controls to help manage and customize notifications on your computer. To begin, head to Settings and select "System." Click on "Notifications," scroll down, click the "Additional settings" card to expand it, and uncheck the "Get tips and suggestions when using Windows" and "Suggest ways to get the most out of Windows and finish setting up this device" options. You can also uncheck "Show the Windows welcome experience after updates and when signed in to show what's new and suggested" and "Suggest ways to get the most out of Windows and finish setting up this device" if you want.
While disabling these options can significantly reduce unnecessary notifications on your computer, it's also important to configure the notifications that come through apps and services. Go to the "Notifications from apps and other senders" section on the "Notifications" page and toggle off the switch next to the apps and services from which you don't want to receive notifications. Alternatively, you can click on an app or service to configure the kinds of notifications it sends and where they appear.
Widgets

Windows 11 utilizes widgets to give you quick and easy access to various apps and features. A widget is essentially an interactive block that presents you with real-time information (weather, markets, scores), news, and apps and services on your computer. Although useful, these widgets consume lots of system resources since they constantly fetch and update content in the background. As such, you may experience slowdowns when trying to access other apps and services, especially if you're on a less powerful computer. By disabling widgets, you can reclaim system resources and ensure a smoother experience on your computer.
To disable widgets in Windows 11, go to Settings and select "Personalization" from the left sidebar. Click "Taskbar items" to expand the card and toggle off the "Widgets" card. This will disable all the widgets and remove the widgets panel from the Taskbar. Alternatively, if you find certain widgets useful, you can configure the widgets panel to show only those, disabling both unneeded widgets and the feed. To disable a widget, first, hover or click the Widgets panel icon in the Taskbar. Alternatively, you can open the Widgets panel using the Windows + W keyboard shortcut. You'll now see your widgets panel with all the widgets. Click the three-dot icon in the upper-right corner of the widget you want to remove and select "Hide this widget." To remove the feed, click the gear icon in the top-right corner and select "Show or hide feeds." Toggle off the "Feed" button on the following page.
Search highlights
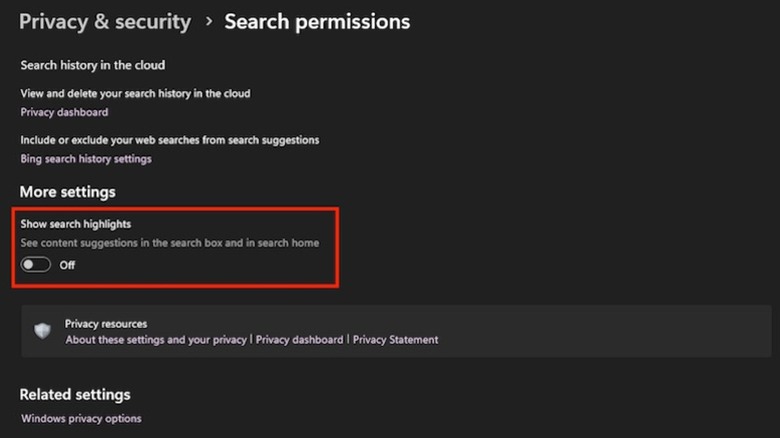
Search highlights is a Windows 11 feature that offers a lot of informative content, right in the search panel. The content you see here typically includes important dates and events, holidays, current headlines, and trending searches. If you're signed in to your computer with a school or work account, search highlights can also surface information related to your organization, such as people, files, events, and more.
Although this sounds useful, it can — much like widgets — hog up your system's resources and affect its overall performance. Additionally, all this information clutters also the search panel, which can slow down the search experience and, at times, require you to wait longer for the search to be available. Hence, it's best to turn off search highlights on your computer. Go to the Settings app and select "Privacy & security." Scroll down and click on "Search permissions" under the "Windows permissions" section. Scroll to the "More settings" section and flip the "Show search highlights" toggle off. Go to the search tab, and you'll only see quick search suggestions along with some suggested and top apps.