5 Easy DIY Auto Projects Any Beginner Can Tackle
Performing automotive maintenance is a wonderful way to save yourself time and cash. It's also a fantastic way to increase your skill set and learn more about your car and how it works. While many auto repair or maintenance jobs can be too complicated for beginners and novices, there are plenty of DIY auto projects that even the most inexperienced drivers and car owners can tackle with relative ease.
If you plan to do your auto maintenance, though, you should consider a couple of things first. One, it's very important that you don't just dive in blind. You should do a little research before starting any DIY project to ensure that you understand the general procedure and find out whether there is anything unique to your vehicle that requires extra steps or special equipment. That leads us to our second consideration: tools. It's important that you have access to the correct tools when working on your car. Most of the projects covered in this list require minimal tools and equipment. However, it's always wise to do your due diligence before starting a maintenance or repair job, as there are few things worse than having to pause your project to go hunting for a tool.
Once you've done a little research and have the proper tools, you're ready to jump into the world of DIY auto maintenance. From oil changes and fuse replacements to tire rotations and brake jobs, here are five simple auto projects that even beginners can handle.
Oil change
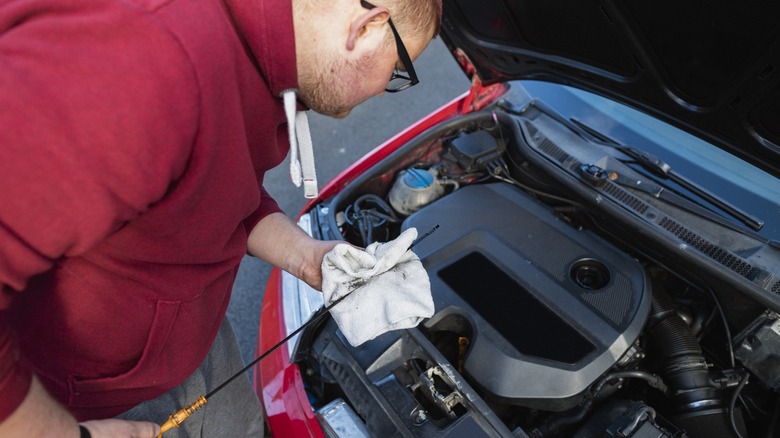
An oil change is one of the most basic and critical forms of vehicle maintenance. Whether or not you plan to do it yourself, oil changes are something you absolutely cannot skip. Most auto manufacturers provide specific intervals for oil changes, which can differ from car to car. However, for most vehicles, you should change your oil every 3,000 to 7,500 miles.
To replace your oil at home, you'll need ramps or jacks to lift the car off the ground, a ratchet and socket set, a torque wrench, a fluid pan, fresh oil that meets your vehicle's specifications, a new oil filter, and rags for cleanup.
The steps to change your oil can vary slightly depending on the vehicle, but here is the general procedure:
-
Open your car's hood and remove the oil fill cap and dipstick.
-
Lift your vehicle's front end off the ground.
-
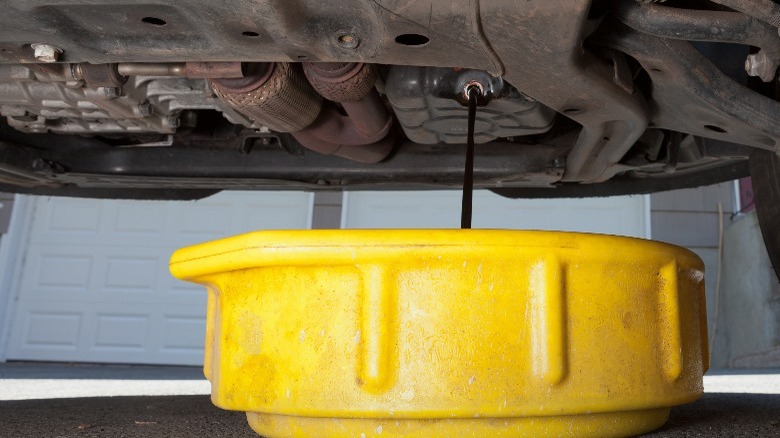
Locate the oil pan and remove the drain plug (position your fluid pan to catch the old oil).
-
Remove the old oil filter.
-
Apply a light layer of oil to the new filter's gasket and screw it into place.
-
Replace the drain plug and torque it to the proper specification.
-
Lower the vehicle.
-
Fill your car's engine with the appropriate amount of clean oil (check your owner's manual to verify).
-
Start the vehicle and let it run for 30 seconds. Then, check the oil level using your dipstick. Top off the oil, and clean up any messes before closing the hood.
Once you finish, complete the project by recycling your old oil. Simply transfer it into the container the new oil came in and return it to your local auto parts store for proper disposal.
Fuse replacement
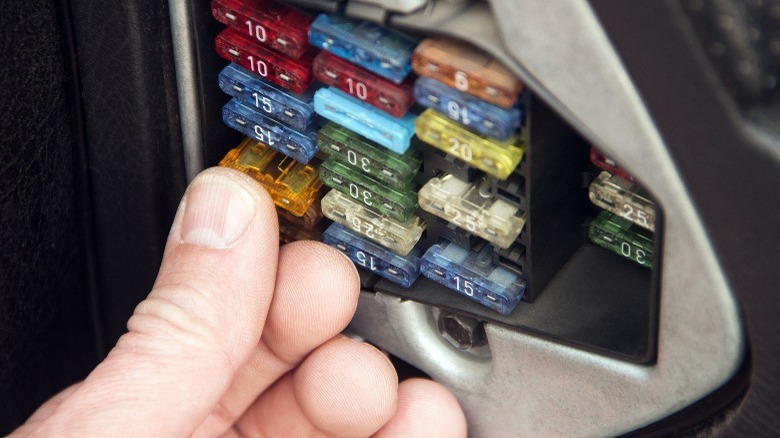
A fuse replacement is an incredibly simple job that basically any novice or beginner can handle with no issues. Fuses work to protect electrical components from receiving too much electricity. If too much electricity flows toward a part, the fuse will break, preventing the electric energy from damaging the expensive component. Fuses are cheap and easy to replace. In most scenarios, you won't need any tools, but it's a good idea to have a pair of pliers handy just in case.
There's no specific interval for changing fuses. You only need to replace one when it fails. Signs of a bad fuse include electrical issues, like lights not turning on or the inability to use your radio. Most cars have two fuse boxes, one under the hood and one inside the cabin. If you suspect your vehicle has a blown fuse, you can open the boxes and visually inspect the fuses. If you notice the filament inside a fuse is broken, you'll need to replace it.
To replace a fuse, follow the steps below.
-
Locate the proper fuse box.
-
Open the fuse box and inspect the diagram on the bottom of the lid.
-
Identify the faulty fuse.
-
Remove the blown fuse by gently pulling it straight up.
-
Install a new fuse by carefully inserting it into the fuse box.
-
Close the fuse box.
Once you complete the above steps, you're done. You can start your vehicle to test your work, and if the blown fuse was the source of your problem, everything should function like normal.
Air filter replacement
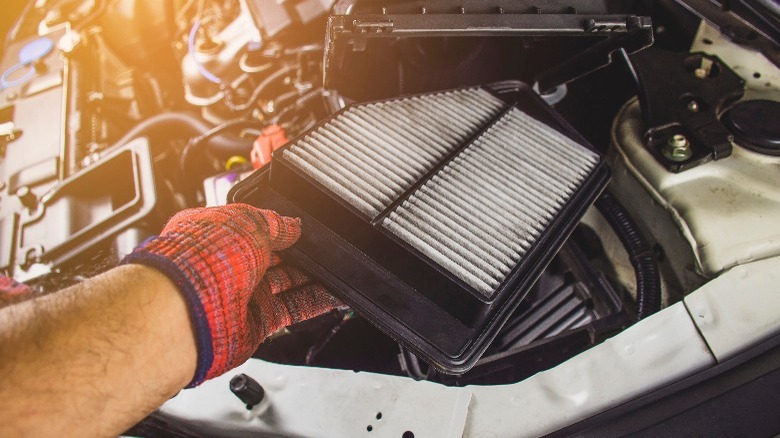
Replacing your car's engine air filter is a quick and simple project that even absolute novices can accomplish. Internal combustion engines rely on a combination of fuel and oxygen to create the small explosions that give your car its power. The engine sucks in oxygen through its air intake system, and the air filter prevents dust, plant material, and other debris from entering the engine or clogging the intake. The air filter is a vital component that contributes to solid and safe engine performance. While each manufacturer may provide different replacement intervals for the engine air filter, you should replace your air filter roughly every 15,000 miles. To do so, you may need a ratchet and socket set, a flathead screwdriver, or no tools at all, depending on your car.
The steps to replace an air filter can vary from vehicle to vehicle, but here is the basic procedure:
-
Open your car's hood.
-
Locate the air box (in most vehicles, the air box is off to the side of the engine and looks like a large black plastic box).
-
Open the air box and remove the old filter (pay attention to the filter's orientation).
-
Inspect the filter for signs of damage.
-
Pay close attention to any orientation arrows, and install the new filter.
-
Close the air box.
-
Close your car's hood.
That's all it takes to replace your engine air filter. Doing so is quick and straightforward and will enable your engine to breathe clearly.
Tire rotation

Rotating your wheels is a great way to extend the life of your tires. It's a simple process that generally only involves moving the front tires to the rear end and the rear tires to the front. You can choose to crisscross your wheels or follow another custom pattern, but in most cases, moving the tires from the front to the back will do the trick. Typically, you should rotate your tires every 5,000 to 7,000 miles.
Before you can rotate your tires, you'll need some jacks to lift the vehicle, an impact wrench or a breaker bar to remove your lug nuts, and a torque wrench. It's important to mention that the tire rotation pattern will depend on the type of tires you have and if you have an AWD, FWD, RWD, or 4WD vehicle. Double-check your owner's manual or call a certified mechanic for information.
Ready to get started? Follow this procedure to rotate your tires:
-
Raise the car off the ground and remove all four wheels.
-
Move the tires based on the proper rotation pattern and tighten the lug nuts.
-
Lower the vehicle and torque all four wheels.
That's all it takes to rotate your car's wheels. It's a straightforward project that can go a long way toward protecting your tires. If you want to go one step further, you can take your wheels and tires to a local shop to have them balanced. That will reduce shakiness and vibrations as you drive while helping to further prolong the life of your tires.
Headlight replacement
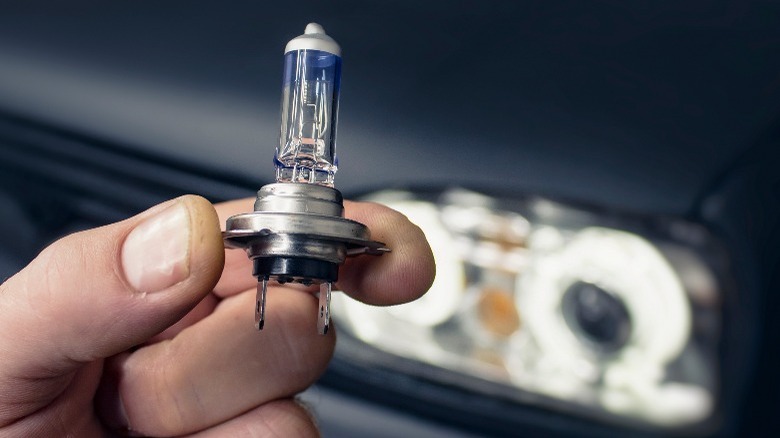
Replacing headlights is another simple and quick job that almost anyone can complete. The process differs from vehicle to vehicle. But in most cases, the steps are relatively similar, and the process is straightforward. There isn't typically a set replacement interval for headlights. However, most automotive headlight bulbs will last for at least 500 hours of use, with some bulb types being able to last for up to 10,000 hours. Basically, you'll need to replace your headlight bulbs when they stop working.
Because headlight assemblies differ from car to car, the tools you'll need to use can vary. You may need a ratchet and socket set, various flathead and Phillips screwdrivers, and some small pry bars or trim tools for your headlight replacement.
The steps to replace a car's headlights depend on the make and model, but here is the general procedure:
-
Open the vehicle's hood.
-
Locate the headlight assembly.
-
Remove the back of the assembly by twisting off the plastic cover or removing any bolts securing it in place.
-
Remove the old headlight bulb from its housing.
-
Install the new bulb, but be very careful not to touch the glass with your fingers.
-
Replace the assembly cover or any other parts you removed.
-
Close the hood and test the lights.
Once you finish the above steps, your headlights should work. You can test them by parking in front of a wall and turning on your lights. If you can see the lights' reflection, you know you were successful.