Every Way To Capture A Screenshot On An iPhone 14 And iPhone 14 Pro
Taking screenshots on the iPhone 14 and the iPhone 14 Pro is very easy, provided you know what to do and which method suits you the best. Yes, you can capture your iPhone's screen in more than one way. Once you set up these methods, snapping a screenshot hardly takes a second. After that, you can use Markup to add text, highlight a particular area, or crop the screenshot.
On iPhones with iOS 15 and older, users can take a screenshot, edit it using the Markup tools and save it or share it with others via apps. With the newest version of iOS, however, Apple also includes the Copy and Delete feature that enables you to take a screenshot and copy it to your clipboard. Then, you can paste this screenshot wherever you want, including apps like Notes, Message, Mail, and more. Excited about taking screenshots on your iPhone 14 or the iPhone 14 Pro? There are four different methods available.
Use the volume buttons to takes a screenshot on iPhone 14

The good old way to take screenshots on iPhones with buttons works perfectly fine on the iPhone 14 and the iPhone 14 Pro models. All you have to do is press the side button and the volume up button together, and that's it (via Apple). The iPhone immediately captures the content on the screen and shows it in the form of a thumbnail that floats for a few seconds in the bottom left corner of the display. To view the screenshot, tap on the thumbnail before it vanishes. If you wish to use the Copy and Delete feature, tap on Done after editing it, and from the options, tap on Copy and Delete. Now, you can paste the screenshot into other apps without clogging your iPhone's storage.
There are two different types of screenshots that you can take on your iPhone. Usually, you take regular screenshots capturing the items on display at the moment. However, if you're browsing through a web page, reading your morning news update, or a how-to explainer, you can also capture a full-page screenshot. Take a screenshot, tap on the thumbnail, and select Full-Page at the top. This will convert the regular screenshot into a long-form screenshot that contains the entire web page. While viewing, you can swipe around to view everything, just like you would when visiting the web page.
Take screenshots with Assistive Touch or Back Tap
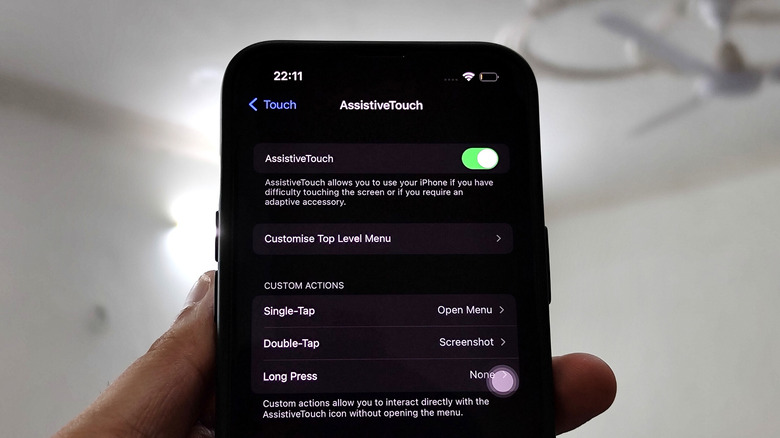
Another feature enables you to take screenshots without pressing multiple buttons at once; it is called Assistive Touch and is available in the Accessibility section of the Settings app. You'll have to enable the feature if you haven't used it before (via Apple). Once you enable Assistive Touch, you'll notice a translucent white circular icon that remains over the top of other items on display.
Tap on "Customise Top Level Menu," select any option, choose Screenshot from the list of tasks that appear, and then tap on Done. Now, you can tap on the white circular icon and select the screenshot option whenever you want to capture a screenshot. The Assistive Touch menu can also help you with other things, such as locking your iPhone, opening Control Center, and more.
It might surprise you, but you can take a screenshot by tapping twice or thrice on the back of the iPhone 14 or iPhone 14 Pro. To make this happen, open the Settings, head to Accessibility, and select Touch under "Physical and Motor." Scroll to the bottom and turn on Back Tap. Now, you'll see two options: Double Tap and Triple Tap. Select either one of them and choose Screenshot in the list of tasks. Assuming that you've selected Double Tap, tap your iPhone's back twice to take a screenshot. Isn't that amazing? You can also assign tasks such as opening the camera, Control Center, and activating Siri, among others.
Ask Siri to take a screenshot for you
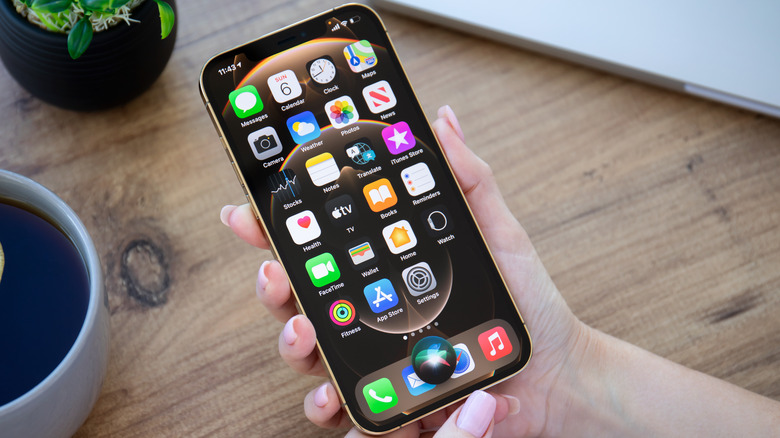
As a bonus method, you can also ask Siri to take screenshots. Apple's voice assistant is quite capable. While it can set alarms, take notes and browse the internet for you, it can also take screenshots. Simply wake up Siri by saying, "Hey Siri," and then tell it the command, "Take a screenshot." As soon as you say this, the animated icon that resembles Siri will disappear and your iPhone will take a screenshot on its own.
The screenshot then appears as a thumbnail for a brief period of time, but how do you find the images later on? By default, all the screenshots are saved in the Screenshots album in Photos as PNG images. You can change that by opening the thumbnail, tapping on done, and selecting Save to Files. Your iPhone will show a couple of locations, including the folders you've created. Further, you can even create a new folder and save related screenshots to it so that you can locate them in the future.
How to edit the screenshots on your iPhone 14
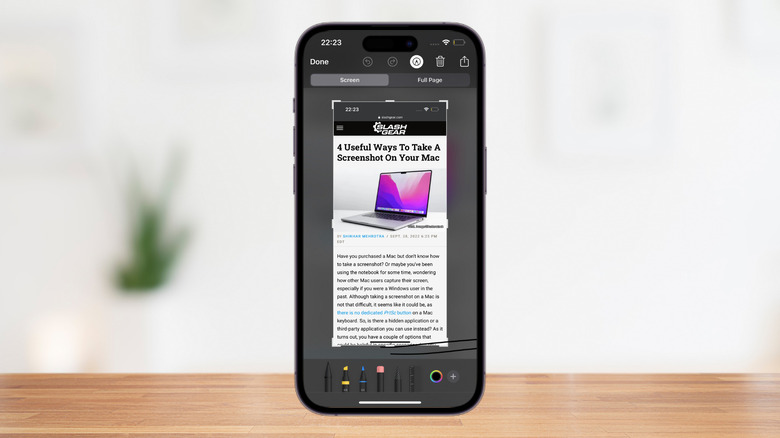
There is a good chance that you will want to edit the screenshots you take on your iPhone. To do that, you don't need to download or use a third-party app. Apple provides Markup tools that help you edit a screenshot. After you take a screenshot, tap on the thumbnail that appears on the screen. Now, tap on the pencil icon that appears toward the top. Select the pencil in the bottom left corner to write something on the screenshot. To highlight some text, use the highlighter next to the pencil. You can even select the ruler and draw straight lines with your finger (via Apple).
Apart from this, tapping on the plus icon near the bottom right of the screen unlocks various options. You can add a description to the screenshot, add a text box and type over it, insert your signature, magnify a specific portion and control the opacity. Once done, you can share this screenshot directly to your contacts via Airdrop, Messages, Mail, social media apps, or even print it through a connected printer.