5 3D Printer Projects That Can Upgrade Your Smart Home
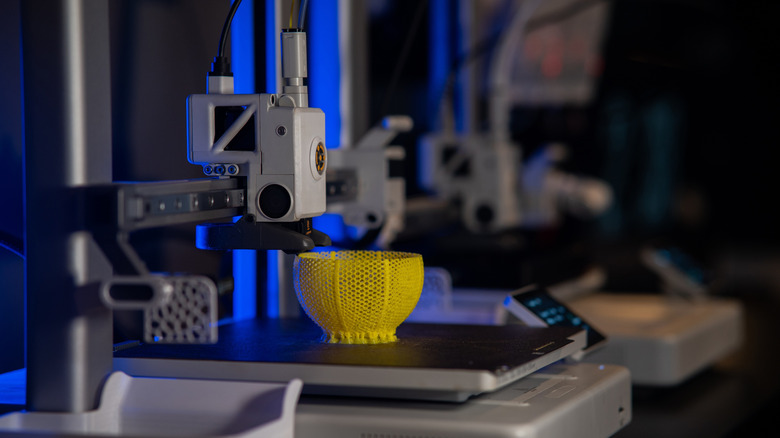
If you're a DIY enthusiast, a 3D printer is pretty much a must-have at this point. The fact that you can design and print your own items based on your requirements around the house unlocks a whole world of possibilities. From useful kitchen gadgets to clever home improvement products, 3D printed items not only add more functionality but also give your home a more customized, unique look.
Apart from these everyday items that you can place around the house, you're in for a treat if you have smart home gadgets along with a 3D printer. Some smart home gadgets and accessories can either work better or provide extended functionality when clubbed with an add-on part. Another use case would be to provide better housing for your smart home gadgets so that they continue to work in the background without occupying space or displaying messy cables.
We've found these solutions, thanks to hundreds of thousands of online models listed on several forums. Whether you have a device from the best smart speaker brands or a smart lightbulb, here are some nifty accessories you can print to upgrade your smart home. Some of these items can even add to your smart home functionality instead of simply improving existing gadgets. The best part about 3D printing is that you can use any color of filament to suit your home's decor, and you'll often find multiple iterations or remixes of a design that you can pick based on your preferences.
Amazon Echo socket mount
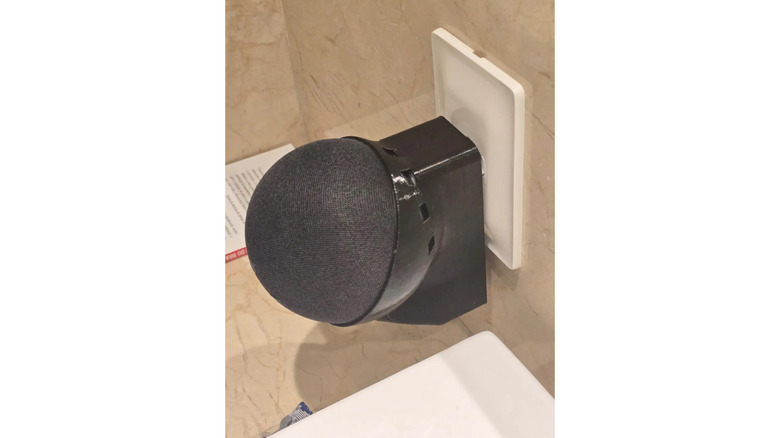
There is a specific kind of satisfaction that comes from 3D printing a solution to a problem you didn't realize was bothering you until it was gone. Most people keep their Amazon Echo on their kitchen counter or a random shelf, with its power cord lying around and ruining the aesthetic of your home. While it works fine this way, it can feel like the speaker is another piece of clutter.
So if you're looking for a cleaner solution, give this Amazon Echo socket mount by Marcel Nóbrega a shot. The design is simple and no-nonsense. It uses the adapter plug itself as the anchor, suspending the Echo directly over the outlet. Do note that, as per the maker, this is an easy print without requiring supports, and can be done in a few hours even with an entry-level printer. The real magic, though, is how smoothly this solution hides the cable. Being able to coil that cord inside the casing means the only thing you see is the Echo itself.
You can see the light ring comfortably from across the room, and the mics are also exposed well. The best part is that you can now use the empty space to keep something else, and you no longer have to deal with a suspended wire that's essentially a trip hazard if you have kids or pets walking around. Considering the Echo Dot is going to stay indoors, you can print this using PLA itself. It's also worth noting that the design is tested to work with the Echo Dot 4 and Echo Dot 5 when used with the original adapter that shipped in the box.
Philips Hue table lamp

If you have a spare Philips Hue smart bulb lying around, consider this your sign to 3D-print the Philips Hue Table Lamp by DSL Design that looks much better than a simple one you can buy at a local store. You can either use it as a design element on your desk or even as a night lamp on your bedside table, especially since you can control the brightness and color of the bulb.
The material choice is critical for a project like this. We highly recommend printing in PETG or ABS rather than PLA. Because lamps are often left on for long durations, PLA's low thermal resistance puts the shade at risk of disfiguring over time. Further, as per the maker's specifications, this model is designed for Philips Hue LED bulbs. You should strictly avoid incandescent or CFL bulbs, as the excessive heat they produce could compromise the plastic holder and shade. The maker also suggests printing at a 0.2mm layer height with 2 walls and 15% infill.
To really lean into a premium aesthetic, consider printing the base in a wood-finish filament. This creates a beautiful contrast against the diffuser, resulting in a piece of home decor that enhances your home's atmosphere. The light bleeds through the layers, giving it a warm glow that you just can't replicate on mass-produced plastic lamps. It's a functional and stylish print that puts the bulb to good use. Notably, you will need a bulb holder to put the contraption together. Once you do, though, you can shift it around the house and use it for various purposes.
Drip irrigation system
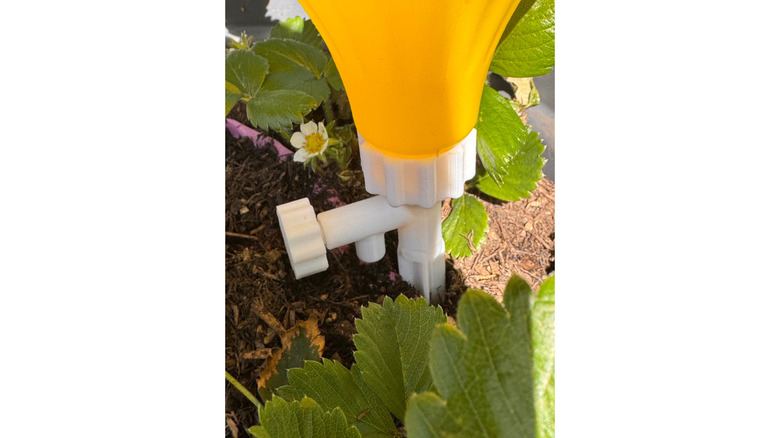
Tired of overwatering or underwatering your plants? Well, GRDesigns3D has a perfect solution that not only helps with perfectly watering your plants but also saves water — the modular drip irrigation system set. This product delivers water directly to the roots, which makes it an ideal fit during periods of high heat or while you're on vacation.
The kit consists of various emitters, splitters, and connectors, making it modular. Whether you need a fine mist for delicate seedlings or a heavier flow of water for grown shrubs, you can print as many irrigators as you want for your garden. While the exact print time varies depending on your machine and how many parts you choose to print at once, the maker says that it would take around 3.5 hours to print one set.
The designer suggests a brilliant low-tech hack to maximize the efficiency of the irrigation system for larger pots. They say placing a piece of cotton cloth in a star pattern, radiating outwards from the drip point, into the soil improves moisture distribution throughout the pot, reaching a wider root zone, effectively eliminating the need for extra nozzles. While the maker says the print doesn't require supports, the model has several overhangs that will certainly require supports to print. Furthermore, as per the manufacturer — while PLA works for indoor pots, using PETG or ASA is recommended for outdoor use to prevent the plastic from deforming in the sun.
Apple TV mount
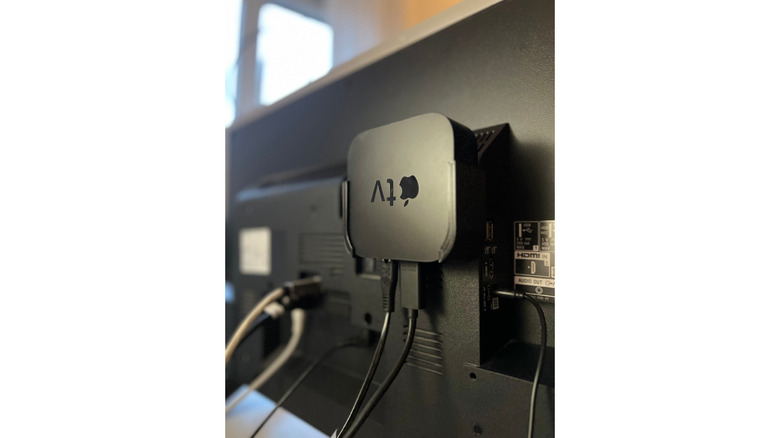
Ever looked at the cable spaghetti behind your TV and wished for it all to disappear? The major part of this mess is caused by external devices being plugged into your TV. If one of those devices is an Apple TV streaming box, and you prefer a clean aesthetic, this Apple TV 4K mount is exactly what you need. It can be easily attached directly to your TV's VESA mount using just a few M6 screws. You don't need additional magnets or fasteners, which is a big plus.
The mount allows you to tuck the device neatly against a wall or even hide it right at the back of your television, reclaiming your TV stand for more important things. Since you no longer have to place the streaming box on the stand, you can also avoid cables from showing up. Simply mount the Apple TV on the rear of the TV and wrap the cables around the mount. Even though the new Apple TV runs cooler than its predecessors, the designer included a smart, ventilated base to ensure airflow isn't restricted.
It's also an excellent solution for those who have wall-mounted their TV, since connecting an external device in such a setup can be a hassle. The mount takes into account the ports on the streaming box, so you can insert the power cord and HDMI cables without any issues.
Philips motion sensor angular mount
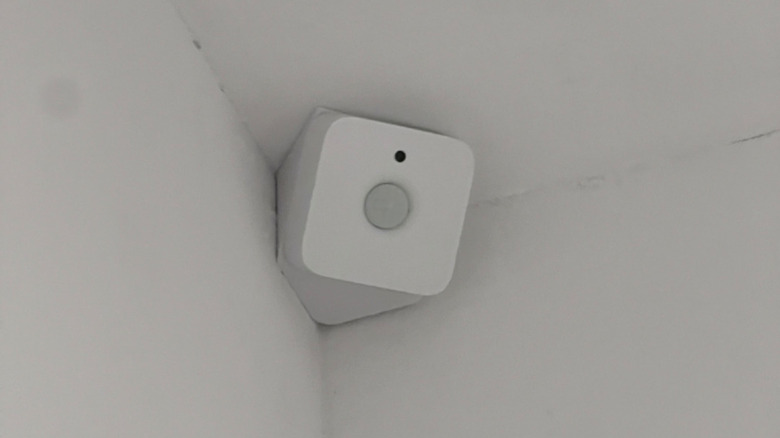
An issue with several smart home sensors, such as the Philips Hue motion sensor, is that they don't necessarily trigger at the right moment. The Philips Hue motion sensor angle mount offers a clever and easy solution for such a problem. The maker has specially designed a wall mount that fixes one major issue. The stock mounting options often leave blind spots, especially in narrow hallways. This design provides an angled wedge that allows you to physically tilt the sensor toward the area where motion is most likely to occur. You can install this mount at the corner of the wall and ceiling. If you have multiple sensors, you can print several mounts for different parts of the house or office.
By orienting the sensor more precisely, you can significantly improve the speed and reliability of your automated lighting, ensuring the lights turn on the moment you enter a room rather than halfway through it. To achieve the best results, the designer recommends printing the mount with a 0.2mm layer height, 3 walls, and 15% infill. This combination ensures the mount is sturdy enough to be screwed into a wall. It also prints without supports. We would recommend printing it in a filament that matches the color of your wall, so that it blends in seamlessly. Because the sensor itself is lightweight, you don't have to worry about the mount falling off.