5 Settings You Might Want To Change After Updating To macOS Tahoe 26
Since 2013, Apple has consistently named macOS versions after famous nature spots in and around California. This year, the company continued the tradition by naming the latest macOS version "Tahoe," inspired by Lake Tahoe. At the same time, Apple introduced one of the biggest changes to its OS branding by switching to more consistent year-based version numbers across its entire OS lineup. Under the old system, this year's macOS would've been macOS 16, but it is labeled as macOS 26. Similarly, iOS 19 is officially iOS 26.
After being in beta since June 9, macOS 26/Tahoe is finally out to the public. The OS brings a lot of new features to MacBooks, including a new Liquid Glass design, customization for Control Center and folders, new options for making Genmojis, the ability to see Live Activities straight from a connected iPhone, an all-new Phone app, and more. That said, the launch hasn't been entirely smooth. Tahoe has also triggered one serious issue, particularly for MacBook Pro models with a Touch Bar. Some users report that the new macOS Tahoe makes the Touch Bar laggy and unresponsive, while others say that their Touch Bar display area has disappeared entirely. Currently, the issue is unresolved, and Apple has yet to release a bug fix.
Beyond these early hurdles, macOS has plenty to offer. And just like you would tweak a few options when setting up a brand-new MacBook, there are a few settings in macOS Tahoe that are worth tweaking.
Reduce Liquid Glass transparency
Apple took inspiration from visionOS and introduced the Liquid Glass effect at WWDC 2025. The new Liquid Glass software design was applied across all of Apple's OS lineup — iOS, iPadOS, macOS Tahoe, watchOS, and tvOS. The Liquid Glass effect is visible across all elements of the system, including icons, notifications, the Control Center, docks, and widgets. In fact, even the light and dark modes have that glass effect. While the new UI is a major redesign from Apple, plenty of forums and Reddit threads show that it isn't universally beloved.
Overall, Liquid Glass has received mixed reviews, with some loving it, while others simply hate it. As one Reddit user said, "it's change for the sake of change that mostly makes things worse across all of Apple's OSes." If you're an Apple user that can't stand Liquid Glass, you might want to reduce its transparency effect.
On your MacBook running macOS Tahoe, simply head over to System Settings > Accessibility > Display and toggle Reduce Transparency on. This makes the UI elements more visible while also improving performance, since you're turning off a visual effect that uses CPU and GPU resources to work. The performance improvements will be more noticeable on older MacBooks.
Change the theme, folder color, and lock screen clock
With macOS Tahoe, Apple brought iOS 26-like customization options to Mac PCs. The latest version of macOS gives plenty of options to the user to tweak the visual appeal of the software and make it their own. By heading over to System Settings > Appearance, you can access a ton of customization options and tweak them as per your needs.
First things first, you can switch between light and dark modes, or select Auto to let the system switch between modes in sync with the day-night cycle. You also get to change the theme of your MacBook and the text highlight color. A fresh addition to customization is the 'Icon and widget style' option. You can choose to set the Liquid Glass look, dark mode, clear mode, or make everything tinted. macOS Tahoe also adds the ability to change the folder color, also letting you change the opacity of the Liquid Glass effect. You can also use symbols or an emoji for your folder icon.
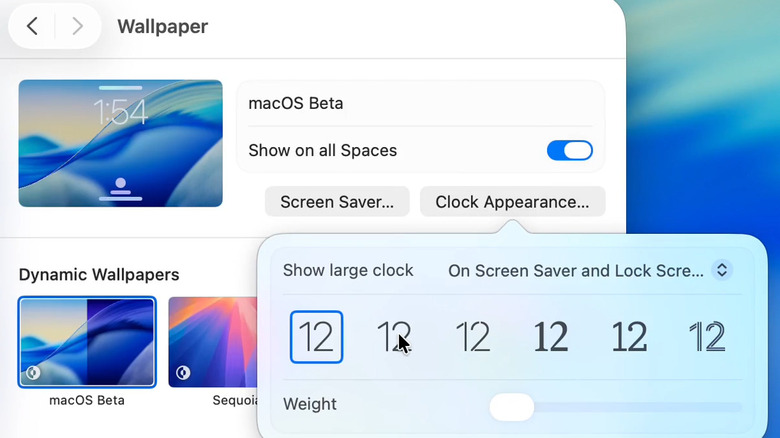
Since macOS Tahoe brings several features from iOS 26 on board, you can now also change the look of the lock screen clock. Navigate to System Settings > Wallpaper > Clock Appearance, and select from the different clock styles. You can also adjust the weight, which is basically the thickness of the clock font.
Enable clipboard history and add quick keys
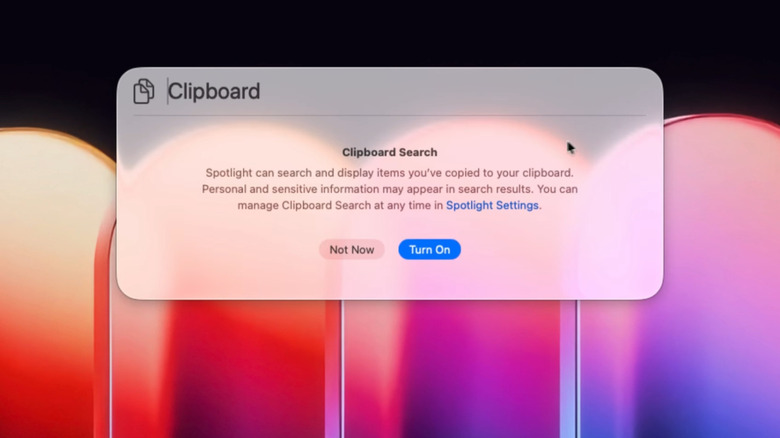
With macOS Tahoe, Apple has finally added a multiple-item clipboard history feature that keeps a record of everything you copy or cut. Windows and Android have had this feature for years, and it is finally available on macOS. The clipboard history feature is accessible via Spotlight, which displays all copied contents — text, images, files, and more. By default, the feature is off, so you have to manually turn it on.
To turn on clipboard history in macOS Tahoe, you need to summon Spotlight by pressing Command + Spacebar > click Clipboard > and select Turn on. Do note that since macOS will be recording everything you copy or paste, personal or sensitive information will also show up in search results. Once enabled, you can access clipboard history more quickly by pressing Command + Space + 4, which skips Spotlight and opens the clipboard history directly.
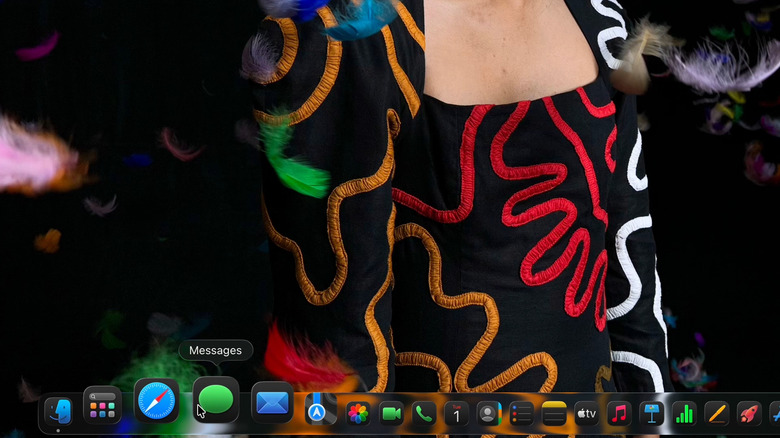
Another cool addition to Spotlight is quick keys. This function allows you to quickly access key functions within Spotlight by typing just a few letters. For instance, Apple has assigned "AR" to add a Reminder, and "SM" to send a Message. To set up your own quick keys, open Spotlight by pressing Command + Space, then press Command + 3, and finally type a task name like "calendar". Click Add Quick Key to the right of the new event and type the characters you want to use to access it quickly.
Customize the Control Center

Apart from integrating several iOS 26 customization options, the Control Center in macOS Tahoe also gets an upgrade. In simple words, you can make the Control Center look the way you want. You can expand or squeeze items, add or remove options, or create a separate area where you can put your most-used controls. To get started, open the Control Center by pressing the button in the top-right corner of the screen and select the Edit Controls button at the bottom to start customizing.
One of the best points to start off is to look at what you already have in the Control Center. You can remove things that you don't find useful, and in the process make room for the ones you want. Once you hit the Edit Controls button, you will find all the available functions that you can add to the menu. You can right-click on any item and select 'Add to Control Center.' Keep in mind that you can't just keep adding stuff to the Control Center, as it has limited space.
The good thing is that, as soon as you go beyond the limited space, your MacBook will automatically create a new page of the Control Center. To access the newly created page, you need to press the plus (+) button at the top, beside the Control Center button.
Turn off Results From iPhone Apps in Spotlight's settings
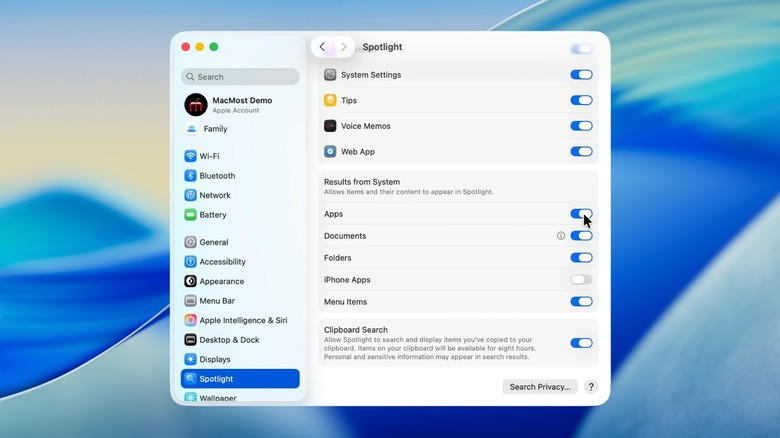
Among all the likable things that Apple has tried to bring with iOS integration into macOS, the option that shows all of your iPhone apps on the Spotlight search is one of the most notable. This feature is based on iPhone mirroring; Because of this, you may see double apps, one mirrored from your iPhone and one installed on the Mac. iPhone apps in Spotlight show up with a small iPhone icon in the bottom right of the App icon, indicating that it is your iPhone's app.
Apart from Spotlight, the iPhone apps also show up in the app launcher. To remove iPhone apps from the app launcher, click on the ellipses (the three dots) button in the top right and deselect the "Show iPhone Apps" option. Next, to remove the apps from showing up in Spotlight, head over to System Settings > Spotlight, scroll down, and under the Results from System section, toggle off the iPhone Apps option.