How To Customize Your MacBook's Trackpad Gestures
Say what you want about Apple's expensive hardware, but its MacBooks are some of the best-built laptops money can buy. As mentioned in our review of the MacBook Air M4, the fact that you get twice the amount of RAM for a cheaper starting price than last year actually makes it a great value offering.
Navigating around apps on macOS will have you moving your cursor a lot — which is when you also notice the MacBook's impeccable trackpad. It's big, made from glass, and clicks with precision and satisfying haptics. Though most might be familiar with the usual two-finger swipe gesture to scroll up or down pages, macOS is best experienced when you familiarize yourself with the several trackpad gestures that make using a Mac easier.
You get a few useful gestures built into the operating system, and macOS does a decent job of demoing them — though you do have to go looking for these options. If you've just picked up a MacBook and are new to macOS, here is how you can use and customize its trackpad gestures to speed up daily operations.
Using trackpad gestures on your MacBook
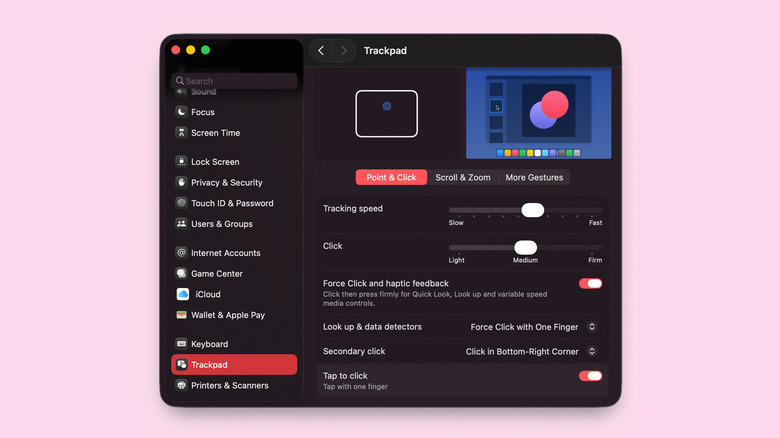
As stated previously, Apple has baked in a few handy gestures into macOS that work with the MacBook's trackpad or a Magic Mouse. You can customize or view these options through the System Settings app. You can either look for it via a Spotlight search or click on the Apple menu in the top-left corner of the screen to access it. Then, scroll down and navigate to the "Trackpad" submenu.
Here, you can immediately customize how single-tap behavior works. This includes the actuation force of your trackpad — remember, it doesn't actually press down like most trackpads on other laptops do. This can be useful to fine-tune just how much pressure you'd like each click to require. You can also enable or disable haptic feedback, which is what gives you the convincing illusion that you've pressed down on something.
Ex-Windows users would be delighted to know that they can change the secondary click trigger to when you tap the right side of the trackpad. You will find a few toggles to adjust the scroll and zoom options, but the final "More Gestures" tab is where most of the fun is.
Here, you can demo existing macOS trackpad gestures, including Mission Control, swiping between full-screen apps, accessing the notification center, and taking a peek at the desktop. Most of these shortcuts let you tweak the gesture actions to include three or four fingers — whichever fits your needs better.
Creating your own trackpad gestures on Mac
The built-in options offer a decent level of customization, and even let you tinker with things like the scroll direction on macOS — but you can go one step further. There are several third-party utilities you can download on macOS to make the experience more personal, and BetterTouchTool is one such app that lets you customize your MacBook's trackpad gestures to a greater degree.
The app can be used to customize not just the MacBook's built-in trackpad, but also connected peripherals like the Magic Mouse, Apple Remote, keyboard shortcuts, or the buttons on any regular mouse. It can also be used to set up window snapping, though macOS Sequoia's window tiling shortcuts let you do it in a similar fashion.
You can assign one, two, three, four, five, or more finger shortcuts — and can even set up multiple actions to the same trigger. If you ever run out of the pre-configured gestures, the app conveniently lets you draw your own squiggly lines and assign them to any actions. The app makes the process of creating gestures and configuring actions quite easy, and you'll feel right at home if you've set up Siri shortcuts on your iPhone before.
For all that it offers, BetterTouchTool is a paid app — though first-time users can avail a 45-day free trial. This utility really is meant for power users, and most of the population would be just fine configuring the built-in trackpad gestures on their MacBooks.