How To Undervolt Your Steam Deck (And Why You Might Want To)

Overclocking has, for decades, been something of a rite of passage for computer geeks everywhere. Overclocking your gaming PC can push the CPU and GPU to a new level of performance beyond what the manufacturer designed it for, giving you every last drop of "bang" for your buck. Overclocking used to involve a lot of BIOS tinkering and major modifications to your cooling system, but these days, it can be done safely and conveniently through your GPU's settings and third-party apps. Steam Deck users, unfortunately, don't have that luxury; you'll have to boot from a USB to overclock your device. But what if we told you there was an easier alternative to overclocking on the Steam Deck that doesn't risk turning your beloved handheld gaming rig into a hot potato just to squeeze a few more frames out? That alternative is called undervolting.
Undervolting can be done by anyone, requires no extra software or tools, and despite what the name seems to imply, it can improve Steam Deck performance in a number of metrics. Today we're going to discuss what undervolting is, what benefits it brings, what potential risks there are, and — if you're sold on the idea — how to do it yourself. We extend a special thanks to CryoByte33, who originally introduced this concept to the Steam Deck community. We'll reference his expertise frequently throughout this article so you have a tech professional's assurance.
The silicon lottery
To understand how undervolting works, you need to understand the core concept behind it: the silicon lottery. Chip manufacturers like TSMC (which makes AMD processors and graphics cards like the Steam Deck APU, and 90% of advanced chips globally) print transistors onto silicon wafers that then get cut into CPUs, GPUs, and whatever else. This system is not perfect. Unavoidable defects due to the manufacturing process result in a yield of 70-90%, and most chips have some amount of defects. Chip makers use a process known as "binning" to test each chip and decide — based on the extent of the defects — which chip model to market it as.
As a result, no two chips of the same model will perform identically. In CryoByte33's words, "Some processors barely meet the required quality... [CPU manufacturers] need to make sure that all [chips] of that model perform similarly, so they... keep all of them at the speed and voltage of the weakest link." This means that some chips of a specific model — with fewer defects — may be able to perform at the same level as their peers while using less power. You "win" the silicon lottery if your Steam Deck has one of those chips, but there's no way to find out until you undergo the undervolting process.
When you try out the steps below, keep in mind that there's a chance you may have "lost" the silicon lottery.
What is undervolting?
Unlike laptops and desktops with a separate CPU and GPU, your Steam deck has an APU. An APU is an "accelerated processing unit," a CPU with integrated graphics on a single die; APUs are common in mobile devices like smartphones where the addition of a dedicated GPU would increase the size, power requirements, and cost. Undervolting, judging by the name, is pretty self-explanatory. It's the process of providing less voltage to the APU. Pulling off the undervolting process once required booting the Steam Deck from a USB, but in the recent 3.5 update, you can do so directly from the stock BIOS.
All you're doing when undervolting is stepping the Steam Deck's various APU components down by 10-millivolt (mV) increments — feeding these components less power — then testing the Deck's performance at those new settings. If you won big in the silicon lottery, you may be able to step your Steam Deck down by as much as 50 mV. If you didn't win the lottery, you may only be able to go down to -10 mV, or you may be unable to undervolt at all. The process could take a couple of hours. Eventually, you'll reach a sweet spot where you can go no further, and then your Steam Deck will be successfully undervolted.
Note: Undervolting is not synonymous with underclocking. Rather than slowing down your Deck, undervolting may actually make your chip perform better while using less power.
The benefits of undervolting

So why undervolt? There are three primary benefits: keeping your Deck at cooler running temperatures, reducing fan noise, and improving battery life. That last one is a huge deal since battery life is widely considered one of the Steam Deck's biggest weaknesses. Some games may also experience improved, more stable performance after undervolting. According to Cryobyte33, "Undervolting can... help maintain higher speeds for longer, which can help improve performance." His testing revealed that for most games, undervolting did not meaningfully harm performance compared to a non-undervolted Steam Deck. However, in every instance, the APU ran at much lower temperatures, sometimes 5-10 degrees cooler.
The biggest gains are seen with the battery. CryoByte33 got up to a 16% boost in battery life, or an extra 15 minutes of game time on a demanding title — and some games pulled up to 2 watts less energy. There was also a very small reduction in fan noise, about 1 decibel below stock settings. All things considered, there is virtually no reason a person wouldn't want to undervolt their Steam Deck. We can't think of a single gamer on the planet who'd turn down lower temps and better battery life. Undervolting won't prevent you from overclocking, either. Cryobyte33 actually recommends having your Deck undervolted and overclocked at the same time. More on that later.
The risks of undervolting

Overclocking always carries an inherent risk since, even if done correctly, the increased stress on your processor will reduce its lifespan. Undervolting, on the other hand, is virtually risk-free, and the risk it does carry is reversible. Follow the steps carefully and methodically, of course, but rest assured that making a mistake won't brick your device. Undervolting too far could cause your Deck to experience serious performance degradation, or prevent it from booting at all. If that happens, a simple CMOS reset will restore your BIOS settings to default and your Deck will be back to the way it was before.
Using this method won't risk you needing a physical hardware repair of any sort for your Deck. That said, CryoByte33 says he is aware of one case where an undervolted Steam Deck needed an RMA from Valve — but to be clear, the user who did the RMA was "pushing the Deck way too hard." Plus, anyone with the know-how could fix it with the right tools at home, no RMA necessary. Long story short, don't drive your Deck to its absolute limits and you will be fine. And even if you do push it too far, there will probably always be a fix available.
DISCLAIMER: SlashGear takes no responsibility for anything that happens to your Steam Deck by following this guide.
Prepare your Steam Deck
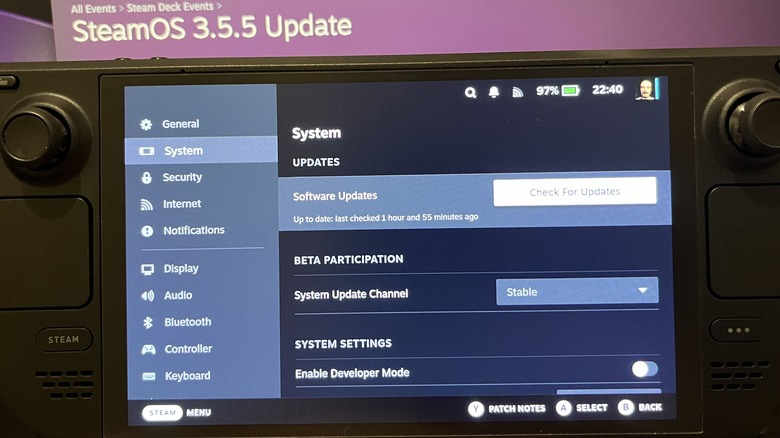
The original undervolting process outlined by CryoByte33 was somewhat tedious — and that wasn't the fault of CryoByte33. You needed to boot your Deck into Smokeless_UMAF simply because Valve did not officially support undervolting controls. Valve later introduced native settings in the Preview channel, which wasn't exactly ideal for users who prefer Stable's, well, stability. However, since Stable update 3.5.5 and firmware 118, anyone can access undervolting settings from their stock BIOS, and no additional software or workarounds are required. Before you get started, hit the Steam button, then head to Settings > System > Software Updates and press Check for Updates. Apply the latest Stable update and restart your device. Once it powers back on, you're ready. You can use a USB mouse if you like, but the arrow keys work fine to change BIOS settings.
We recommend avoiding Preview and Beta channels since they are for testing purposes and therefore exhibit more bugs. Make sure to set aside a couple of hours to undervolt your Deck. You'll be booting into your BIOS, changing settings, rebooting, and stress-testing your Deck with a game — and repeating that sequence multiple times. A proper undervolt could, based on personal experience, take anywhere from 2-4 hours. Remember to keep your Steam Deck plugged in during testing since you'll easily consume all the battery. Bonus tip: Have a YouTube video or TV show playing in the background to keep yourself entertained.
Change voltage offset in the BIOS
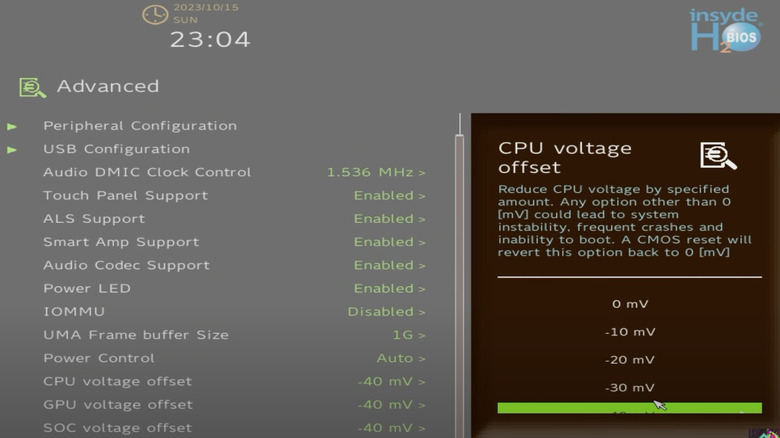
Hit the Steam button, then Power > Shut Down . Your Deck will be fully off when the fan stops blowing. Now, hold down the Volume + button and press the power button at the same time. Let go once you see the Steak Deck logo. In the BIOS menu, head to the Setup Utility on the bottom right (use the arrow keys, not the thumbsticks) and drop down to Advanced. At the bottom, you'll see the following three options: CPU voltage offset, GPU voltage offset, and SOC voltage offset. These are your undervolting controls. They're set by default to 0 mV and allow you to decrease in -10 mV increments down to -50 mV.
Decrease one setting by -10 mV and reboot — never decrease more than that, and never for more than one setting at a time. So, for example, you'll first decrease the CPU offset by -10 mV, reboot, then decrease the GPU offset, reboot, and then SOC offset, reboot, and so on. You'll repeat this process until you get as low as your Deck can go on all settings. For now, having made the first -10 mV reduction, hit Save & Exit to reboot your Deck. It should start up just fine, but if it doesn't, you unfortunately lost the silicon lottery. Do a CMOS reset by holding Volume -, the three-dot button, and the power button all together until you see the logo.
Test your Steam Deck

Just as essential as changing undervolting settings is testing how your Steam Deck fares with them. This is where you will be spending the bulk of your time. After each -10 mV increment, you need to play a demanding (preferably AAA) game that stresses your Steam Deck — i.e. makes it get hot and makes the fan blow at full. We recommend a Steam Deck-verified, single-player title you can jump right into like Cyberpunk 2077 or The Last of Us. There are also plenty of other free AAA Steam Deck games every owner should have installed. Avoid online games, since you'll probably get stuck waiting for matches. Make sure the game you choose is one that you've played before, and whose performance you're familiar with. Consider starting a new game; you might corrupt your current save if the Deck crashes.
Now, play that game for about 5-10 minutes, preferably even longer. Pay careful attention to how the game performs and how stable it seems compared to prior performance. Does the game suddenly crash for no good reason? Does it have more frame drops and freezes? Notice any uncommon bugs? These are pretty clear signs the undervolt is too much for your Deck, and you need to revert it in the BIOS. If the game performs well, congratulations. You can continue dropping the settings and see how big of a silicon lottery winner you are.
Repeat the process

This is the part where you hit play on that YouTube video or TV show and repeat the above steps: drop one APU component by -10 mV, reboot your system, perform a stress test, and repeat. Don't just play mindlessly; really pay attention to how stability changes after each increment. It's a good idea to keep the test consistent each time, too. For example, you could re-play the same side-mission in Cyberpunk 2077 so you're putting your Steam Deck under a uniform performance load. Inconsistent testing could possibly mislead you into thinking your Steam Deck is getting better — or worse — performance after the most recent undervolt setting change.
Testing one setting at a time isn't just to avoid bricking your system, it's so you know exactly what to revert if things go awry. It might be worth taking a picture of your Steam Deck's BIOS screen after changing each setting so you don't forget which one it was. If you're really dedicated to precision, you could even record a video of yourself playing so you can compare performance at that setting with performance during the next round of testing. Again, don't freak out if your Steam Deck crashes after an offset decrease. Calmly revert that setting or — if it doesn't boot at all — perform a CMOS reset, and you'll be back to normal.
Pay attention to long-term performance

Once you've found that silicon lottery sweet spot, snap a picture of the BIOS screen with your phone and keep it for future reference. Now, go and play your games as you usually might. In most cases, everything should work flawlessly. Speaking from personal experience, though, there is a small chance the undervolt's performance degradation won't rear its ugly head until after the testing phase. The game you initially used might be better optimized than other titles you'll play later on down the line, giving you a false understanding of your Steam Deck's actual undervolting capabilities.
You might play a Steam Deck-verified game some weeks or months later that inexplicably has terrible performance at recommended settings. Check online for Steam Deck gameplay videos of the same title, ensure your graphics settings match the videos, and then compare; if your performance is visibly worse, then the undervolt is likely to blame. Research the game in question to find out whether it's CPU-bound or GPU-bound (how heavily it relies on CPU or GPU specifically), then bump up the CPU or GPU offset to see if that fixes the problem. You may well need to raise everything by +10 mV across the board until the performance issues desist. Having that BIOS picture you took will be a huge help so you don't forget how low your Steam Deck can go.
Further performance enhancements and recommendations
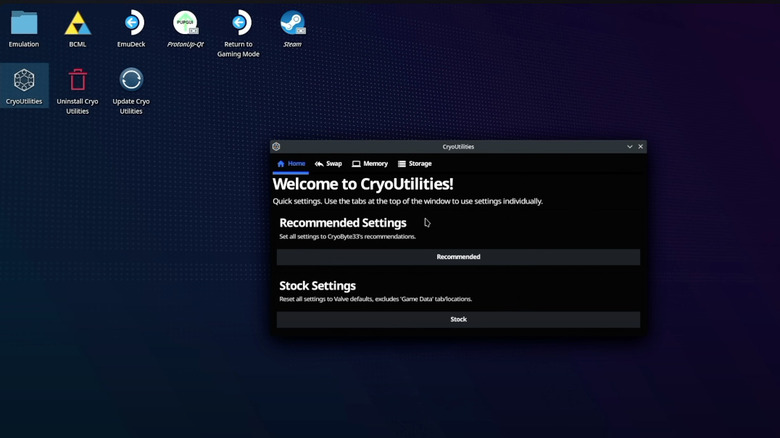
Undervolting is worth doing for virtually any Steam Deck user, but for those who want to keep making modifications, your undervolt won't stand in the way. CryoByte33 himself says that undervolting actually makes overclocking more effective since it "saves you some power and heat, then you use that overhead to push your overclock further." If you'd rather not take the hit to your battery and your device's longevity, though, there are other settings ruining your Steam Deck experience. For AAA gamers, we highly recommend installing CryoByte33's CryoUtilities, which makes some changes to VRAM and memory swap and results in framerate improvements sometimes up to 43%. This process is easy and won't take longer than 10 minutes.
To keep your Deck nice and frosty, disable the "Updated Fan Curve" setting, which lets your fan run at higher RPMs — provided you don't mind the noise. Consider putting a frame limit on demanding games for better FPS stability. Make sure to only enable a particular setting via in-game settings or the Quick Access Menu (the three-dot button) to avoid unnecessary performance hits — so for example, disable FSR in Quick Access if it's already enabled in-game. Consider dropping the TDP for games that have minimal requirements, such as those with retro pixel graphics, to improve battery life. We've only scratched the surface, but small changes like these can add further improvements to your Steam Deck's undervolt.