5 Photography Tips And Tricks Every iPhone Owner Should Know

Apple's iPhones are among the best point-and-shoot smartphone cameras out there. When snapping a picture or even recording a video, your iPhone takes care of everything, from adjusting focus, exposure, white balance, HDR, and so much more, while all you have to do is press the shutter button.
Although the Camera app is pretty straightforward, there are a couple of things that aren't obvious at first, but once you get to know them, they'll instantly help you take better photos or videos.
For instance, a Lens Correction option in the Camera settings reduces distortion on images clicked with the ultra-wide or front camera. If you feel like your iPhone isn't capturing accurate colors while recording videos or switching between different shades of white, enabling the "Lock White Balance" option helps improve the accuracy.
While these are just some hidden camera settings on your iPhone, we have compiled a list of five photography tips and tricks every iPhone owner should know. Let's get started.
Locking focus and adjusting exposure
Although iPhones are great at figuring out the subject and focusing on it, there are some scenarios where you might want to lock the focus, especially when the subject or the background is in motion.
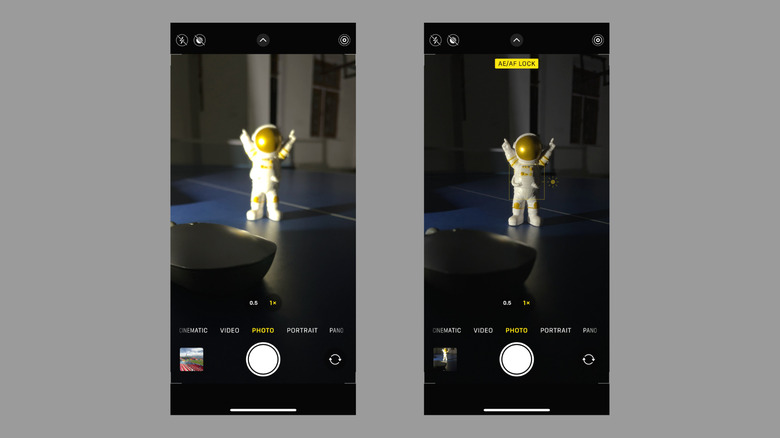
To lock focus and exposure on a subject or the background, if you have something creative in your mind, press and hold on a point in the viewfinder until you see "AE/AF Lock" at the top and a yellow square at the focus point. You can use this trick to click a picture in tricky scenarios where the iPhone fails to adjust focus or exposure.
The moment you lock on something, you'll see the yellow square (depicting the point of focus), and, along with it, you'll also see a sun icon. This is the magical exposure dial that can turn a regular scene into an artistic photograph or help reduce flicker in a scene. To adjust exposure, all you have to do is slide the dial up to increase the overall brightness or slide it down to decrease brightness.
Notice how the iPhone couldn't focus on the figurine in the image on the left and how locking the focus/exposure resulted in a better-looking photograph.
Explore and use the available Composition options
Composition refers to the general placement of the subject, the background, and the resultant image. The Camera settings menu on your iPhone has a couple of options to help you improve the overall composition of a photo or a video.
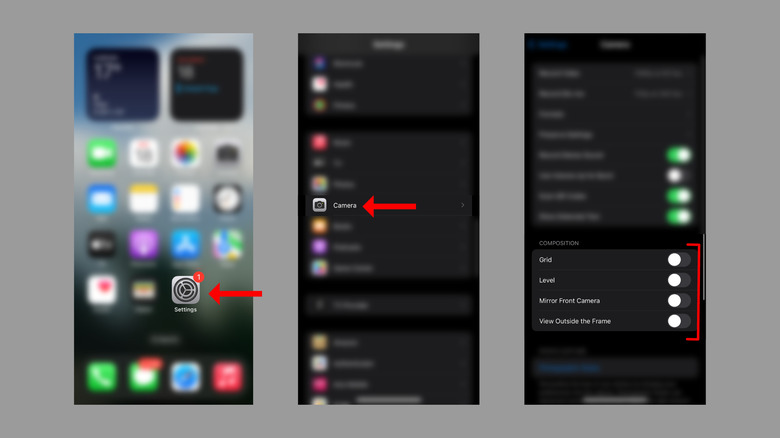
First, head to Settings > Camera, and scroll down until you see the "Composition" section. Here, you will see four options: Grid, Level, Mirror Front Camera, and View Outside the Frame.
As you enable the first option, Grid, you'll see that your camera's viewfinder shows two vertical and two horizontal lines, dividing the entire scene into nine equal portions. Per the rule of thirds, keeping the subject along the points of intersection of the grid lines makes an image more compelling and aesthetic.
The second option, Level, tells you whether you've held the camera straight or not. This could be very useful, especially if you're learning to click pictures from your iPhone or you're an enthusiast wanting to ensure all the images are leveled.
By default, the iPhone's front camera flips the images horizontally. If you don't want this to happen, simply enable the Mirror Front Camera option, and you're good. Enabling the "View Outside the Frame" option lets you peak at the scene outside the frame to show what you could capture using another lens.
Control flash and night mode
Our next photography tip for you is taking manual control over your iPhone's flash.
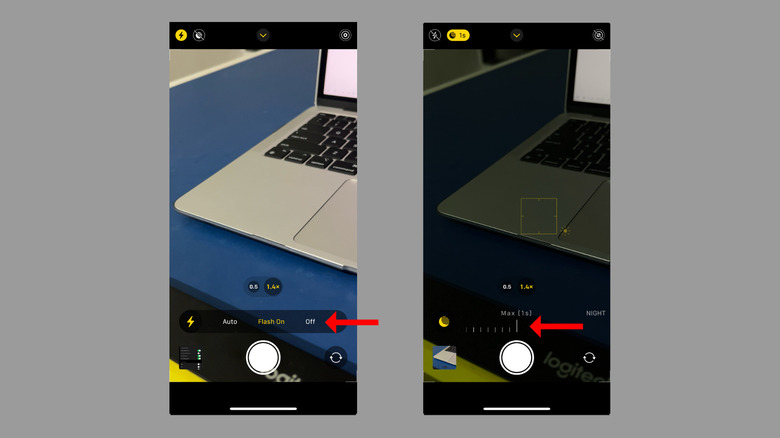
Swipe up on the viewfinder screen while clicking a picture or recording a video and hit the flash icon. You'll see three options: Auto, On, and Flash Off. While Auto will let the camera decide whether it needs flash, Flash Off deactivates it. However, if you need extra light in a picture, select On from the available options.
While your iPhone's flash is effective for subjects closer to you, it won't work if you're capturing a landscape. For this and other situations when the subject is poorly lit, you can enable your iPhone's Night Mode.
Essentially, Night Mode decreases the shutter speed, allowing the image sensor to pick up more light and, subsequently, information and click a well-exposed image, even in the dark. You can even use Night Mode for astrophotography.
To enable Night Mode, swipe up on the viewfinder and select the moon-shaped icon. Next, decide the shutter speed from the available options, which generally include Auto (for letting the phone decide the duration) or Max (which varies depending on how dark the scene is).
Play around with Live Photos
By default, your iPhone keeps Live Photos on, which captures what happens 1.5 seconds before and 1.5 seconds after you take a picture.
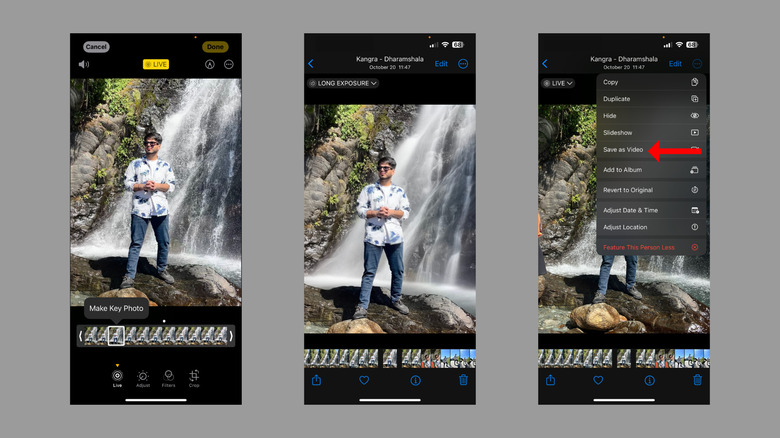
You can edit a Live Photo in several ways. To change the key photo that appears in the gallery, open the Live Photo, tap Edit at the top right, select Live from the options at the bottom, and then select the right moment by dragging the slider at the bottom. Next, tap "Make Key Photo" and hit Done at the top right.
You can also switch from several Live Photo effects, including Live, Loop, Bounce, Long Exposure, or Live Off. The first or the default effect plays the short video that a Live Photo captures on holding the photo. The second effect plays the image in a loop. The third effect rocks the video back and forth.
The Long Exposure effect captures the movement with time. With this effect, fireworks look like a streak of light, while waterfalls look like a blurry and smooth stream of water.
Another iPhone photography trick involves saving a Live Photo as a video. Simply open the picture, hit the three-dot menu at the top right, and then select "Save as Video." If you feel like Live Photos take too much space, you can turn them off too.