How To Get The Best Astrophotography Photos Out Of Your iPhone
Capturing shots of the night sky and celestial events, an art known as astrophotography, may sound intimidating at first. After all, the fantastic stills you often see making rounds on social media are captured with uber expensive cameras, stands, and computing gear to go with post-edits. But the humble iPhone in your pocket is a fairly powerful snapper that can click some beautiful shots of the night sky. And you don't necessarily need a whole lot of supporting gear for it. A decent support to keep the still and a proper framing can get the job done, as you can see in the sample below:
Iphones have come a long way for astrophotography. This is a photo I took out in the desert a few nights ago on my Iphone 15 Max Pro! #iphone @Apple pic.twitter.com/Bwry0UF2LW
— Sean Parker (@seanparkerphoto) May 9, 2025
The execution is easy, but as NASA puts it in the agency's astrophotography guide, "don't expect Hubble-level images to start."The first step to clicking decent night sky or planetary object shots is getting ready for the frame. You must first ask yourself questions such as "when does the eclipse begin?" "What hour will produce the least light pollution?" "What phase of the night will provide the easiest view of the constellation from the spot you are going?" Some of these questions can be answered — and prepared for — using mobile apps.
Coming back from Osaka, on our way to Taipei.
Not the best quality but not a bad job considering it was shot with an iphone.Milky Way, Venus and Comet Tsuchinshan-Atlas (c/2023 a3)#Astrophotography #comet #milkyway #venus pic.twitter.com/hWCMjAzXxn
— Andre Quiros (@flyingheavy747) October 22, 2024
SkySafari is one of the best stargazing apps out there, and a close second would be Star Walk. If you want to prep for location scouting and readying the camera kit (such as calculating the best exposure and depth settings), Photopills is a lovely option. Night Sky is a hot favorite in the Apple community, thanks to its beginner-friendly approach and intuitive AR (augmented reality) experiences. Stellarium Mobile is another highly rated app loved for its night sky simulation view and massive knowledge bank.
Preparing for night capture
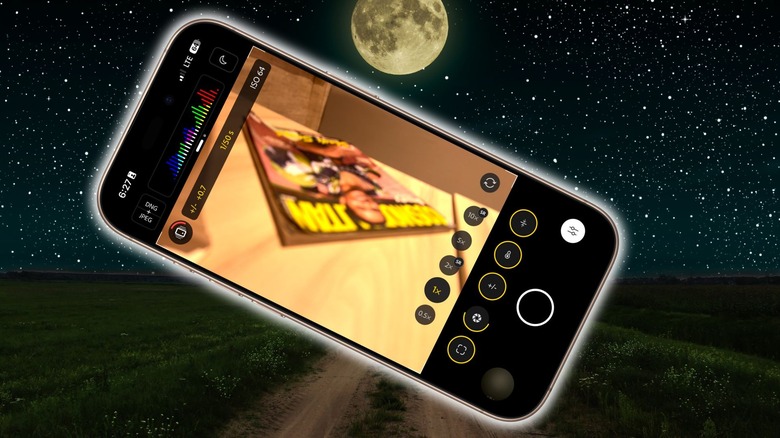
Once you are done with the prep work, have finalized the spot, and are ready to put your phone's camera through the paces, decide what kind of shot you want to click. On some occasions, you just want to point and shoot in handheld mode, and it's totally fine. The sensor-shift stabilization system on iPhones does a fairly good job of negating hand movements, while the algorithm further helps reduce blurry artifacts and deliver crisp pictures. But if you want to capture long-exposure shots or seek to push the night mode and get the absolute best, even a small (and cheap) tripod can work wonders. Take a look:
Just shot the Milky Way with my iPhone, and honestly, I'm speechless
sc ig/amsyarnaaif pic.twitter.com/lXSdcvz5qw
— Mutia (@Mutiyaagustin2) September 11, 2025
The folks over at The New York Times' WireCutter suggest the Joby GorillaPod 1K Kit and Ulanzi ST-27 combo, Joby Podzilla, Moment Tripod Mount for MagSafe, MOFT Snap Phone Tripod Stand MOVAS, Benro MeVIDEO Sidekick Pocket, and the Apexel Gorillas Tripod. Benro KoalaPod and KraftGeek are also highly recommended by the experts at DigitalCameraWorld, so they're worth checking out, as well.
Double moon halo, Ireland, Monday night. iPhone 14 📱#Astrophotography @321MoonHourGirl @NASAMoon @MoonHourSocial @ThePhotoHour @StormHour pic.twitter.com/amHEZLSjDw
— SkyWatcherDave (@SkyWatch07) January 24, 2024
Now, support and mounting gear are important for a couple of reasons. First, the iPhone's Night Mode is only triggered when the phone is resting still. Second, a mount + tripod combo offers the flexibility to point the phone's camera at the best angle and view. In fact, you can use the Apple Watch as a remote shutter button if you absolutely don't want to touch the iPhone after putting it in the perfect spot and angle. This is the stage where you decide between the auto mode or go full manual for deeper controls. They may look intimidating at first, but as you experiment, it's easy to get a grasp.
Working with the iPhone's camera sensor
Usually, I would suggest sticking with the primary camera, since it's the most advanced imaging sensor available, but if you want to get closer to an object, stick within the optical zoom range when you switch to the telephoto lens. This ensures visual minimal quality loss and doesn't force digital cropping in your pictures. But if you have a "Pro" model (iPhone 16 and 17 series) or the iPhone 17, switch to the ultrawide mode (0.5x button). These phones feature a 48-megapixel sensor, so you don't have to worry about the quality, and capture a much wider view of the sky. Have a look:
You guys, I shot this last night on an iPhone 14 Pro 🤯 the level of dust detail is insane! And this is only a quick edit using the in built tools of the phone! Who said you need a DSLR to capture the Milky Way?!? Will be trying for more tonight! pic.twitter.com/Qhe4tDIfi4
— Dr. Jenifer Millard 🇪🇺🏴🇺🇦 (@DrJeniMillard) June 15, 2023
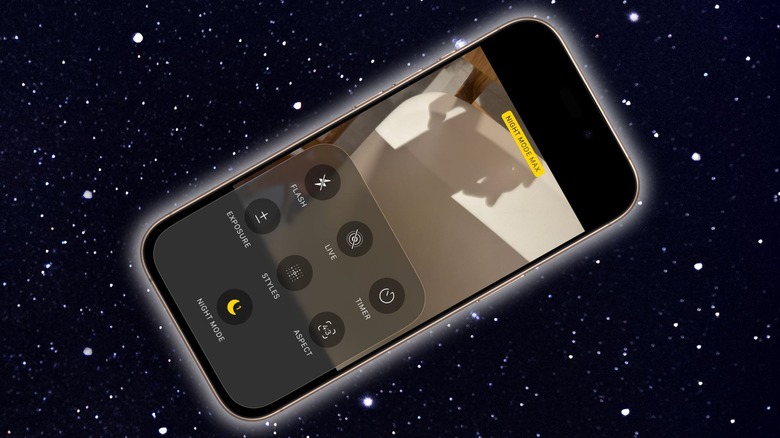
Next, make sure Night Mode is active (yellow moon crescent icon in the top-right corner). At the bottom of the screen, tap on "Photo" to open the tools panel, and tap a few times on "Night Mode" until you see a small "Night Mode Max" message appear at the top of the screen. In this state, the sensor waits up to 30 seconds to collect all the optical data, and then performs the algorithmic processing to produce the most detailed astrophotography shot.
‼️✨ I captured the Southern Cross constellation using my iPhone 16 Pro ! Modern smartphone cameras perform remarkably well in low-light conditions, and astrophotography is the ultimate test of their capabilities 👍 I took this image in Chile's Atacama Desert, renowned for its... pic.twitter.com/We8rhvwe72
— Yuri Beletsky (@YBeletsky) July 23, 2025
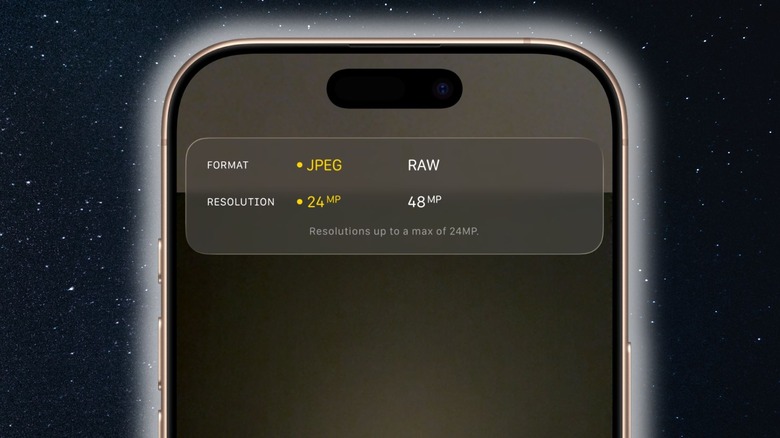
If you seek more creative control over your shots and want to perform post-capture edits, switch to the highest possible resolution (48-megapixel) and set the photo format to RAW. The real magic happens with long exposure and fine-tuned adjustments. For that, you will need apps such as ProCamera and Halide Mark II for the most extensive suite of manual controls. ProcessZero is a mode in the Halide app that removes all algorithmic processing and produces pristine shots with natural noise retention. The Indigo app by Adobe is another fantastic choice.