How To Access Your iCloud Photos

iCloud Photos provides a convenient way to backup pictures and access them across your Apple devices. A feature of iCloud, Apple's cloud storage service can also be used to backup your iPhone and iPad, store important files in iCloud Drive, save your passwords in Keychain, and sync your Apple apps like Notes, Calendar, and Mail, among others. Apple offers 5GB of free iCloud storage, after which you will need to pay monthly for additional storage. iCloud+ plans are priced at $0.99 a month for 50GB of storage, $2.99 a month for 200GB, and $9.99 a month for 2TB.
The ability to backup photos is among the most useful iCloud features. Like Google Photos, iCloud lets you view synced photos on multiple devices, including iPhone, iPad, Mac, Apple TV, Windows, and even the web. Provided iCloud Photos has been enabled, you'll always have access to your photo library, even if your Apple device is damaged, lost, or stolen.
Access iCloud Photos on iPhone, iPad, and Mac

Before accessing iCloud Photos on an Apple device, the feature first needs to be enabled in Settings. Here's how to do it on an iPhone or iPad:
-
Open the Settings app.
-
Tap your name at the top.
-
Tap iCloud.
-
Tap Photos.
-
Turn on the toggle next to Sync this [iPhone or iPad].
Once the photos are synced to iCloud, you can view them by opening the Photos app and tapping Library. Select the Albums tab to view different categories like My Albums, Shared Albums, People & Places, Media Types, and Utilities.
To turn on iCloud Photos on a Mac, follow these steps:
-
Click on the Apple menu.
-
Choose System Settings or System Preferences, depending on your macOS version.
-
Click Apple ID at the top.
-
Click iCloud.
-
Select Photos.
-
Turn on the toggle next to Sync this Mac.
You can now view iCloud Photos on a Mac inside the Photos app by clicking on Library. The sidebar displays categories like Photos, Albums, and Projects. If your iCloud Photos aren't visible, make sure you've signed into iCloud with the correct Apple ID. It's worth noting that if you've enabled iCloud Photos on your iPhone or iPad but not your Mac, they will not be visible on the latter. Instead, you'll only be able to see photos you've manually saved to your Mac's Photos app. Similarly, the photos on your Mac will not be visible on your iPhone or iPad.
Access iCloud Photos on Apple TV

If you have an Apple TV, you can view iCloud Photos from your iPhone, iPad, or Mac on your TV screen. The feature is available on Apple TV HD and Apple TV 4K. As with other Apple devices, you'll first need to enable iCloud Photos. Here's how:
-
Open Settings.
-
Go to Users and Accounts.
-
Select Photos.
-
Turn on iCloud Photos.
You can now open the Photos app on Apple TV and go to the Library category to view iCloud Photos. If you have a big library, you can quickly scroll through the list to view photos by year. To do this with a second-generation Siri Remote or later, press and hold the up or down button on the clickpad ring to view a scrolling timeline. On a first generation Siri remote, quickly swipe up and down on the touch surface a few times to enable the scrolling timeline.
If iCloud Shared Photo Library has been enabled on your other devices, you can view these photos on Apple TV as well. To do this, open the Library category in the Photos app and select the Library View button (two overlapping photos) at the top. You can now choose between Personal Library, Shared Library, or Both Libraries.
Access iCloud Photos on a Windows PC
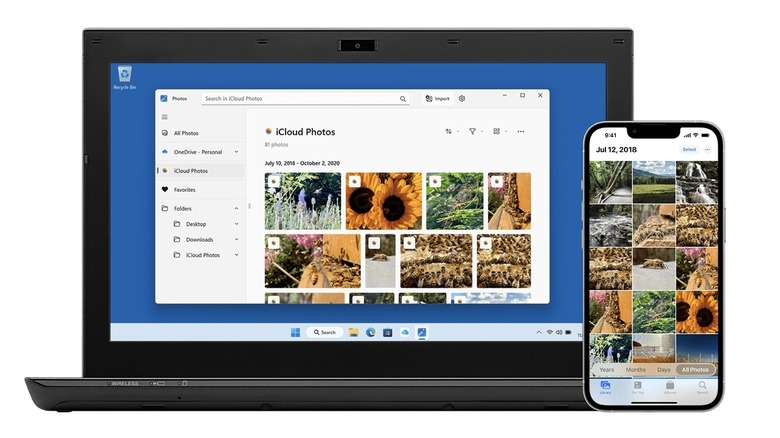
If you have an Apple device like an iPhone or iPad and use a Windows PC, you can also access iCloud Photos via the iCloud Windows app. For this feature to work, iCloud Photos should be enabled on the Apple device. Once done, follow these steps to get iCloud Photos on Windows:
-
Search for the iCloud app on the Microsoft Store and download it.
-
Open the app and sign in with your Apple ID.
-
Click Options next to Photos.
-
Select iCloud Photos.
-
Select Shared Albums if required, and choose a location for the folders.
-
Click Done.
-
Click Apply.
Once complete, you can view iCloud Photos on your Windows 11 PC by opening Microsoft Photos and selecting iCloud Photos in the left sidebar. If you're running Windows 10, open File Explorer and click on iCloud Photos in the navigation pane.
Any new photos added to iCloud Photos will now appear on your Windows PC. You can also manually upload photos from your PC by clicking on iCloud Photos in the File Explorer navigation pane and dragging and dropping the photos into the folder. Once synced, these photos can be accessed on your Apple devices or the web.
Access iCloud Photos on the web
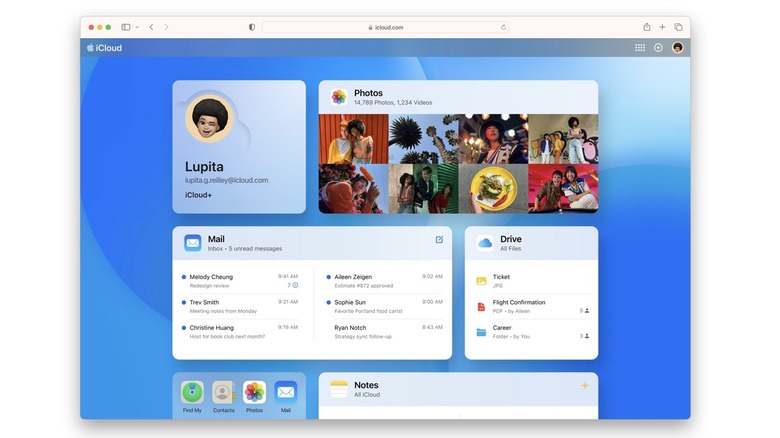
Apple's iCloud website is a convenient way to access all your iCloud Photos in a mobile or desktop browser. All you need to do is open iCloud.com in a browser and sign in with your Apple ID and password. iCloud Photos will be displayed under Photos. The layout is similar to the Mac Photos app, with a sidebar for your library and albums. A slider on top lets you increase or decrease the size of the thumbnails, while the cloud icon in the top right corner lets you upload images to iCloud.
The iCloud website is also great for organizing photos. You can select multiple photos and click on Add to an album in the menu bar. You can also create a new album by following these steps:
-
Click on the Albums tab in the sidebar.
-
Hover the cursor over My Albums.
-
Click on the + icon and select New Album.
-
Enter an album name and click Save.
You can now select multiple photos from the library and add them to the album, or drag and drop them into the album. You can also click on an album in the sidebar to view its contents, then select photos you want to remove. Click the trashcan icon to delete them from the album. It's worth noting that doing this will only delete the photos from the album, but not iCloud Photos.