Apple Photos: 6 Helpful Tips For Using The App On A Mac Or MacBook

Apple Photos is a very helpful, perhaps even essential, part of any iPhone. Its ability to display, sort, and edit photographs taken with or saved on your phone is great for anyone, from experienced photographers to casual novices. By connecting your Apple devices together using the same Apple ID, you can also view these photos on your Mac desktop and MacBook.
For many people, though, the desktop version of the Photos app can be a bit daunting at first glance. With so many pictures and a potentially overwhelming display at your disposal, you might prefer to just step away from it and exclusively use the iPhone version. At the same time, it might be important for you to keep a copy of your most cherished memories on your computer. Thankfully, the desktop Photos app actually isn't that difficult to use once you get the hang of it, and it has some pretty great features that are quite easy to master.
Make professional-quality edits
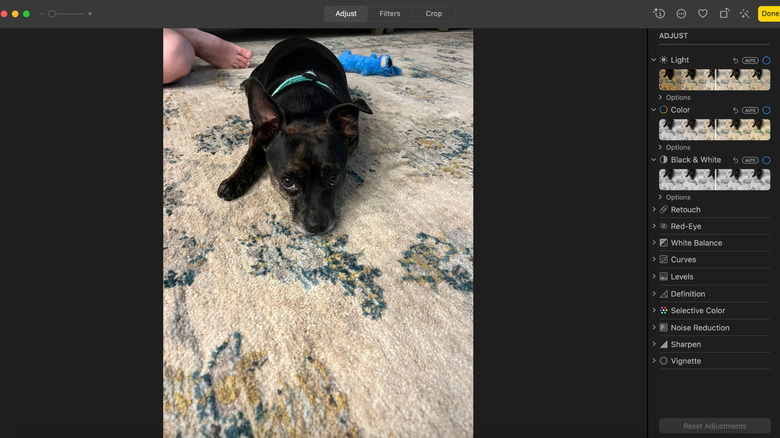
Photoshop might be the most recognizable photo editing software, but you don't have to invest in the program to edit your images like a pro. The Photos app for Mac has plenty of different editing features — including some the phone app lacks — all within a user-friendly interface. Simply click on a photo and then click on the Edit button in the top right corner.
From there, you'll be taken to the editing screen. Apple divided it into three sections: Adjust, Filters, and Crop. The Adjust section allows you to alter the lighting and coloring of the image, while also including features such as red-eye removal and noise reduction.
"Filters" is a pretty self-explanatory section, as it contains a collection of pre-made filters that you can adjust by intensity. Finally, you have the Crop section, which can actually adjust your image in different ways. For example, you can adjust the vertical and horizontal angles of the original image, adding a layer of depth in the process.
Merge or delete duplicate uploads

Accidentally saving the same image twice is always a pain, but you can alleviate it with this neat feature. When opening the Duplicates folder located in the left-hand menu, Apple explains that every replicated image appears divided by date. This folder also gives a concise definition of content flagged as duplicates. Essentially, if two images appear to be exact copies of each other, even with slightly different details such as photo formats, they will be transferred to this folder.
This makes handling images from your computer much easier. You are given the option to delete one or both of the photos if you right-click on them and choose the last option in the drop-down menu. That way, you can have only one version of the image on your laptop. However, you are also given the option to merge the two images together by clicking on the button right next to the photos' original date. When clicking on that button, you'll get a pop-up detailing how merging will keep the images the same but will combine their data.
Turn a video into a GIF
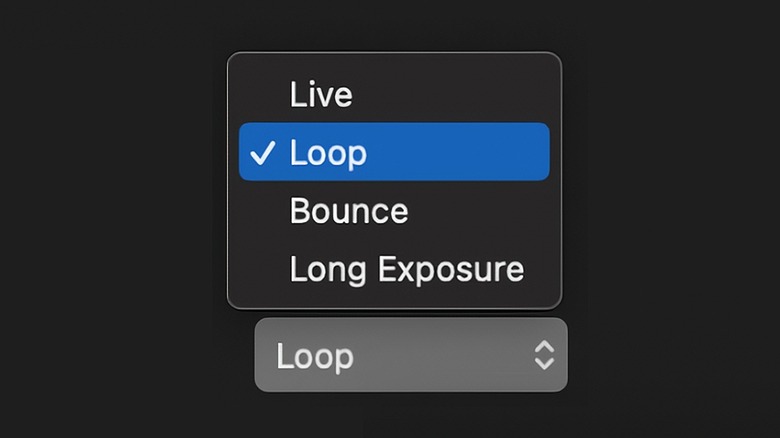
There are some moments that you capture on video that deserved to be played forever. That is what the GIF format sets out to do, and you can convert a Live Photo to a GIF file through the Photos app! While its automatic inclusion in your camera app might turn problematic at times, Live Photos are often taken on iPhones and can add movement to pictures. While you might not be able to take these photos on your Mac, Apple allows users to export and edit them on their desktop or laptop.
The process behind this actually ties back to the Photos app's extensive editing options. When viewing a Live Photo, click on the Edit button in the upper right-hand corner. Once the Editing panel comes up, look to the bottom left-hand corner of the screen. There, you'll find a pop-up menu with four options for Live Photos: Live, Loop, Bounce, and Long Exposure. Click Loop to make the pre-selected Live moment, well, Loop. If you want to edit this selection, put it back to Live and use the timeline located next to the pop-up menu to adjust accordingly. Once you save your edits, go to File on the top of your display, hover over the Export option, then click Export GIF.
Create a password-protected album
Making an album on both the iPhone and Mac versions of Photos is very easy. Simply click or tap File on the upper left-hand corner of your display, and then select New Album. However, what you might not have known is that you can make albums that aren't easily accessible to anyone that uses your computer.
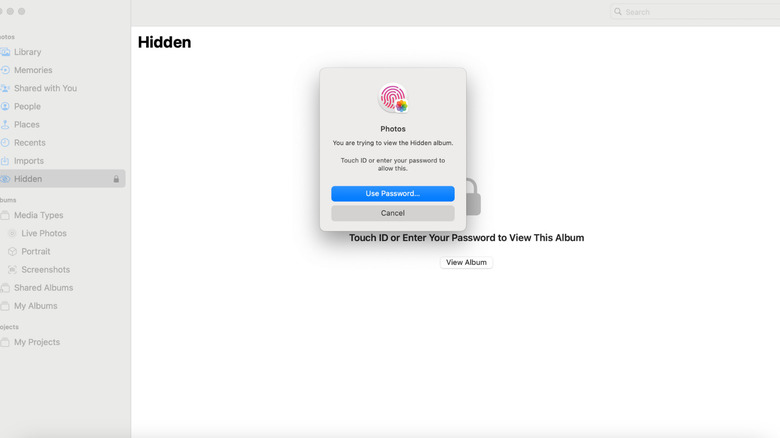
You are able to create albums that are protected by a passcode or your Touch ID, as explained by Apple. Select the images you want to hide by holding down the shift key on your keyboard and right-clicking them. After that, right-click on your selections and choose the Hide Photos option. Once you confirm that you do want to hide these images, they won't be easily accessible on your main Photos hub.
However, you can see them again if you go to the app's display menu, hover over View, and select Show Hidden Photo Album. This will cause the album to appear, but clicking on it will prompt you to either provide your Touch ID or your computer's password.
Find image metadata
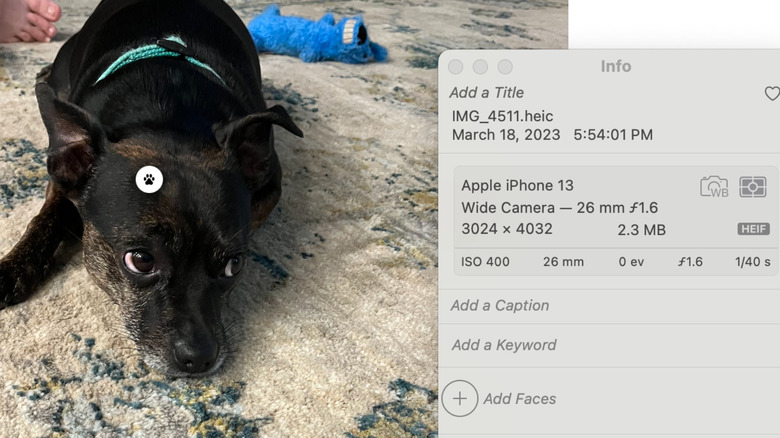
IPTC defines image metadata as data embedded in a digital photograph that provides "information about rights and administration of an image." This information can include anything from the camera specs to the precise location where a photo was taken or saved.
You are able to access this image metadata on the desktop Photos app, according to Apple. Click on the image you want to examine, then you can do one of two things: either click on the circular "I" icon in the upper right-hand corner or right-click the photo and select Get Info. Either way, you'll be greeted with a menu of information gathered from the photograph. You can also add new data to the image, such as captions and tags that allow for easy navigation.
The problem with metadata is that, if your computer can access it, others potentially can, too. That's why it's important to try and erase metadata from private photographs before posting them online, depending on the platform. Big social media platforms automatically erase metadata for privacy reasons, but some platforms like private forums may not have that same feature. While you can't erase this data directly from the Photos app, you can use a third-party app or take and save a screenshot of the image.
Use App Store extensions to create books, cards, and more
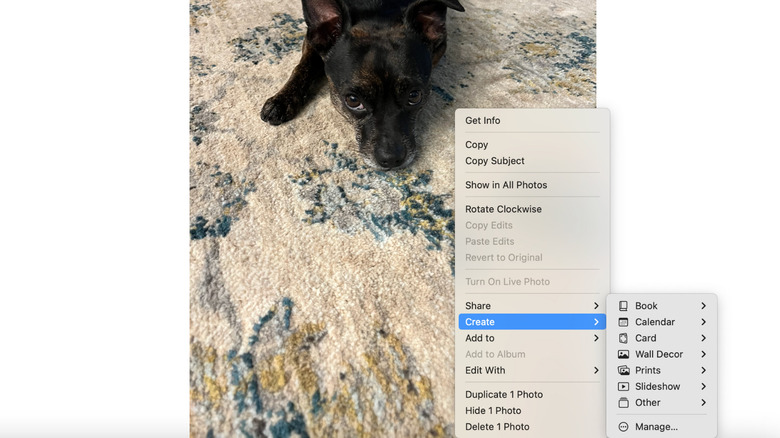
While online photo libraries such as Apple Photos are useful, you can't deny the impact of having a book or print of the images you've taken in your possession. There are just some moments that you need to preserve physical copies of — graduations, weddings, particularly important family vacations, and everything in between. Thankfully, you don't have to spend all day at the drugstore printing out photos to assemble on your own, because Apple Photos is able to support App Store extensions that'll help you bring your images to life.
To access these extensions, right-click on an image you want to transform into a physical object. In the drop-down menu, hover over the Create button. This should bring up a new list that includes Books, Calendars, Cards, and other options for printing. Clicking on any of these will direct you to the App Store, specifically to a pop-up that advertises printing and editing programs that have Photos integration.