How To Locate And Delete Your Trash Files On iPhone

With camera quality improving exponentially and the number of apps we use in our day-to-day lives increasing, it can be challenging to keep storage space available on our mobile phones. While there are definitely many ways to get more storage on your iPhone, like paying for external hard drives or iCloud+, your first line of defense should always be to delete the unnecessary apps and media files on your device.
Unfortunately, clearing out the trash files from your iPhone isn't as straightforward as on macOS, Android, or Windows. In addition, when deleting files on your iPhone, they sometimes appear in the "Recently Deleted" or similar folder, where they will typically stay for a certain number of days before the system deletes them permanently. For the most part, the "Recently Deleted" feature can be useful because many people delete things accidentally (or in a rush of emotions) and can sometimes want the option to retrieve them.
However, this also means that the supposed "deleted" files are still lingering on your iPhone, taking up valuable space that could be used for something else. To reclaim your lost storage space right away, you'll need to permanently delete files manually. However, since there's no single folder where tentatively "deleted" documents, images, and files live, you'll need to permanently delete files through apps directly. While each person will have dozens of different apps on their iPhone, here are a few key ones that you should probably check for hidden deleted files today.
How to locate files you don't use on your iPhone Files app
Despite being a native app, many iPhone users don't know how their Files app works or how to get the most out of it, which is a shame knowing all the cool things it can do, like file compression and document scanning. However, for users who do know how it works, it is unsurprising if it quickly becomes one of your favorite apps that help you at school, work, or home.
Unfortunately, because the Files app deals with many file types, it can quickly eat up your iPhone's storage space if you're not careful. Even if you make an effort to delete unused files, the Files app can continue to keep them in its Trash folder. Thankfully, you can easily delete these pesky hidden deleted files in just a few taps. Here's how:
 Quina Baterna/SlashGear
-
On your iPhone, launch the Files app.
-
In the lower-right corner of the screen, tap Browse.
-
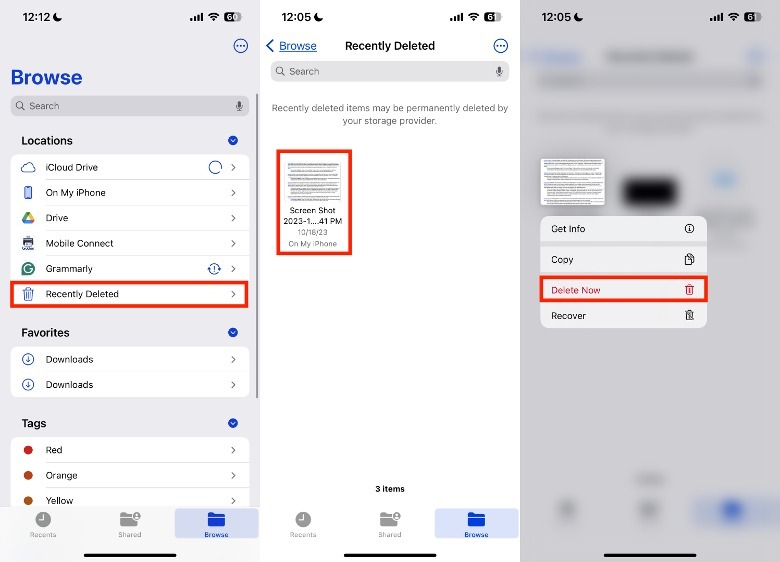
Under Locations, tap Recently Deleted.
-
Tap and hold the file that you want to delete.
-
Select Delete Now.
-
In the pop-up, tap Delete to confirm your decision.
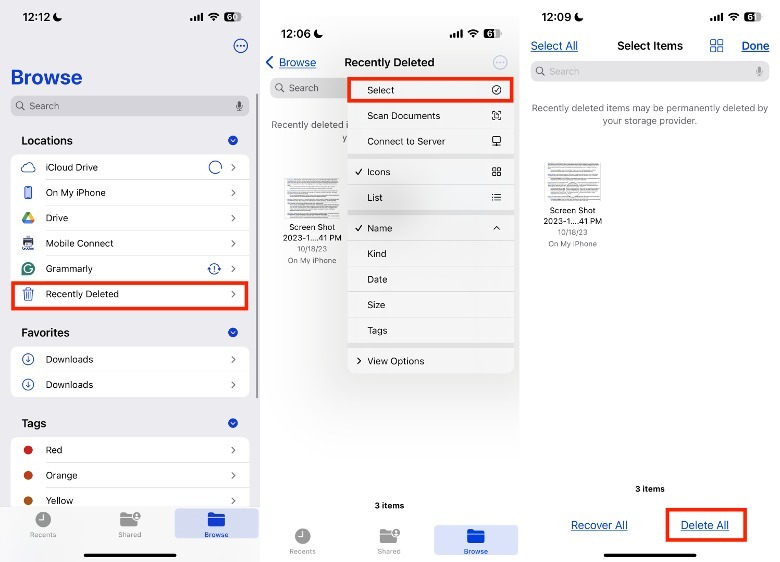
Alternatively, you can delete all the files in the Recently Deleted folder all at once. Here's how.
 Quina Baterna/SlashGear
-
Navigate to the Recently Deleted tab.
-
In the upper-right corner of the screen, tap the more or three dots icon > Select.
-
In the lower-right corner of the screen, tap Delete All.
-
In the pop-up, tap Delete.
How to permanently delete media files on your iPhone Photos app
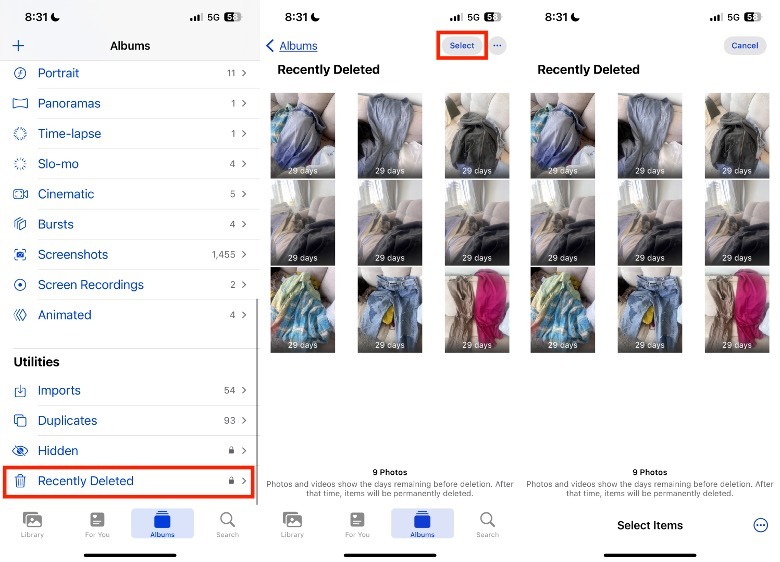
In your Photos app's Recently Deleted folder, previously deleted photos and videos will appear in reverse chronological order. Depending on your preference, you'll have two options to permanently delete media files in this way: individual/group selection or delete all. Here's how to do both.
 Quina Baterna/SlashGear
-
On your iPhone, launch the Photos app.
-
In the lower portion of the screen, tap Albums.
-
Under Utilities, tap Recently Deleted.
-
In the upper-right corner of the screen, tap Select.
Quina Baterna/SlashGear -
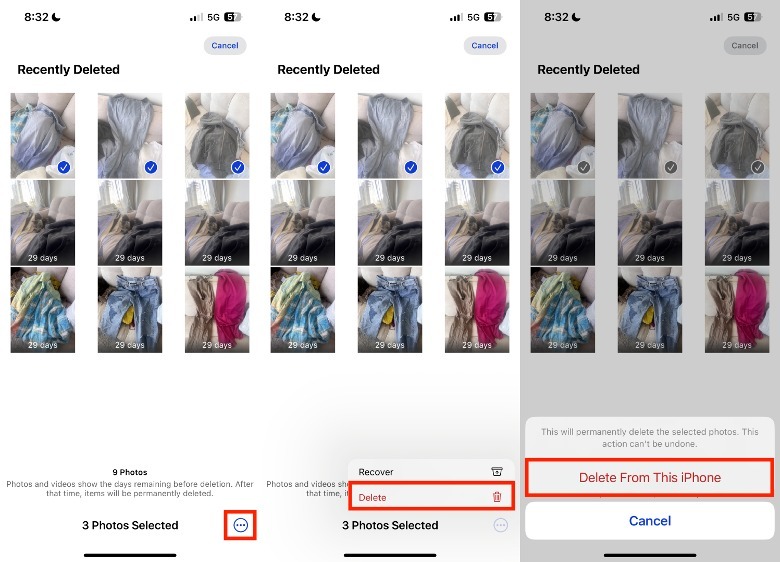
Select the specific photo or photos you want to permanently delete.
-
In the lower-right corner of the screen, tap the more or three dots icon > Delete.
-
In the pop-up, tap Delete From This iPhone to confirm your decision
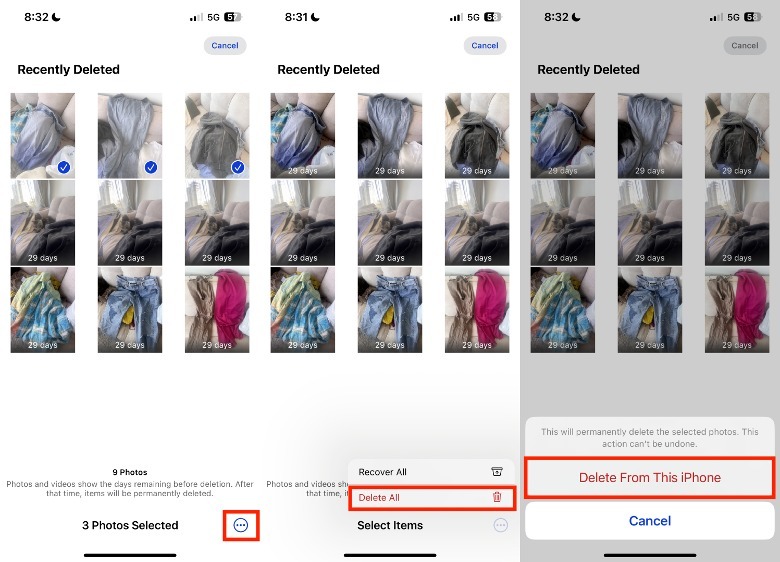
Alternatively, there is also a quick and easy way to delete everything in your Recently Deleted folder.
-
On your iPhone, launch the Photos app.
-
In the lower portion of the screen, tap Albums.
-
Under Utilities, tap Recently Deleted.
-
In the upper-right corner of the screen, tap Select.
Quina Baterna/SlashGear -
In the lower-right corner of the screen, tap the more or three dots icon.
-
Tap Delete All.
-
In the pop-up, tap Delete From This iPhone to confirm your decision.
Aside from permanently deleting images on your Photos app, you can reduce photo file sizes in other ways as well, such as changing image quality, compressing images, turning Live photos into still ones, and more.
How to delete notes on the Notes app permanently
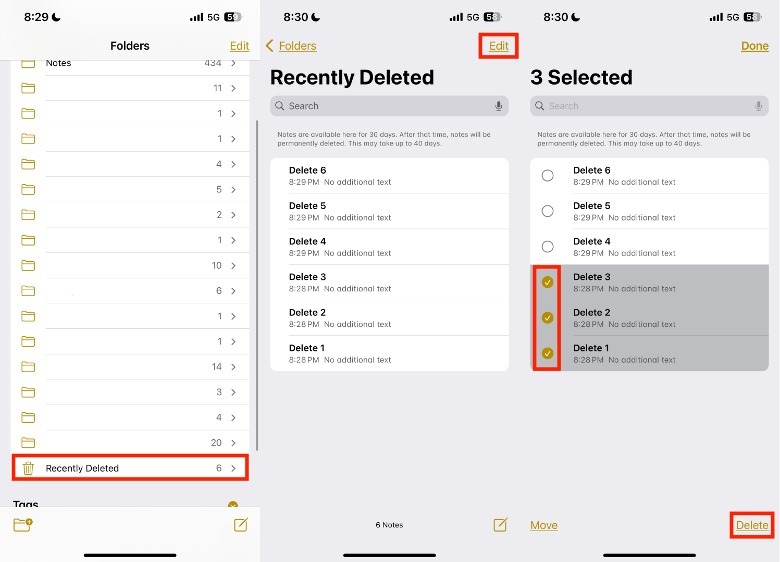
While there are plenty of highly-rated note-taking apps designed for the iPhone, its native iPhone note-taking app, Notes, has a lot to offer. Aside from being able to seamlessly integrate with multiple devices through iCloud, it can also utilize photos, tables, and scribbling features. Similar to the Photos app, the Notes app will retain deleted notes for 30 days before it permanently gets rid of them. However, it does have an additional disclaimer that this deletion process can take up to 40 days. If you are not keen on waiting more than a month, you can delete notes forever in two ways: individual/group or delete all. Here's how to get started.
 Quina Baterna/SlashGear
-
On your iPhone, launch the Notes app.
-
Under iCloud, tap Recently Deleted.
-
In the upper-right corner of the screen, tap Edit.
-
Select the note/s that you want to delete permanently.
-
In the lower-right corner of the screen, tap Delete.
-
On the pop-up, tap Delete Note to confirm your decision.
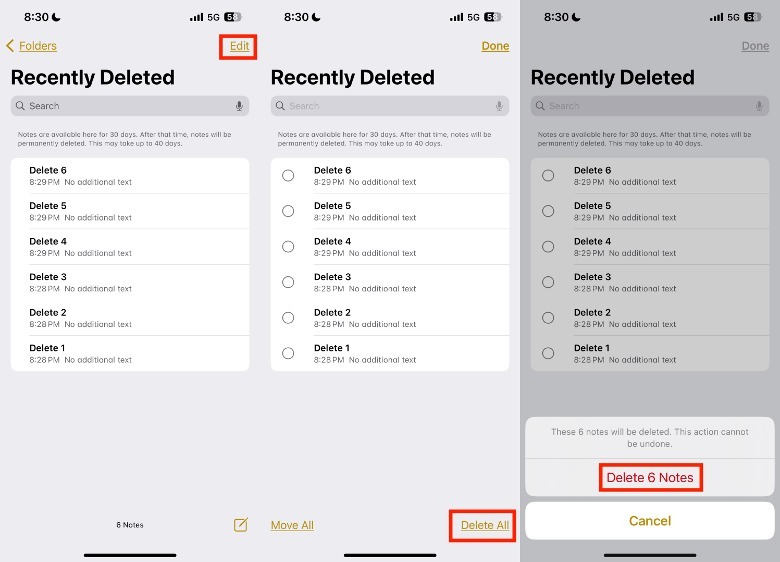
On the other hand, if you can't be bothered with manually reading through your deleted notes and just want everything gone anyway, you can quickly delete all your notes as well. Here's how.
 Quina Baterna/SlashGear
-
On your iPhone, launch the Notes app.
-
Under iCloud, tap Recently Deleted.
-
In the upper-right corner of the screen, tap Edit.
-
In the lower-right corner of the screen, tap Delete All.
-
In the pop-up provided, tap Delete X Notes to confirm your decision.
How to permanently delete items in the Mail App
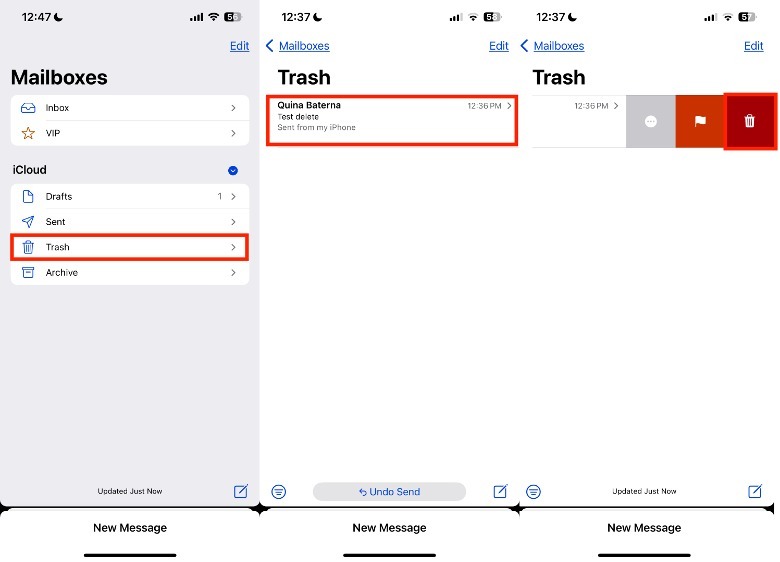
While many iPhone users prefer the use of their email provider-specific apps, the iPhone's Mail app still has a few tricks up its sleeve, such as being an easy way to sign a document via iPhone while you're on the road or letting you send up to 5 GB of attachments through Mail Drop (even without an iCloud+ subscription). However, anyone can tell you that mailing apps, including the native Mail app, can get full quickly. Aside from attachments taking up a lot of space, it's also possible that you don't delete emails properly, leading to a full Trash folder. Here's how to empty it.
 Quina Baterna/SlashGear
-
On your iPhone, launch the Mail app.
-
Under iCloud, tap Trash.
-
In the Trash section, swipe the email name to the left.
-
Tap the Trash icon.
 Quina Baterna/SlashGear
-
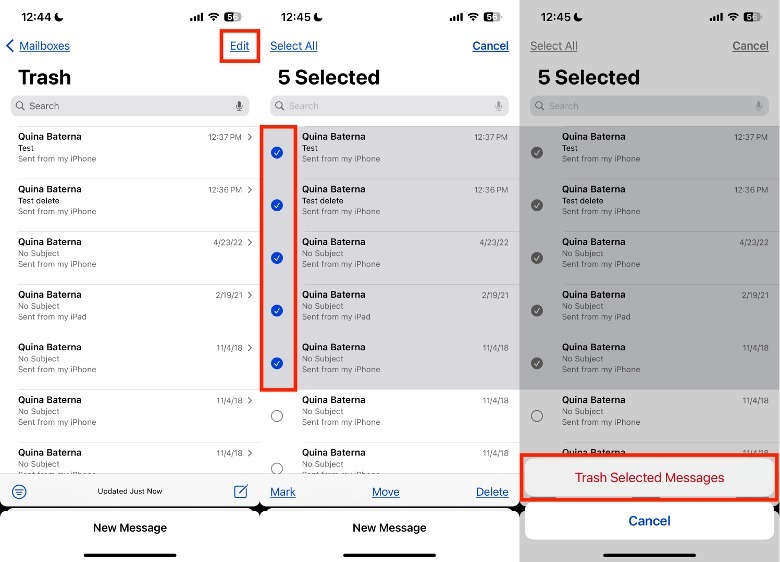
Navigate to the Trash section of the Mail app.
-
In the upper-right corner of the screen, tap Edit.
-
Select the emails you wish to get rid of permanently.
-
In the bottom-right corner of the screen, tap Delete.
-
In the pop-up, tap Trash Selected Messages to confirm your decision.
Aside from managing your deleted emails via the Mail app, you might also want to do a general sweep for your other email-related applications as well. For example, you can clean up your Gmail account or even re-organize your Google Drive as well.
Delete third-party file apps on your iPhone

Third-party apps will also have locally stored files that you can remove for more storage space. To find these files, check the particular app for any "Trash" or "Recently Deleted" folders or features. Afterward, you may need to follow app-specific instructions to delete them completely. In some cases, third-party apps will also have a specific folder in your Files app as well, which we've discussed how to manage earlier in this article.
If you want specific instructions on how to delete files permanently on your iPhone's third-party apps, especially unnecessary files, you can consult the FAQ section, forums, or other official app channels owned by the app's specific developer. As a last resort, you can delete the app entirely and download it again to remove all of those unnecessary cache files.
Aside from the specific Files app folders, you might also want to consider checking your Downloads folder. Typically, this is where files you downloaded online via the browser can appear, such as PDFs, images, and so on. Although there is no straightforward way to delete all the "trash" files on your iPhone, you can follow the steps above to get more space back on your device. And if you're still struggling with low storage space, there are plenty of tricks you can follow to free up space on your iPhone.