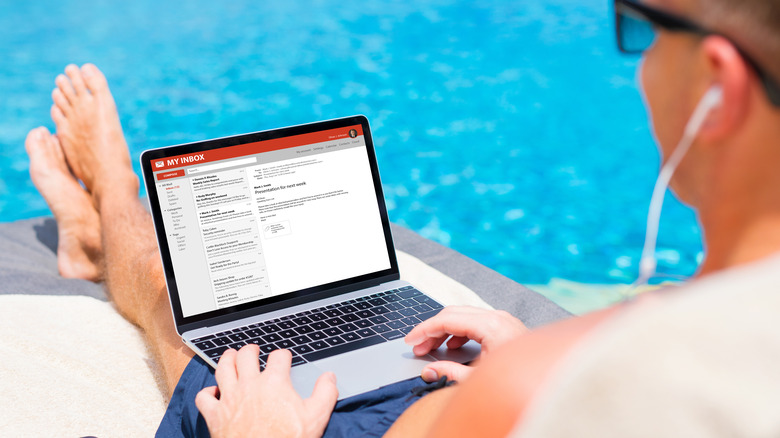
Simplify Your Digital Life: Here's How To Clean Up Your Gmail Inbox
Doesn't it just drive you up the wall? Every morning, you do your best to sift through an overwhelming onslaught of emails only to find yourself just as submerged in messages the very next day. And the worst part is, even after you clear your notifications and unsubscribe from annoying promotional emails, your inbox still looks as chaotic as ever. One of the biggest problems is that you may end up unintentionally ignoring a couple of important messages, leading you to lose clients or miss a meeting with your company executives.
Yes, taming a congested and disorganized Gmail inbox can be quite a daunting task, especially if you have to deal with thousands upon thousands of emails. So where do you begin? How can you turn an unruly inbox into something more manageable? We've outlined several actionable steps you can take to start decluttering your Gmail account and simplifying your digital life.
Archive emails in bulk
Archiving is for emails that you don't want to see in your Inbox but also don't wish to permanently delete if they hold some importance or may be needed for reference at a later time. By archiving, you essentially move the emails out of your Inbox and into the All Mail folder. Here's how you can archive emails in bulk:
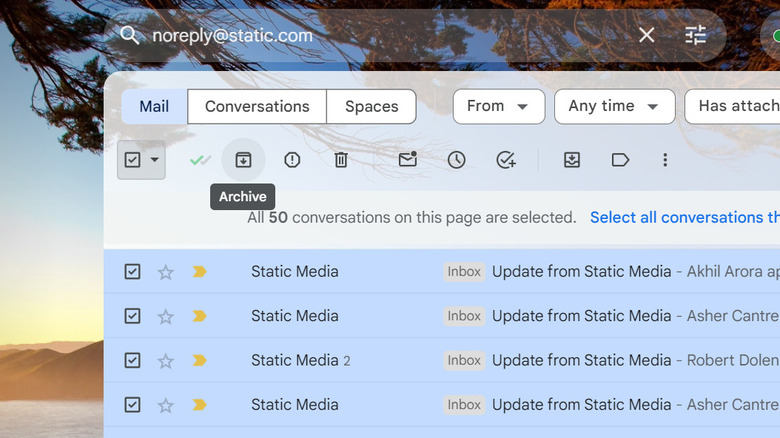
- If the mass of emails are sent by the same person:
- Right-click on one of the emails sent by that individual/business.
- Select Find emails from [sender's name]. This will display all the messages you've received from that sender.
- Click the checkbox at the upper right of the email list to select all the emails on the current page.
- Click on "Select all conversations that match this search" to choose all the emails from that specific sender.
- Hit the Archive button.
- In the pop-up notification, press OK to confirm the action.
- If the emails are sent by different people:
- Mark the checkbox next to the individual emails you intend to archive.
- After selecting all the emails, click on the Archive button.
- If the emails are older or from a specified time:
- To archive emails that are older than, say one year, type older_than:1y in the search box. It can also be older_than:3d (to show emails older than three days) and older_than:7m (to display emails older than seven months).
- Click the Select All checkbox at the top.
- Choose "Select all conversations that match this search."
- Press Archive.
- Confirm the action to proceed.
Should you want to view your archived emails, just go to the left-hand side panel and scroll down to All Mail.
Delete emails in bulk
Chances are you have a bunch of emails from way back that you no longer need. Perhaps they're from a content creator you once subscribed to or an online store where you signed up for discounts. You might also want to delete emails you've already read. Whatever the case, removing these emails from your account would do your inbox and your mental health some good. Here's what you need to do:
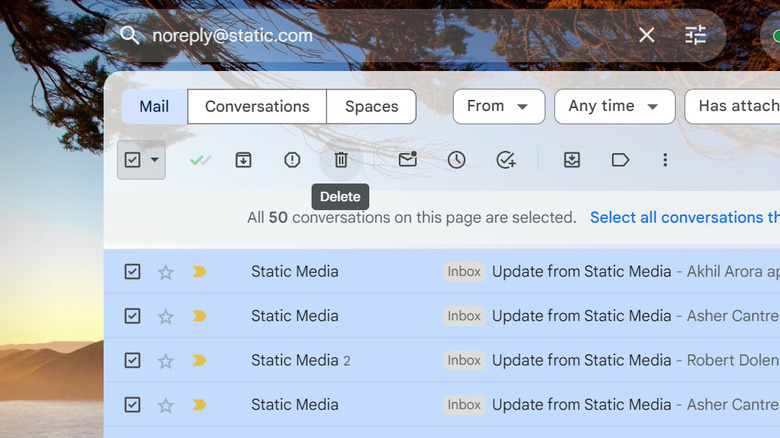
- To bulk delete emails from the same sender:
- In the search bar, type the email address of said sender.
- Click on the From drop-down menu.
- Paste the same email address here.
- Mark the checkbox at the very top of the email list to select every email on the current page.
- Click on "Select all conversations that match this search" to choose all the emails you received from that individual.
- Press the trash icon to delete the selected emails.
- Hit OK on the notification pop-up to confirm the bulk action.
- To bulk delete all unread or read emails:
- In the search bar, type is:unread (to delete only unread emails) or is:read (to delete all opened emails).
- Click the checkbox at the very top of the email list.
- Choose "Select all conversations that match this search."
- Hit the delete icon at the top.
- In the pop-up, press OK to proceed with the action.
Your deleted emails should now appear in your Trash folder but will be permanently removed after 30 days.
Manage emails with attachments
If you frequently get emails with attached PDFs, photos, and videos, sooner or later, you'll likely find yourself exceeding Google's free 15GB storage. This could spell disaster for you as this means you would no longer be able to receive emails (one of the most common problems Gmail on Android users encounter), upload new files to Drive, or back up media to Google Photos. To prevent such incidents from happening and keep your Inbox free from eyesore emails with attachments, it's best to remove this type of message from your account. Here's how:
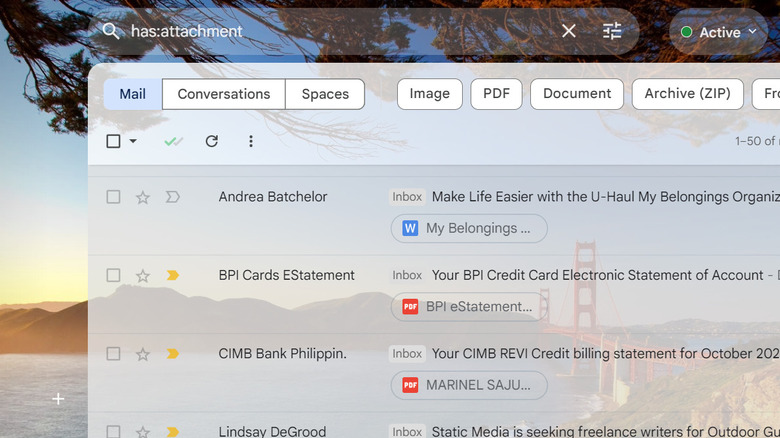
- In the search bar, type has:attachment.
- (Optional) Filter the search results by selecting the type of attachment at the top. Options include Image, PDF, Document, and Archive (ZIP).
- Go through the search results and mark the emails you want to remove from your Inbox. Alternatively, you can select all emails with attachments by clicking the Select All checkbox at the top and choosing "Selecting all conversations that match this search."
- Hit Delete if you wish to move all selected messages to the trash or Archive if you want to retain the emails but move them out of your Inbox into the All Mail section.
- When prompted, click on OK to proceed.
Sort your emails into labels
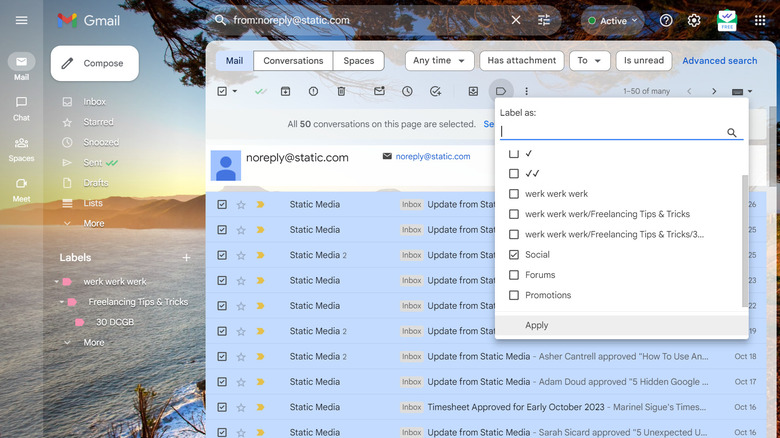
Labels organize your emails into personalized categories, effectively reducing the visual clutter in your Inbox and helping you find specific messages quickly. Here's a step-by-step guide on how to sort your emails into labels:
- Create a new label by clicking on the plus sign next to the Labels section in the left-hand side panel.
- Type a name for your label. For instance, you can make a label named "Finances" for all money-related emails.
- If you want this new label to be a sub-category of an existing label, mark the option "Nest label under" and select your parent label from the dropdown list.
- Hit Create. Your label should now appear under the Labels section.
- (Optional) Change the color of your label to keep things visually organized. Click on the three vertical dots next to your newly created label, and from the menu, select Label color. Pick from the predefined options or customize your own. In the pop-up, choose whether to apply the color to just the parent label or both the parent label and its sub-labels.
- Go to your Inbox and mark the emails you wish to label. You can do this individually (mark the emails one by one) or in bulk (type from:[email address] in the search bar, hit the Select All button, and click on "Select all conversations that match this search").
- After selecting your emails, press the Labels option at the top.
- Check the label you want to use for those emails. You're free to use more than one label.
- Press Apply.
Hide unused categories
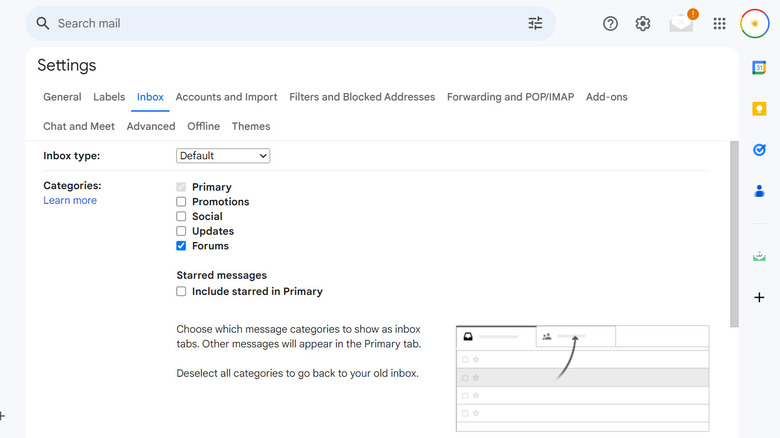
One thing to love about Gmail is how it automatically classifies emails into five distinct categories: Primary (your main inbox), Promotions (for promotional emails), Socials (emails from social media and similar platforms), Updates (such as receipts, confirmations, and statements), and Forums (messages from forums, online discussions, and mailing lists). If you don't read emails from these categories and prefer them out of your sight, Gmail lets you hide them from view to keep your home page clean and minimal. To do so:
- Open the settings by clicking on the gear icon at the top right.
- Select See all settings.
- Go to the Inbox tab.
- In the Categories section, unmark the categories you wish to hide. If you want to hide all of them from the home page, unmark all the options. Alternatively, if you want to replace Social and Promotions with just the Forums category, leave the Forums box checked.
- Scroll down to the very bottom of the page.
- Hit Save Changes.
You'll notice your Gmail home page will now only display emails from your Primary category, ridding you of unnecessary distractions. Also, while you're at it, you can start trimming down the emails sorted into these categories and delete the ones you don't need, especially those in the Promotions tab. They're typically just marketing material with already expired discounts and sales.
Set filters for incoming emails
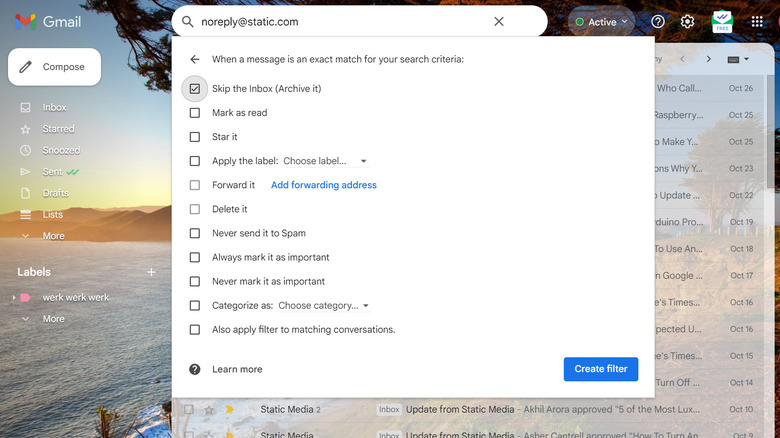
Unless you stop actively using your email address or completely delete your Gmail account, your inbox will inevitably return to its cluttered state once new messages start trickling in. There is, however, a nifty strategy you can use to maintain the order of your mailbox even when you get flooded with emails again: filters. Gmail's filters essentially apply certain action/s to incoming messages, making it easier to keep your inbox organized and clean. Available actions include:
- Archive
- Mark as read
- Star
- Apply a label
- Forward to a specific address
- Delete
- Never send to Spam
- Always mark as important
- Never mark as important
- Sort into a specific category
To create a filter in Gmail, follow these steps:
- Select the options button on the search bar.
- Fill in one or all of the fields:
- From: Applies the action to emails from the same sender.
- To: Applies the action to emails sent to these addresses.
- Subject/Has the words/Doesn't have: Applies the action to emails that contain a specific subject, certain words, or lack certain words.
- Size: Applies the action to emails larger or smaller than a specific size.
- Has attachment: Mark the checkbox to apply the rule to emails with attachments.
- Hit Create filter.
- Check the actions you want the filter to use.
- Press the Create filter option to finalize the process.
Incoming emails will start using the actions you selected, so you won't need to spend hours deep cleaning your inbox the next time around.