13 Useful Things You Can Do With Your Rotary Tool
If you're a handy person, whether by hobby or necessity, it's no secret that you'll need a wide range of tools at your disposal to attend to repairs and projects around the house. It's not enough to own, say, an all-purpose drill and a selection of screwdrivers. The more complex and varied your projects get, the more specialized tools you'll discover you need to own.
A rotary tool is one of these items -– a handheld power tool that you whip out when you're looking for precision and detailing once the heavy-duty cutting and grinding aspects of your work are complete. You might only associate the rotary tool with conventional workshop tasks; that is, cutting, carving, drilling, and the like. You'd be wrong. You can extend the rotary tool's applications beyond your workshop and into your home.
Thinking of adding one to your toolbox? We've ranked every major rotary tool brand you can think of to help you make your decision (13 to be exact).
Sharpen tools
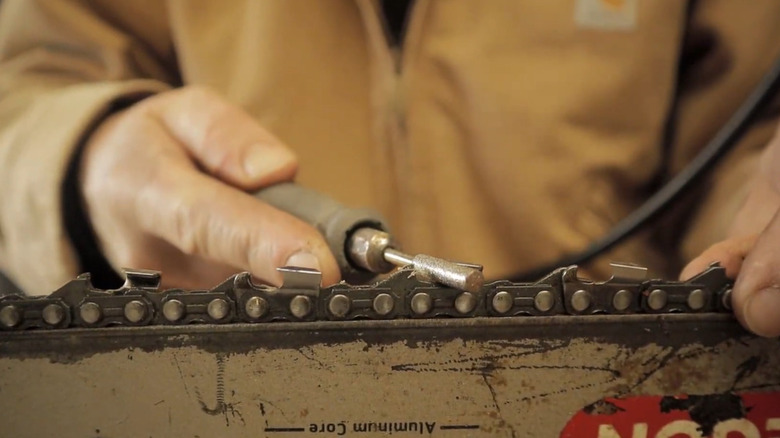
Cutting and drilling might be the two main tasks that come to your head when you think of a rotary tool, but it's pretty useful for sharpening, too. You can use a rotary tool to sharpen nearly any item with a cutting edge, from a knife to a lawnmower to a chainsaw. For starters, though, you'd need to clamp the tool in a vise or any other securing equipment so you're not at risk of hurting yourself.
You'll use the rotary tool, whether a Dremel or any other brand, in conjunction with a grinding stone. Attach the grinding stone to your rotary tool, turn it on, and run it along the length of the metal of the tool you're sharpening. You'll likely need multiple strokes, so be sure to check the edge periodically to ensure it's as sharp as you need it.
If you use a Ryobi, we have a segment detailing how to sharpen your dull knives with its rotary tool. Also, don't forget to take safety precautions -– wear eye protection and a dust mask if necessary to keep flying particles from harming you.
Clean rust and paint

Once rust starts to appear on any surface, its aesthetic is in trouble — it's unsightly, not to mention dangerous in the right conditions. If you have iron tools that are frequently exposed to water, like a dishwasher rack, you can apply the rotary tool here instead of getting a new one -– at least in the short term. There are multiple solutions to combat rust: you could soak the besieged item in vinegar, scrub it with baking soda, or use more aggressive methods like sandpaper and wire brushes. All these methods can be time-consuming and labour-intensive, though.
The same applies to paint; getting it off a wall or any other surface isn't the easiest task in the world — you'd have to chip away at multiple layers before finishing a job. You can use a rotary tool instead of your bare hands for this. Load your desired wire brush into the tool -– for instance, if the rust stains are stubborn, you might prefer a steel brush over a brass one — and get to work. Turn on the rotary tool and make multiple passes in circular motions to rid the surface of rust or paint.
Take care not to apply too much pressure; you don't want to damage your work surface or the rotary tool itself. As usual, take precautions for your safety: wear eye gear at a minimum to protect your eyes from flying particles.
Carve and detail wood
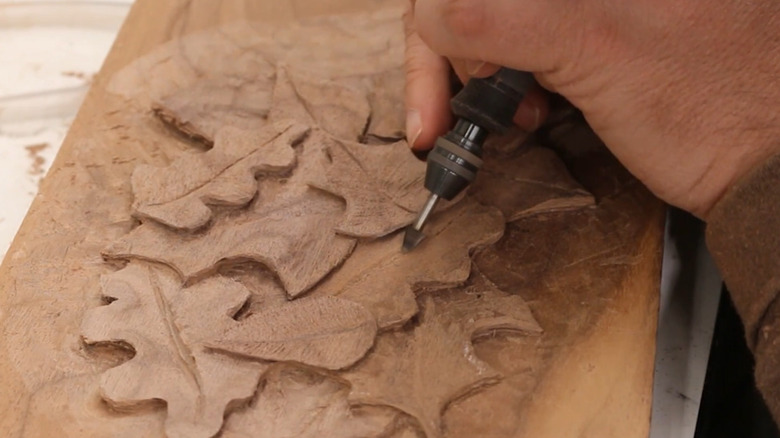
Gouges and chisels might be the first tools to come to mind when the topic of carving wood comes up in the workshop, and maybe even a Swiss Army Knife, but a rotary tool can work just as well for the task. It's designed for jobs that require precision, so you can make precise cuts and carvings on the wood piece that you're working on.
First, you'll want to secure the piece you're working on, whether with a simple item like masking tape or a clamp if it's on the larger side. Then, you can carve or detail the wood to your aesthetic tastes. If you're a beginner, though, you might be better off tracing a sketch of the carving pattern you're trying to imprint on the piece of wood first; this way, you'll just have to cut into the lines with your rotary tool and not worry about creativity while on the job.
As before, try not to apply too much pressure to the rotary tool — at least not right off the bat. Make a few passes with it first and assess how the material is taking to your designs before adjusting accordingly.
Engrave glass or stone
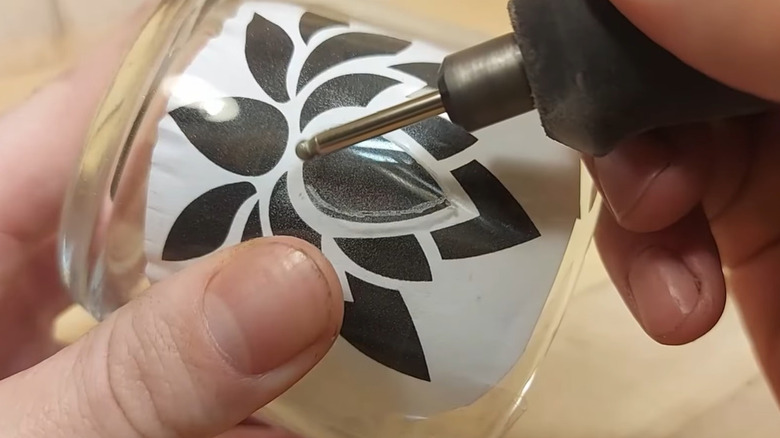
Just as you can use a rotary tool to carve wood, you can also extend its utility to engraving. The key difference in engraving designs on materials like glass or stone, as opposed to carving, lies in the technique and bit type you'll need. For instance, if you're working with glass, you'll need attachments like diamond-tip engraving bits to make it easier for you to etch your designs into the material. Other metals might call for you to use carbide tips instead.
The procedure is almost identical to wood carving; clamp the material you're working with so it doesn't move unexpectedly, draw the pattern you want beforehand with a pencil, then trace the outline with your rotary tool.
You want to lead with light pressure and speed when you start the design -– that's because the first etching should be as precise as possible. You can adjust accordingly on subsequent passes, but the first pass is all about getting your design right.
Polish jewelry
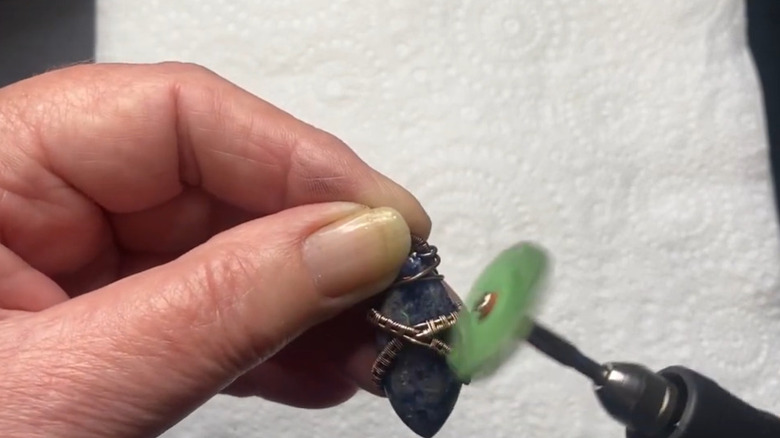
This one's a bit more involved than the other previously mentioned tasks you can perform with a rotary tool. By default, working with jewelry requires you to take more precautions than other surfaces -– you don't want to harm the value of your workpiece with a shoddy job. To polish your jewelry with a rotary tool, the first thing you need to do is consider the metal it's made of; you can't use the same brushes on a gold ring as you would on a brass ring.
Next, you'll want to prepare the workpiece for polishing by cleaning it with soapy water or isopropyl alcohol. This step is particularly important because any debris on your jewelry will scratch the surface if you polish over it. Then, choose your brush and apply your polishing compound to the spinning felt bob of the rotary tool. Do this while the device is on and apply the compound sparingly. Too much of it reduces the effectiveness, which means your piece won't shine as it should.
Once you have enough polishing compound applied to the felt bob, get to work polishing. Remember to keep your workpiece steady with a clamp and apply light and even pressure. You'll need to be on your toes when inspecting your jewelry, though. Ensure the entire surface is uniformly clean and shiny, then remove any scratches from the polishing process by reducing the pressure on the rotary tool and increasing the speed.
Repair damaged electricals

When it comes to electrical repair work, it's understandable to be hesitant to attempt DIY fixes. Electricity is dangerous to handle, even for trained professionals, so you might not think of a quick fix when you have a damaged power cord lying around. However, instead of making a trip to your local Home Depot every time you have a faulty cable, a rotary tool can restore voltage to your electrical system.
First, you should locate the point where the cable sustained damage. As with all electrical tools, you'll need to turn off your power supply. Only when you're absolutely sure of this should you proceed with the next steps. Using a cutting wheel attachment on your rotary tool, cut out the affected area of the cable. Strip away the outer insulation with a wire stripper, slide a heat-shrink tube onto the newly-exposed wires, then connect the individual wires with single-pole connecting terminals.
At this point, you'll need a solder, so hold the wires together and heat the shrink tubing with the soldering tip. Finally, use a hot air blower to give the wiring a snug fit, and your cable should be as good as new. Chances are you'll need some experience doing this, so don't hesitate to contact your electrician for a few pointers.
Trim screws and pet nails

Ever had your clothes caught on a protruding screw or nail? Such protrusions can rip a hole in your favorite shirt, or worse, leave you with an injury if your skin comes into contact with them with enough force or at an awkward angle. This can make for one incredible microannoyance. You might be tempted to get some pliers and pull the errant fastener loose, but you don't have to do that; a rotary tool can come to the rescue.
Attach the cutting wheel accessory to your Dremel, Ryobi, or other rotary tool, power it up, and let it slice through the metal neatly to solve the problem. Take cues from the tool when cutting, though. If it starts to slow down while shearing the metal in two, you probably need to ease up on the pressure you're applying.
Screws and nails aren't the only things you can trim with a rotary tool, either. Your pet's nails are also on the table. Of course, you'd need to get your pet comfortable with the sound and appearance of the tool. That most likely means using treats and rewards to acclimate them to it. For the actual practice of cutting pet nails, you'll want to avoid shearing off the quick of the nail. This part of your pet's paw structure contains blood vessels that can cause discomfort if you make contact with them. Also, use only light pressure when you're trimming.
Remove grout from tiles
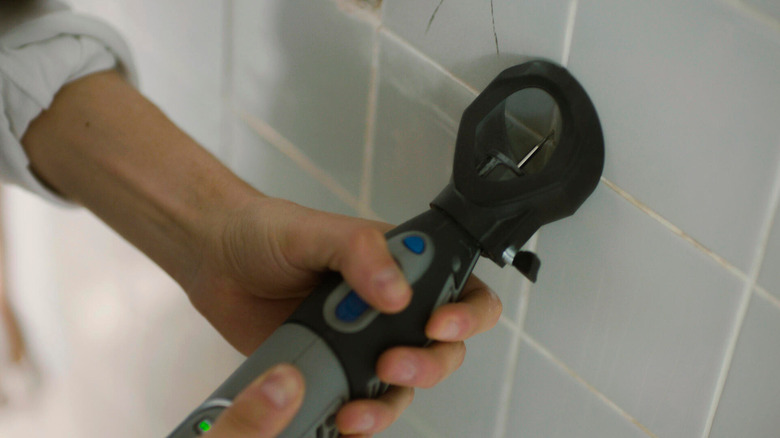
The importance of grout to your tile health can't be overestimated: it's a binding agent that fills the spaces between tiles in your installation. However, over time, it can stop responding to the regular deep cleaning treatment you give your floors and start darkening, cracking, or even shrinking. That's because grout absorbs everything from moisture to dirt, and at some point, you might have to swap out the existing grout for a new application -– you don't want to apply new grout over an old layer.
As one can imagine, manually removing grout from your tiles can be a tiring and rather dusty endeavor. Instead, let a rotary tool do the hard work for you. You'd need a pointed bit for this job, as well as a wire brush bit — this attachment helps safely remove grout residue. Move your rotary tool from one end of the tile to another, taking care to avoid scratching the tile surface. Bear in mind, though, you might need multiple passes depending on your speed and the strength of your grout.
In terms of safety, you'll want to wear a dust mask, safety goggles, gloves, and any other type of body protection when doing this as removing grout kicks up a lot of dust. Then, be sure to clean the newly exposed area with a cleaning solution or a vacuum cleaner to remove any stray debris. At this point, your tiles are ready for regrouting.
Smooth rough edges on furniture
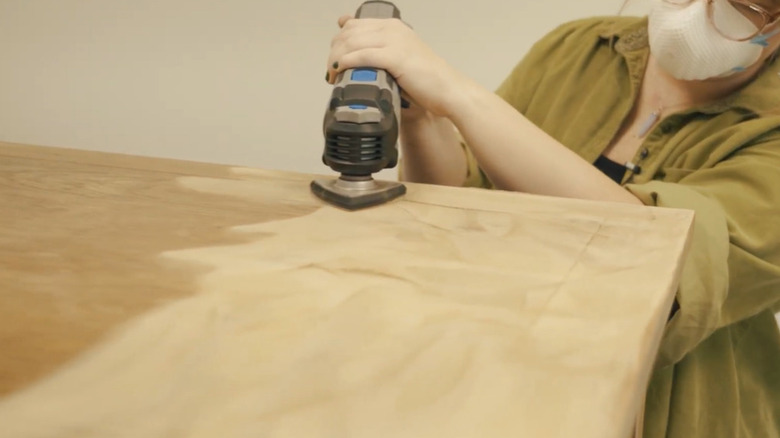
Sanding is an essential piece in the puzzle of woodworking, and one of the most common ways to smooth or shape items you're making in the workshop is to use sandpaper. While that abrasive does a fine enough job most of the time, the shape of your workpiece can limit its effectiveness. Other times, you need that extra bit of firepower to drive your sanding efforts, and that's where a rotary tool can come in handy.
You'll need to use your rotary tool with sanding accessories such as sanding bands or abrasive brushes; the ideal attachment depends on your specific use case, though. Looking for the best of the bunch? We've got you covered with the best sanding disk brands. Once again, kit up against dust particles with the usual safety equipment, clamp the piece (or use a non-slip pad), and apply the rotary tool against it until you're satisfied with the consistency of the finish.
When you're finished smoothing out the rough edges, remember to clean up with a vacuum cleaner and use a cloth dampened with rubbing alcohol to remove any stray sawdust.
Cut old caulk from sinks
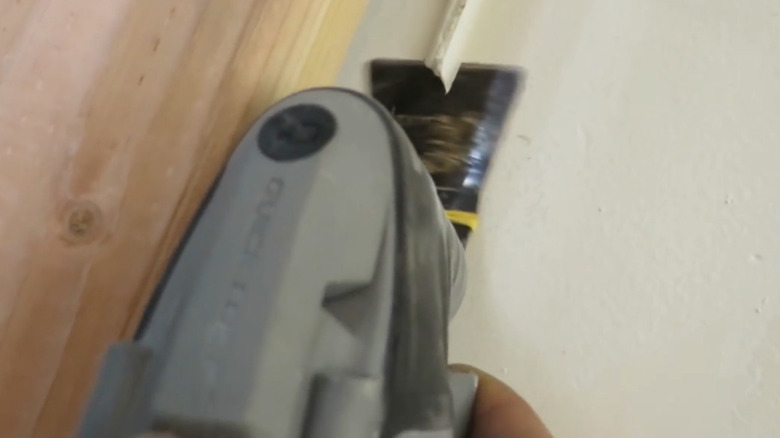
Just as rotary tools can remove degraded grout, they can also be applied to caulk. You might wonder what the difference between grout and caulk is. Where grout holds tiles together, caulk is used around joints to stop water damage. However, there's a similarity between caulk and grout in knowing when it's time for a revamp: the color changes. Where grout darkens, caulk turns yellow -– but it cracks just like the tile adhesive.
You can use a wide range of affordable home improvement tools to remove old caulk: a dedicated caulk-removal tool, razor scrapers, or even a putty knife will do. However, using a rotary tool has its advantages, mainly that it allows you to access areas that are difficult to reach with other equipment.
With the rotary tool, cutting caulk is simply a matter of using the right attachment and angling the tool to gain easy access to the caulk line. Just remember not to press too hard and use a steady motion when cutting.
Carve pumpkins
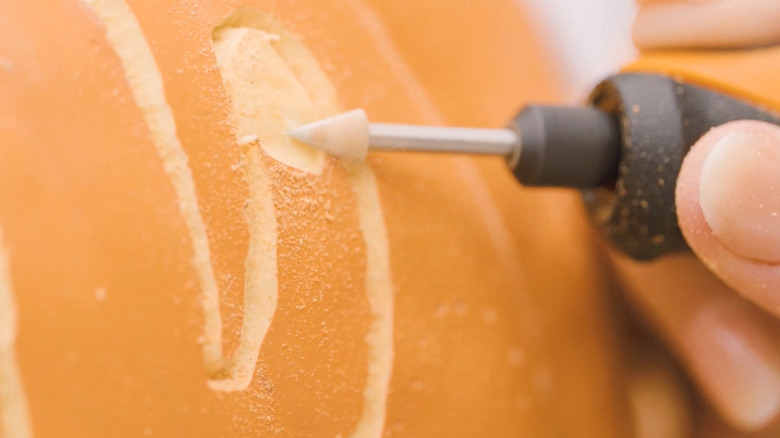
It's no secret that pumpkins can be tough to open, particularly when they start to swell when Halloween is around the corner. However, that doesn't mean you have to expend physical effort carving them up. You can use a rotary tool instead. Before you do any mechanical drilling, though, you'll have to prepare the pumpkin. That means cutting an opening in the top (or bottom, as you prefer) and scooping out the pulp and seeds.
Next, trace the design outline you want to display on the pumpkin. A pen, a toothpick, or even a needle can do the job here. Once the outline's etched into the pumpkin, you can then pick up your rotary tool, attach the bit you want to work with, and use a high RPM setting to cut through the exterior. Make steady passes until you're confident that light can pass through the sections you've cut away.
When this is done, rinse the areas you've carved and apply a touch of bleach. Bleach slows mold growth and helps to preserve the pumpkin for all your Halloween fun.
Cut door hinges
You can't install a door without hinges, and for you to install those, you must first cut them away. If you don't do this properly, your hinges will protrude out of the door and frame. That translates to gaps in the doorway, which affects both the aesthetic and the function. Using a plunge router attachment with a rotary tool prevents that gap from ever becoming a problem, though.
First, mark the points on the door where you want the hinge to reside, then use a utility knife to trace the outline into the wood. Once the outline is properly traced, whip out your rotary tool, attach the router bit, and connect it to the body of the plunge router.
With this setup, you can proceed to cut out all the wood in the outline to accommodate your hinges. This method is quicker than using a chisel or a Forstner bit.
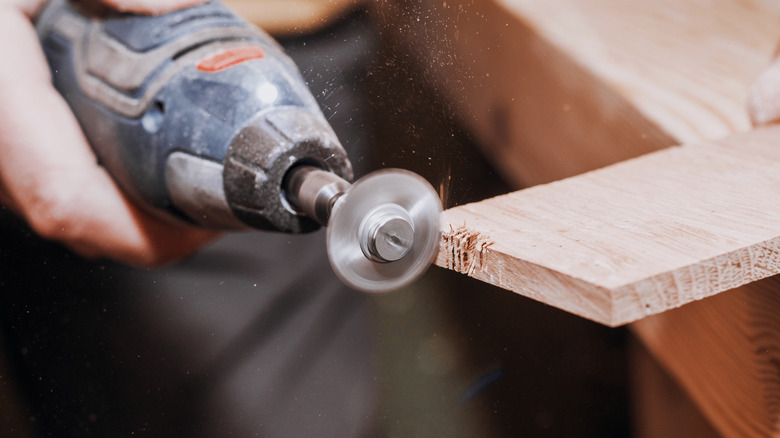
Cut thin sheet metal
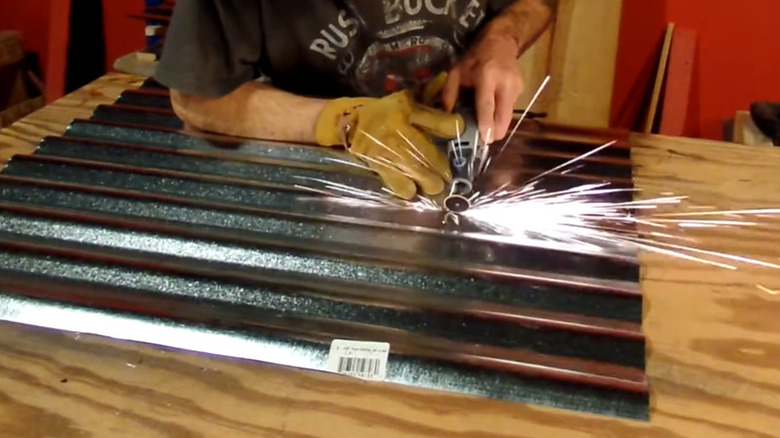
Cutting thin sheet metal can be quite the exercise in finesse; one wrong move and the entire shape (and possibly viability) of your project is in jeopardy. You need a tool that can cut the metal without bending it or leaving rough edges in its wake. An angle grinder or a jigsaw can work for these purposes, depending on the type of cuts you're trying to make.
However, if you're working on a project that requires intricate detailing like creating small holes or fancy shapes in metal sheets, a rotary tool should be your pick -– you can apply minimal pressure and still produce fine cuts that won't compromise the metal's integrity. That's doubly true when you consider that the angle grinder is one of the riskier tools out there.
You'll need a cut-off wheel attachment to accomplish this, so bear in mind that applying too much pressure can cause it to break. Make several light passes instead of trying to cut all at once, and the rotary tool will likely give you satisfactory results.