13 Things You Can Make With A Wood Lathe (And The Supplies You'll Need)
If you're a creative person and a jack-of-all-trades, chances are that you've given woodworking a try at some point in the past, or you intend to get your hands dirty with wood filings in the future. There's something immensely gratifying about crafting usable or purely objects out of what used to be a bland log of wood.
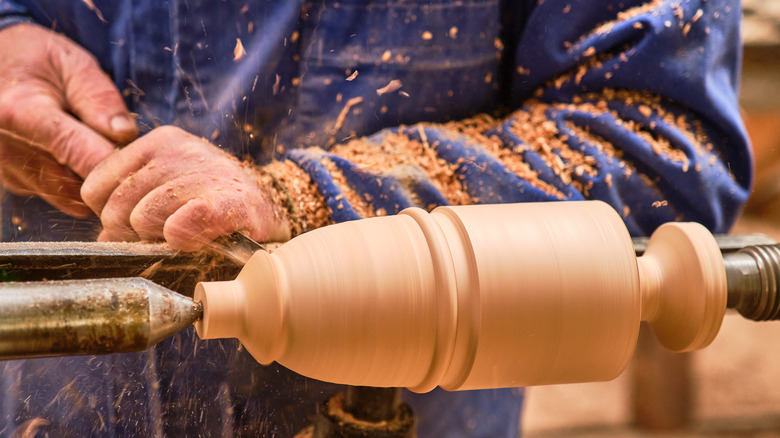
To shape your wood in certain outlines, you're probably going to need a wood lathe. Wood lathes are woodworking machines used to spin pieces of wood on an axis. While the wood rotates, users apply cutting objects (which are held stationary) on the moving piece to do the shaping. There's a wide variety of tools you can make using a wood lathe, decorative and with utility in mind, that will spice up the look of your home. Handcrafted wood objects are also a perfect gift for a loved one, especially when they're made by you.
From kitchen utensils to furniture and even personal accessories, this list covers a bevy of objects you can make with a wood lathe. The list will also go over which tools and supplies you'll need, but it assumes that you'll have some of the essential tools for woodturning, like a wood lathe, sandpaper, and finishing oil.
Spoon
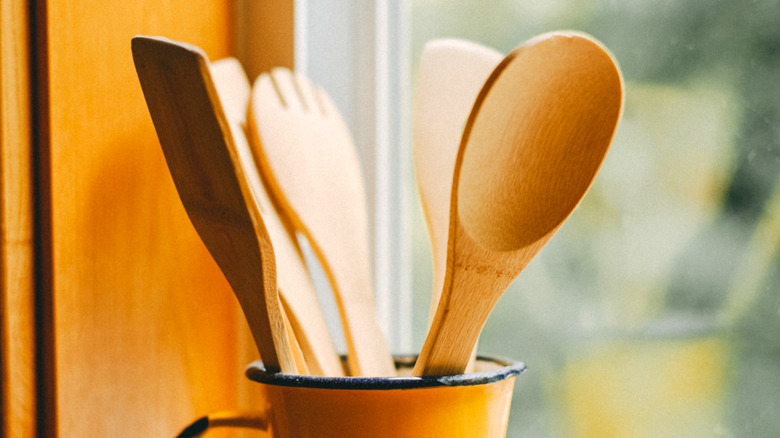
When considering sheer simplicity and practicality, few items beat a good old wooden spoon. If you're looking for a simple piece to start with, you need look no further than a spoon.
What you'll need:
-
Band saw
-
Electric sander
-
Rotary tool
-
Compressor
There's one thing to keep in mind in spoon design: the bigger the spoon, the more wood you'll require. Once you've settled on a desirable size, the next step is to shape the wood piece using the wood lathe. When turning the wood in this part of the process, remember to give allowance in your measurements.
You'll also want to cut your wood piece roughly in half with a band saw to make spinning easier and safer. Once done, cut away the excess portions made for allowance and use sandpaper or a belt sander to give the shaping an elite finish. The next step on the checklist is to hollow out a bowl for actual scooping. You can achieve this with a rotary tool, then proceed to sand down your spoon at varying grits (anywhere between 60 and 100 should be fine). Finally, use a compressor to clear any leftover sawdust particles and add a finishing oil of your choice.
Bowl
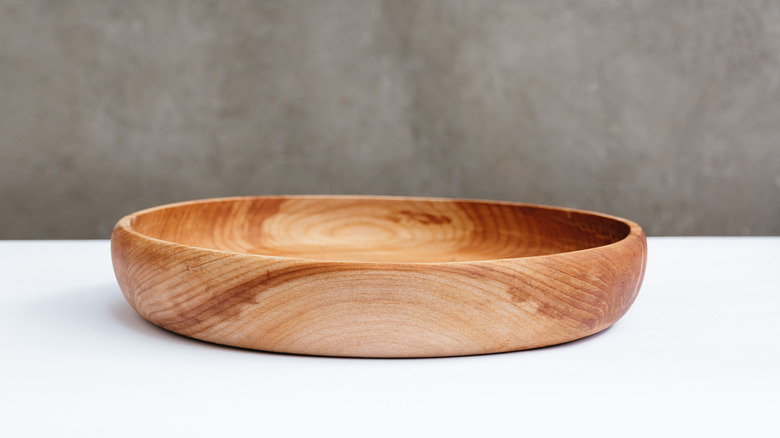
As with spoons, bowls are a simple and practical option for beginners and experts alike to hone their woodturning craft.
What you'll need:
-
Bandsaw
-
Bowl gouge
-
Faceplate
-
Lathe chuck
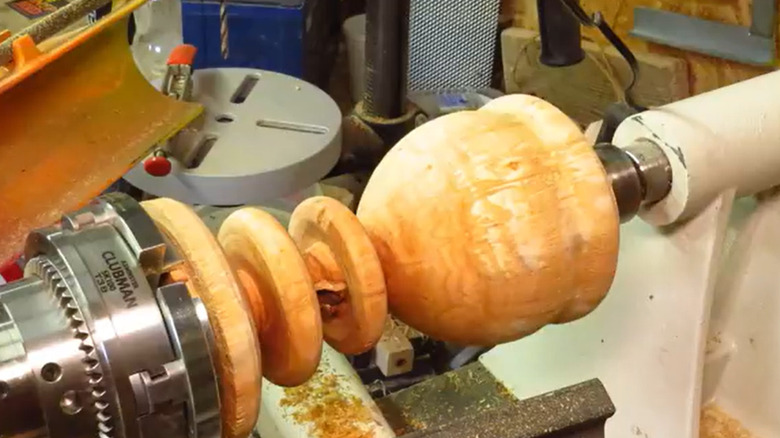
The first task in making a bowl is to prep the wood bowl blank. A bandsaw makes this part really easy; you simply cut the wood down to the desired size. Once you're done cutting, screw the piece onto the faceplate. You could use a center finder here, since the main idea is to be as close to the center as possible.
When turning the wood piece on the lathe, avoid using a spindle roughing gouge to remove the mass of bowl material (i.e., the outer portion or walls). Go with a bowl gouge instead – it's much more suited to handling the torque of a bowl. That's not to say the spindle gouge is useless, as you can use it to form the tenon on the bottom to match the chuck's dovetail profile.
The next step in the process is hollowing towards the base. A drill chuck can do this effectively. To finish the bowl, use a high-quality mesh sanding disk to remove excess wood strips. There's a wide variety of sanding disk brands to choose from; just make sure you get a solid one. Apply any finishing oil of your choice to give your bowl a glistening profile.
Rolling Pin
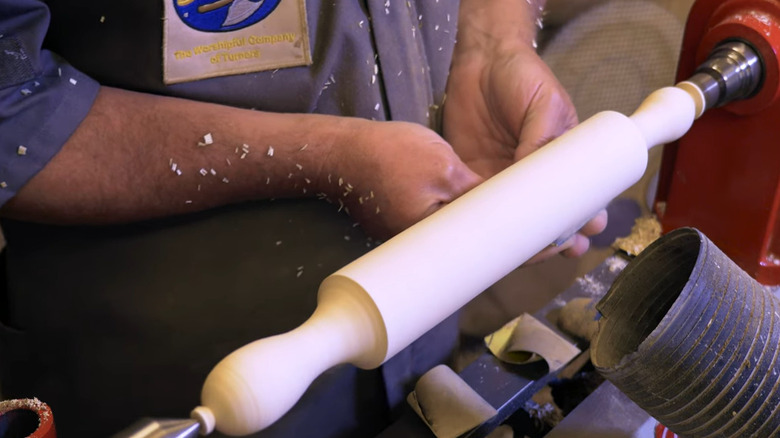
Another handy kitchen utensil on the list is the rolling pin. Chances are, you don't use these frequently unless you're a baking enthusiast, but what better way to make pastry-making extra special than baking them with a custom-made rolling pin?
What you'll need:
-
Center finder
-
Bradawl
-
Roughing gouge
-
Fingernail gouge or parting tool
-
Skew Chisel
The first step to crafting rolling pins is simple: Find the center point at each end of your chosen wood blank. You can use a center finder or the old-fashioned pencil-and-ruler combo for this task. Once you find the center, mark a small point using a bradawl. Mount the wood piece on the lathe chuck and use a roughing gouge to shape the square into a cylinder. For the handles, you can use a parting tool and calipers to size them before applying the roughing gouge again to trim the wood to your ideal measurements. A fingernail gouge also works fine for this. Give some room at the ends to cut away the holes you created as handholds for the lathe to grip.
Once this is complete, before moving on to sanding, use a skew chisel to wipe the surface clean of any remaining sawdust. You'll need to be thorough with sanding, starting with 100-grit sandpaper and running up to 400. If this task starts getting repetitive, you can use a drill to make sanding easier. Then, for the final step, apply a food-safe mineral oil and let it soak.
Candleholder
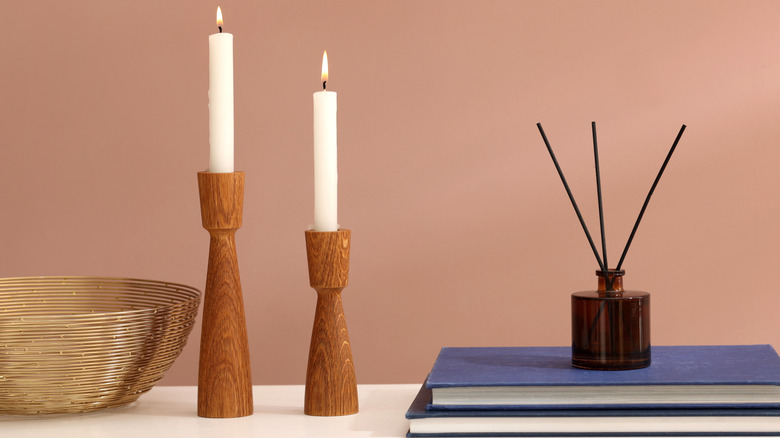
While kitchen utensils are a woodturner's favorite, for obvious reasons, candleholders can transform your home's aesthetic into a quaint paradise straight out of a children's novel. While you can make candleholders from any wood type, thinner designs work best with spindle-oriented stock.
What you'll need:
-
Center finder
-
Roughing gouge
-
Spindle gouge
-
Gloss wax
-
Drill chuck
The first step here, like for most woodturning projects involving circular shapes, is to locate the center on a wood blank. Depending on your design, you can then either shape the blank into an octagon, for smaller sizes, or create a dovetail tenon, for longer shapes. Proceed to shape the edges into a cylinder. You'll need to cut a "foot" to serve as the base of the candleholder, then place this foot into the chuck. For longer shapes, use a drill chuck to drill a hole up to your desired candle depth in the holder. Shaping the candleholder can be done using a roughing gouge and a scraper.
Once your ideal shape comes to life, sand the candleholder, ideally with 220 grits and above, but be careful. Over-sanding the top could alter your measurements of visible candle length. Once sanding is complete, apply any finishing oil of your choice. If you're inclined, you can add gloss wax to give the candleholder a shine.
Goblet
There are several goblet designs to try out, but at their heart, the core structure remains the same: a deep bowl on a stemmed foot. You'll need to ensure the physics works just right. The stem shouldn't be too thin, and the base has to support the entire structure.
What you'll need:
-
Center finder
-
Roughing gouge
-
Spindle gouge
-
Parting Tool
-
Drill bit
-
Scraper
-
Chucks
Starting with your prepped wood blank, use the center finder to create a spigot to attach the piece to the wood lathe. Shape the wood piece into a cylinder using the roughing gouge. You'll need to decide the height of the cup portion at this point, making a sizable indentation into what will eventually form the stem of the goblet. Use a spindle gouge and roughing gouge to shape the base of the cup and define its sides. The next step is to hollow out the cup (a drill bit makes this part easier) and open it up using a scraper. Once this is done, you'll need to employ the spindle gouge again to define the stem.
For the base, use a parting tool to cut through the chucked end of the blank. As usual, sand all areas using grits of your choice and apply a food-safe finish to wrap up the goblet creation process.
Honey Dipper
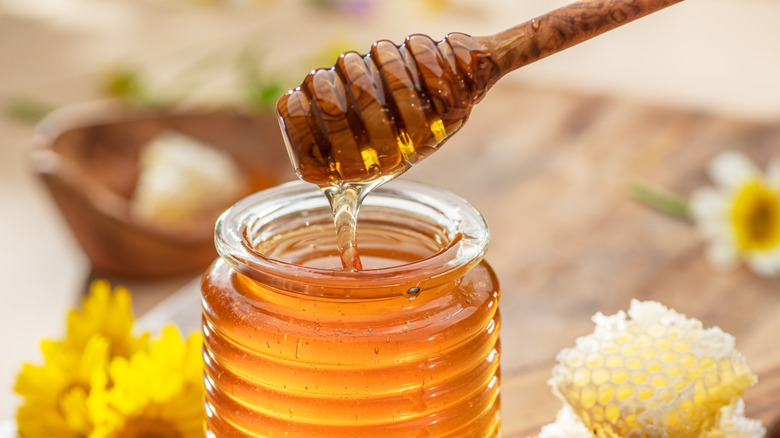
Spoons work just fine for scooping liquid honey out of jars, but things don't have to be "just fine". They can always be designed to be a bit more chic. That's the idea behind the honey dipper – it picks up honey and controls the flow in a drooping manner that gives the ordinarily mundane task a bit more extravagance. The shape of the dipping end affects how much honey you can scoop up, so you'll need to do a bit of research to find the right fit that suits your fancy. The next item on the design checklist is wood selection; It's important to steer clear of wood stocks that might taint the honey.
What you'll need:
-
Roughing gouge
-
Spindle gouge
-
Band saw
-
Food-grade finishing oils
When prepping the wood that'll eventually become your honey dipper, use a pencil to mark out the grooves. Trim the edges with a parting tool (for allowance reasons), then shape the dipper end before cutting into it. You'll use the parting tool for cutting the grooves as well — you should have an ideal diameter in mind to stop your incisions for uniformity. The same holds for the handle.
For sanding, you should aim to progressively apply sandpaper grits between 100 and 220, wiping down with a paper towel. Remove the honey dipper from the lathe and cut off excess wood with a band saw. Apply a food-safe finishing oil, and the honey dipper is ready to go.
Salt and Pepper Mill

Although they don't jump out of the page as collectibles, salt and pepper shakers are useful to have in the kitchen and are often attached to sentimental value. Condiments don't always have to be sprayed by hand; you could infuse a bit of old-school aesthetic into your cooking with these shakers.
What you'll need:
-
Miter saw
-
Drill bit
-
Drill press
-
Calipers
-
Center finder
Prep the wood blank with the miter saw, making the wood piece square and ready for turning. You'll do a fair bit of drilling in this design, so mark the center at both sides with a center finder. The right drill press and drill bits are useful for creating holes at the top and bottom of the shaker, as the bottom will serve as a chucking point during turning.
For the turning process, use a caliper to keep track of your diameter while biting into the square wood with your roughing gouge. Per usual, observe sanding and finishing protocols, and your salt and pepper shakers are ready to garnish your dishes with their spices.
Vase
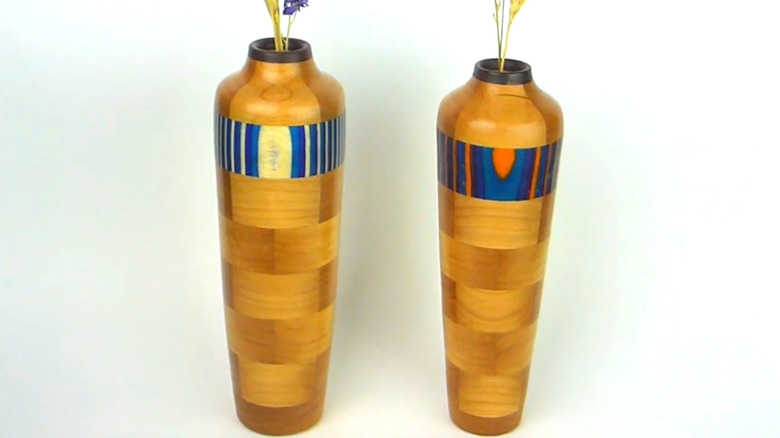
When it comes to accentuating your room decor, vases can be one of the most versatile pieces to add to your collection. Whether they're serving as a holder for flowers (artificial or real) or as standalone showpiece, vases help to amplify the tone of the artistry you've set for your furniture.
What you'll need:
-
Wood glue
-
Table saw
-
Band clamps
-
Drill bit
-
Drill
For this segmented design, you'll be working with multiple pieces of wood, gluing them together into a single cohesive masterpiece. That said, you'll need quite a bit of wood glue, as each "floor" of the vase needs to be glued to the next, and the individual "floors" are made of tiny pieces that also need joining. You can use band clamps to assist in this process.
As for the joining process, take care not to glue the entire structure together at once — do it in halves. The reason for this is to turn and properly hollow each half on the wood lathe. A drill bit can be used to complete this drilling maneuver. After hollowing, you can glue the halves together to get your final vase shape. You could use epoxy to coat the innards of the vase if you plan on filling it with water. Otherwise, apply any finish of your choice to complete the design.
Furniture legs

Every now and then, furniture starts to show signs of structural compromise due to aging or misuse. With wooden designs, the legs may even split over time. Instead of producing a completely new design, you could replace faulty legs with identical ones made on a wood lathe.
What you'll need:
-
Story stick
-
Outside calipers
-
Center finder
The story stick is perhaps the most essential component of the leg-making process. It details all the necessary dimensions for replicating a leg. You'll obtain this by tracing the outline of an existing leg onto any material.
To begin shaping the legs, first ensure the lengths are uniform to avoid imbalance. Then, mount the piece on the wood lathe after finding the center. The design then becomes a process of tracing; transfer the markings on the story stick to the mounted wood piece. As a final check, make sure the tenon fits snugly in an existing seat leg hole.
Pen

Wooden pens have an aesthetic that mass-produced stationery pales in comparison to. As a bonus, since no two pieces of wood are exactly alike, wooden pens always have a unique design. Plus, turning pens on a lathe can feel especially rewarding.
What you'll need:
-
Skew chisel (or pen turning kit)
-
Pen mandrel
-
Pen tube
-
Drill press
-
Clamp
-
CA Glue
The first step in crafting your pen is to drill a hole in your prepped wood blank using a good drill press. Apply CA glue to the pen tube and insert it in the blank, ensuring the glue is properly applied inside. Also, watch out for alignment issues between the tube and the blank — you might need to sand down one of them for uniformity.
To actually turn the pen on the lathe, use a pen mandrel and a set of bushings to secure the piece. Bushings also serve as a diameter guide when thinning the wood. Sand down the product using a minimum of 220 grit and apply your finish.
Bracelet

Much like the accentuation power vases have on home decor, bracelets can really put a fashionable look together. Whether it's glistening jewelry or wooden bangles, there's a place for bracelets on every wrist.
What you'll need:
-
Parting tool
The good news is that almost any type of wood can work for designing bangles, so you don't need to be picky. Prep your wood blank by cutting off the corners. Attach the blank to the wood lathe and turn the square block round, then use a parting tool to cut the inside diameter. Remember to sand the insides of the resulting circle properly (around 220 grit should be fine). You don't want to get splinters from wearing your new accessory.
Likewise, part the bracelet from the tightened chuck jaws and sand the outsides. You can perform this incrementally from 100 to 320 grits. Add the necessary wax to give the bracelet an eye-catching shine.
Lamp

The degree of difficulty associated with turning lamps depends on the structure, but the intricacy involved in the crafting process makes this object a significant challenge.
What you'll need:
-
Spindle gouge
-
Roughing gouge
-
Parting tool
-
Skew chisel
-
Calipers
-
Wood glue (optional)
-
Lamp kit
Depending on your design specifications, you might need to glue wood blanks together to meet the desired body diameter. Before gluing, cut grooves in them and install plugs, so the whole blank can be mounted on the wood lathe. Shape the wood blank into a cylinder using the spindle roughing gouge (remember to wear a face shield). Use the parting tool to size the appropriate diameters, then shape the curved portion of the lamp first with the spindle gouge. Similarly, work the neck by cutting towards the center from both sides.
For the bottom section of the body, you'll need to create a tenon that'll join the body to the base mount before treating it just like the previous segments. Crafting the base mount isn't difficult, just remember to drill a hole for the wiring to pass through the entire lamp. To transform the lamp from mere decor to a functional masterpiece, assemble the electricals by following the lamp kit's wiring instructions.
Chessboard and pieces

Chessboards have an undeniable elegance, as the hardwood that serves as battlefield for the sharpest of minds. The alternating, foldable wooden design of the board, as well as the intricate carvings of the individual pieces, present a challenge even for experienced woodworkers.
What you'll need:
-
Clamps
-
Wood glue
-
Glue scraper
-
Hand plane
-
Cross-cut sled
-
Bandsaw
-
Spindle roughing gouge
-
Skew
The first thing to consider is that chessboards are made up of 64 squares – meaning you'll need at least eight smooth pieces of wood. Prep each piece sufficiently, then put your clamps and wood glue to use, joining your pieces together. Once the glue dries sufficiently, use a glue scraper to remove any excess. To get the signature checkered pattern, apply the cross-cut sled and rip eight strips, flipping every other strip. Glue them back together as before and add borders. Then, sand down the board with 150 to 320-grit sandpaper.
For the pieces, once you've selected an ideal wood stock, cut the blanks down into specified dimensions for each chess piece. You could start designing from the simplest piece, the pawn, shaping the square round with a spindle roughing gouge. You'll also need a skew for the more precise cuts. The knight is considered the most difficult piece to design — you'll need to carve it in addition to turning, and there's a fair bit of gluing involved as well.