13 Camera Maintenance Tips To Make Your Photography Gear Last A Lifetime

We may receive a commission on purchases made from links.
Despite significant advancements in cameras, which have increased their durability, even particularly rugged models — such as the Olympus OM-1 Mark II — require proper maintenance to stand the test of time and the rigors of heavy use. Cameras represent an investment ranging from hundreds to thousands of dollars, or even more in some extreme cases. With your camera costing potentially as much as a used car, these aren't just mere accessories and tools but a major investment, and handling them carelessly can have soul crushing and financially crippling consequences.
A good camera can last a lifetime if you treat it right, and old cameras that have been kept in good condition can even retain considerable value many years later. It can pay to take care of your gear. I've learned this the hard way, and with over a decade's experience as a professional photographer under my belt, I'd like to share the best practices I use to keep my cameras in good working order.
Install a camera skin
Stick-on camera skins provide an extra layer of protection for the camera body. They won't prevent damage from serious accidents, but they help to keep the camera from being degraded by wear and tear via extended use. Like with screen protectors, I now install a camera skin immediately upon purchasing the camera. This removes the need to clean the camera before installation, and reduces the possibility of unwanted debris from becoming trapped under the camera skin.
I began using skins for my camera gear after I purchased the very expensive (but amazing) Nikon 800mm f/6.3 VR S lens. I was disturbed by little superficial scratches appearing on the barrel of the lens, so I purchased a skin, which has since prevented wear and tear from affecting the lens. I then noticed that my Nikon Z9 was suffering from rubber components warping and losing cohesion with the body, so when I bought the Nikon Z8 I immediately installed a skin on that, which has kept it in tip-top condition ever since. I personally use Alphagvrd skins, though other brands are available.
Use screen protectors
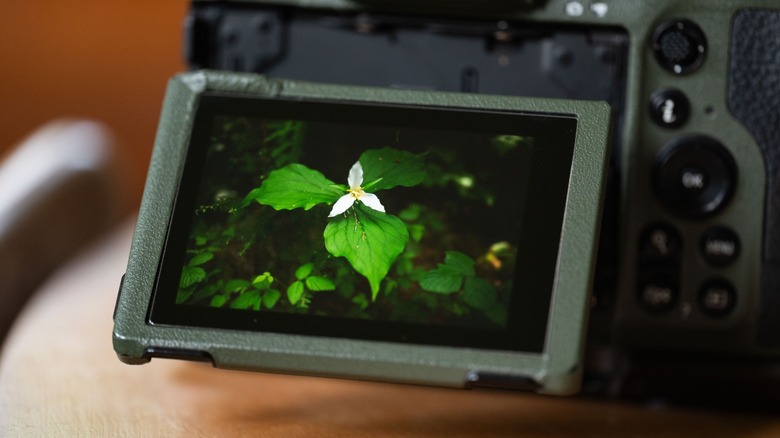
You don't want your LCD screens getting scratched, and I always install high quality screen protectors on my cameras. Even if you're really careful, accidents happen. Even if you don't ever drop or handle the camera lightly, all it takes is a piece of particularly hard grit in your camera bag, or perhaps a sharp metal zipper on your clothing to leave a permanent, irritating mark. One of the first things I always do when buying a new camera is to install a stick-on glass screen protector. In fact, I'll order the screen protector before I even buy the camera.
They're available for as little for $7.99 on Amazon, and installation is easy. It's essentially the same as installing a screen protector on a smartphone, and I have never known any I've installed over the years to need to be replaced. What's more, they don't interfere with touch-sensitive displays, and once installed you will soon forget it's even there. If your camera also has a top-mounted display (typically used to show exposure settings), be sure to also protect that — though in camera specific kits, protectors for all displays on a camera are typically included. One thing to look out for is that it's easy to get bubbles trapped between the protector and the screen during installation. These are annoying, but do not really affect the operation of the camera.
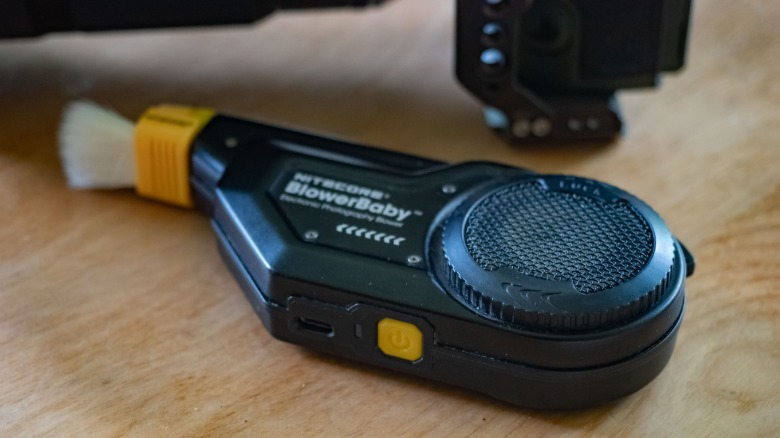
Clean it with a blower/brush
Your camera will acquire dust and grime over time, and a blower/brush should always be your first method for removing the accumulated particles. Even if you are meticulously careful about keeping your camera in a camera case when at home or out shooting, dust accumulation is inevitable. Worse, this dust and grime can contain particles capable of scratching your camera or lens. An air blower and brush can remove dust and dirt from your camera without applying the pressure which might otherwise lead to damage.
 Andy Zahn/SlashGear
I personally use a Nitecore Blowerbaby, which is a pocket-sized electric air blower, and it does a fine job of cleaning off my camera and other gear. It has both hard and soft brushes available to purchase separately which clip onto the blower, so that particles are blown away as they are dislodged by the brush. Nitecore also sells a newer, upgraded model for $69 on Amazon, and after long use, I can confidently say that these devices are well worth your money.
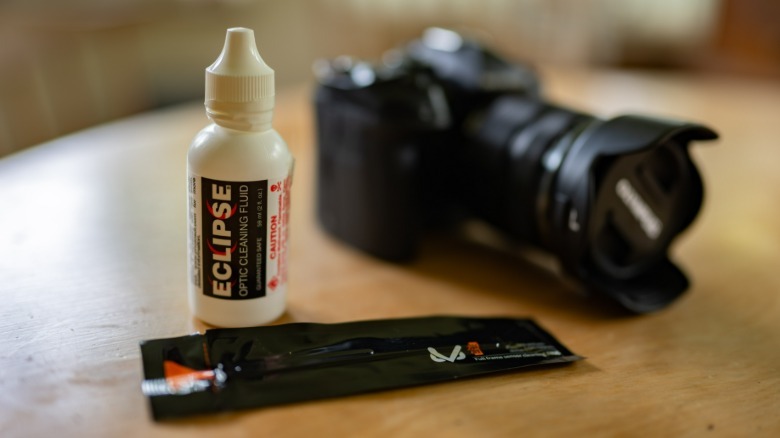
Take care of your camera sensor
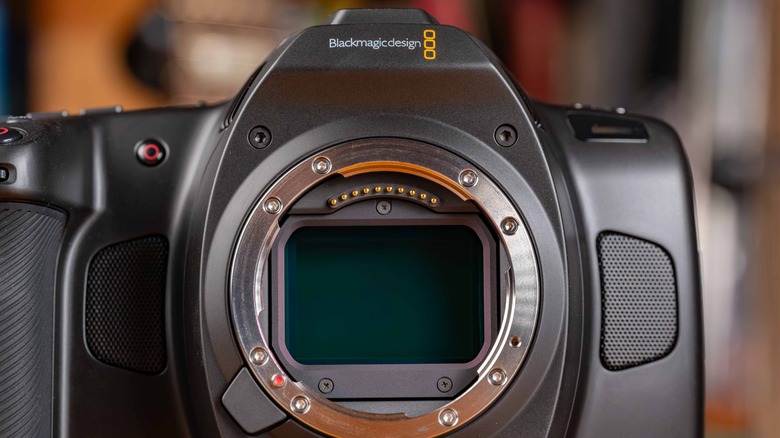
Your sensor is possibly the most delicate part of the entire device, and there are a few things to take into consideration to prevent damage to it and keep it operating at peak quality. First of all, never touch the camera sensor, with the sole exception of cleaning tools designed for the task. If you need to remove dust from the sensor, use a tool like the previously mentioned Blowerbaby, and do not blow on it with your breath, as your breath is moist, and spit residue is difficult to remove.
It's also important to take particular care to reduce exposure of the sensor to the elements when changing lenses. Keep the camera pointed down to reduce the chance of particulates or moisture entering the camera body and falling on the sensor, and avoid changing lenses in inclement weather. A sandy beach or desert environment is particularly dangerous, and you certainly don't want to be changing lenses in a rainstorm.
 Andy Zahn/SlashGear
You can clean your own sensor if you're feeling brave, but you can also have it done at most camera stores, and some manufacturers (such as Nikon) will offer this service. If you do it yourself, be sure to use the right tools, and study precisely how to carry out this procedure. I use Eclipse Optic Cleaning Fluid ($8 on Amazon) and VSGO sensor swabs ($32 on Amazon) with excellent results.
Wipe it down regularly
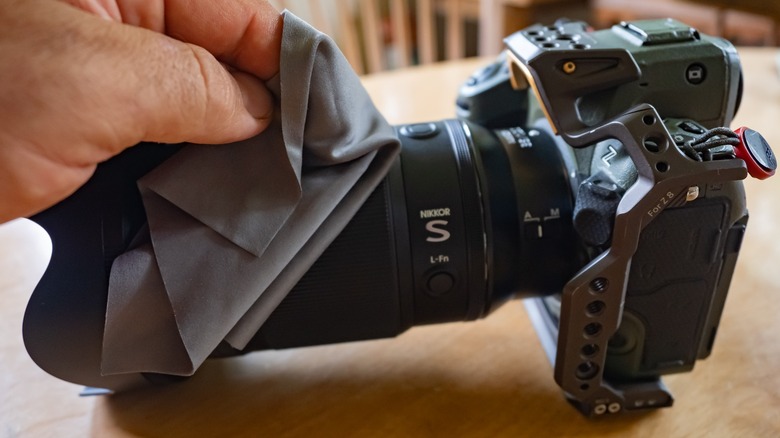
If you get salt spray, sunblock, or even just sweat on the camera body, it can cause damage. It's a good idea to wipe it down after each use. Corrosion and damage can have a severe, adverse impact on the camera, even if left on just overnight. This is likely what resulted in the rubber grip and port covers of my Nikon Z9 becoming warped and beginning to peel off. I have highly acidic skin, and I frequently shoot outdoors while undertaking activities such as hiking which results in copious sweat. When I use the camera after hauling an 80-pound pack up a mountain, all that sweat on my hands is transferred to the camera. The acidity of the sweat then impacts the rubber, resulting in it breaking down and warping over time.
By simply using a damp cloth to wipe your camera down at the end of the day, you can prevent degradation from any material which might have collected on it. This can greatly increase the longevity of your camera.
Store it in a dry cabinet
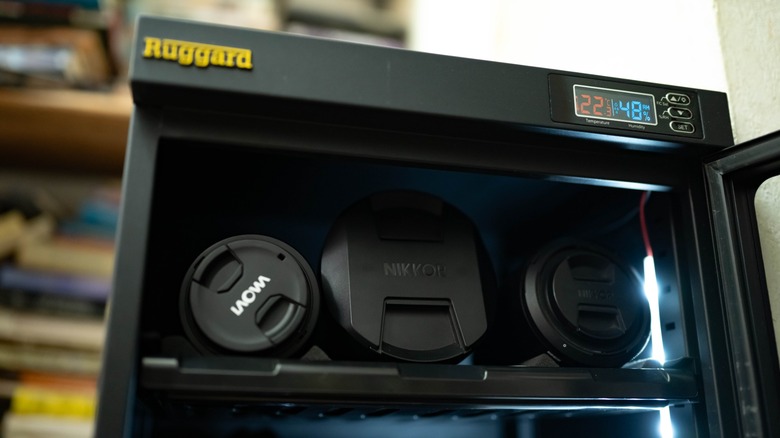
When not in use, I store my gear in a dehumidified dry cabinet. This is particularly important in especially damp regions, such as the Pacific Northwest. Maintaining proper, consistent humidity during storage of your camera is key to ensuring that it lasts as long as possible. These cabinets, being sealed environments with no air movement or dust ingress (save when you open the door), also help to prevent your gear from growing increasingly grimy when you aren't actively using it.
I personally own two Ruggard cabinets, which have functioned flawlessly for many years, and do so in complete silence. They feature padded, customizable shelving, which pulls out for easy access to your gear, and they feature customizable temperature and humidity redouts, as well as a locking door and interior lighting. The only downsides to these cabinets is that they do need to be located near an outlet and plugged in, and they are somewhat pricey on B&H (though they do frequently go on sale).
Consider using UV filters
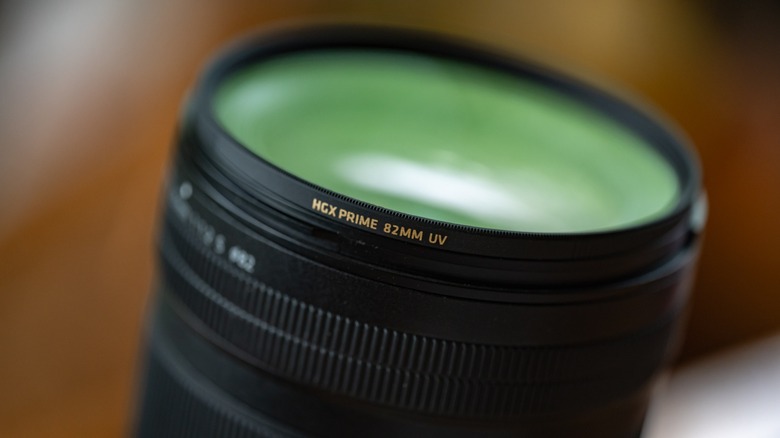
UV filters help protect your lens from damage. Also known as "skylight" or "defender" filters, they allow most wavelengths of light to pass through, other than UV of course. UV light doesn't really affect image quality with modern digital cameras, but neither does the lack of UV light negatively impact image quality.
However, inexpensive filters can negatively affect image quality, and even really good filters will have some small impact on image quality, though typically it is so imperceptible as to be practically nonexistent. Many photographers choose not to use UV filters at all for this reason. It's a personal choice you have to make based on whether the slight loss of image quality and the expense of a high quality UV filter is worth the protection they offer to your lens. I personally don't use UV filters on most of my lenses, and several aren't really compatible with them. However, I do have a UV filter on my new Nikon 35mm f1.2 S lens, just because it is quite valuable and it does accept typical 82mm filters. It's also my absolute favorite lens, and I would be shattered if anything happened to it.
Install a camera cage
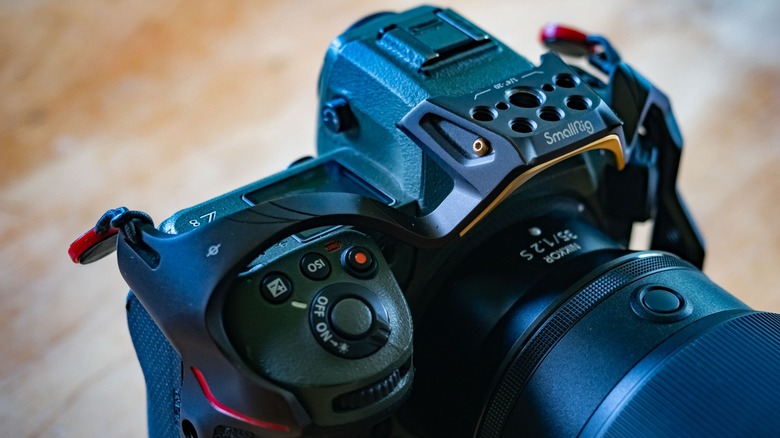
A camera cage offers many advantages, one of which is protection against accidental impact. Camera cages come in many shapes and sizes and are usually made to fit specific camera models. They attach via the tripod mount on your camera, and often add useful attachment points, integrated cold shoes, and even built-in quick-release mounts for tripods. Usually it's this extra functionality is why you'd install one on your camera, but in my experience they also function as an incredibly valuable method of warding off unexpected scrapes.
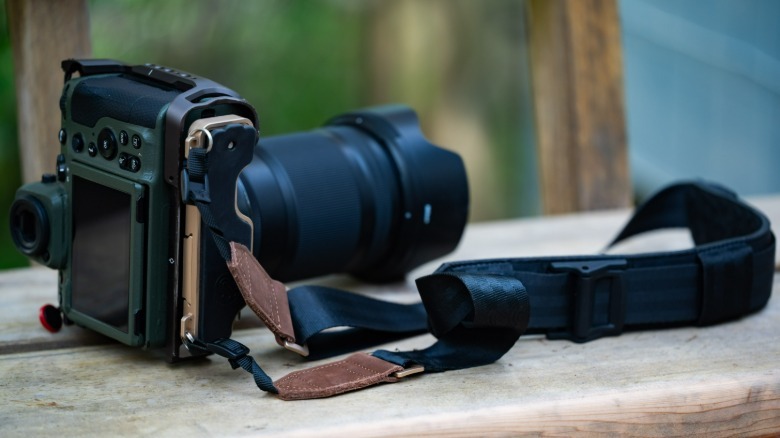
For my Nikon Z8 camera, I purchased the Smallrig Night Eagle camera cage ($99 on Amazon), which very much lives up to its name thanks to its sleek, contoured shape and beautiful paint job. It fully encapsulates the camera, and has saved my Z8 from many potentially damaging scenarios. The integrated Arca-Swiss compatible tripod quick-release plate is extremely handy, as is the optional detachable top handle, which I use to mount microphones on the camera via its integrated cold shoe without having to utilize the hot shoe on the camera itself. Between its military green Alphagvrd skin, screen protector, and this camera cage, my Z8 is rather well protected.
Attach a camera strap correctly
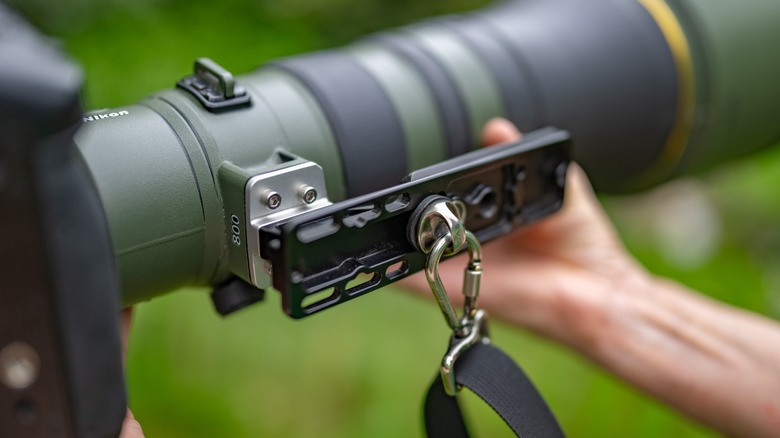
It may be tempting not to use a camera strap, as they often get in the way, but they can save your camera from destruction. Be sure to use them correctly, as with longer lenses they may cause damage. When you connect a large, heavy lens to a camera, remember that the lens mount is a weak point which can only withstand so much force. If you suspend a camera from a camera strap attached to the camera itself, and you have a heavy lens — unless you're holding onto the lens at all times — you're putting a significant amount of stress on the lens mount. With this in mind, I recommend a Blackrapid Sport strap, which was one of the first products I ever reviewed and has been a durable, reliable part of my kit for over a decade.
 Andy Zahn/SlashGear
As a rule of thumb, if a lens includes a tripod foot, then this is where you should attach the camera strap. However, with smaller lenses you need to attach the camera strap to the body of the camera itself. For this you can use the strap included with your camera, but I recommend investing in a third party strap. You can attach this to the strap hooks found on most cameras, or from the ¼-inch screw mount on the underside of the camera. I recommend a strap from PeakDesign if attaching it to the standard strap mounts, however, the new Lemurstrap is a really clever option which attaches to the screw mount with a quick release plate. It's extremely comfortable, and does a better job of keeping the camera secure than other straps I've used.
Take care of your batteries
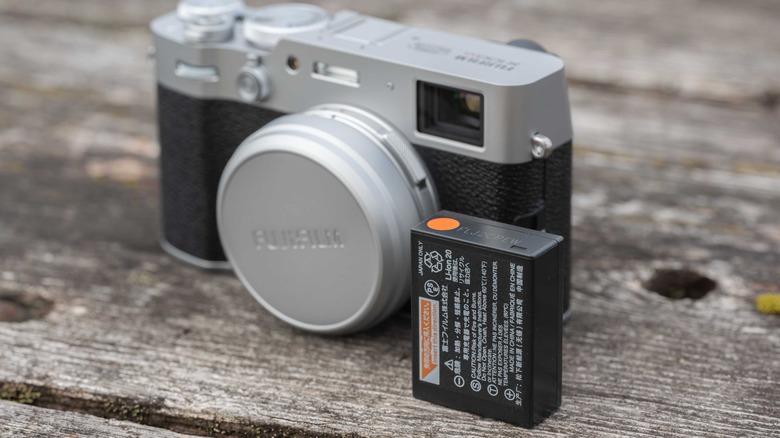
Lithium-ion batteries are delicate, potentially dangerous things with a limited lifespan, and proper care and maintenance is necessary. Keeping these stored in the aforementioned dry cabinet is a good idea, and you'll want to avoid storing them at full capacity. Also, when storing your battery over a long period of time you will want to remember to recharge it regularly, as you don't want to let it run down to empty. This will result in the battery losing capacity over time.
Additionally, you want to do your best to avoid exposing batteries to the elements. Water is not a friend, so if you're in a wet environment you need to be careful when swapping batteries. Hot and cold temperatures also aren't good for them, and you should avoid exposing them to direct sunlight for extended periods. Such harsh conditions will result in reduced capacity, so you want to be mindful of your spare batteries when out in the field. For example, when backpacking I sleep with my batteries inside my sleeping bag at night.
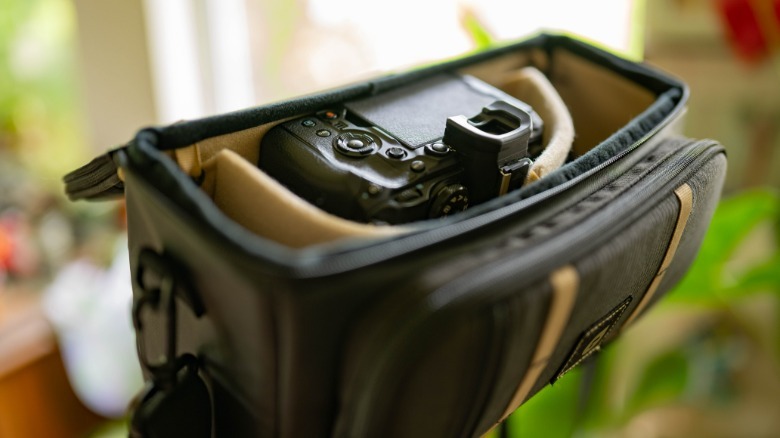
Carry your camera in a protective bag
When stowing your camera between shots, it's important to use a high-quality camera bag that will provide adequate protection. You really don't want to be carrying a camera in a thin bag, or be mixing it in with random junk such stowed in a purse or backpack. Also, you don't want to carry your camera in a container where it might shift around as you walk. I once carried a lens in a backpack in which it was poorly secured, and when I got back to the trailhead after climbing a mountain, an interior element in the lens had broken from being rattled around in the pack. This is why it's important to have sturdy, customizable internal dividers inside your pack so that your camera and lenses will remain held securely in place.
 Andy Zahn/SlashGear
For these reasons, I highly recommend PolarPro's Roadrunner series, as I have found them to be durable, well padded, and possessing an excellent customizable internal divider system. What's more, each has integrated cleaning cloths, so you can wipe your gear down when needed.
Treat your storage media with care
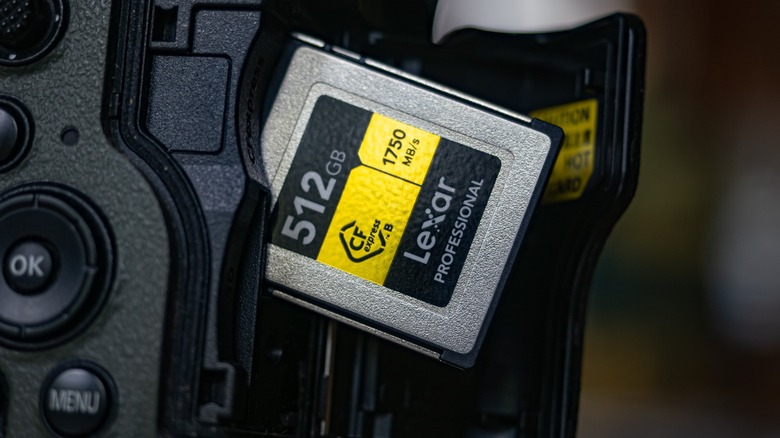
Properly care for your SD or CFE cards, and practice correct protocol when unplugging your camera from a computer. This means that before unplugging storage media, it's always a good idea to have the computer eject your SD, CFE, or camera connected via USB before removing it. The method for ejecting storage media varies by device, but on PC it can be done from the taskbar, or from file explorer by right clicking on the icon/name of the storage media and clicking "eject" from the pop-up menu. This helps to prevent file corruption or other errors from occurring.
When not in your camera, it's a good idea to place storage media in protective cases, and it's also smart to keep them in a dry cabinet. With microSD cards, a protective case is also a particularly good idea given how small and easily lost they are. For devices with internal storage, it's important to be extra careful not to damage the USB port, as it's the only way to access that media (unless of course it can connect via Wi-Fi).
Buy insurance and take precautions against theft

Accidents happen, and there's only so much you can do to prevent the worst from befalling your camera. The more expensive your gear, the more worthwhile it is to invest in protection for it. This may be done through your homeowners or rental insurance, or a dedicated camera insurance company, such as Full Frame Insurance. While your plan will vary in what it covers, and there are caveats, the more you have invested in your camera gear, the more important it is to get it insured.
Beyond insurance, there are some basic steps you can take to keep your camera out of harm's way. Car break-ins are a serious problem, and the last thing you want to have stolen is your camera gear. Also, think of your car like an oven or a freezer, depending on the weather. Neither of these appliances are good places to keep your camera, and neither is your car. Similarly, don't leave your camera or camera bag unsecured in a public space, even if you are present. It's all too easy for a skilled thief to snatch a bag by your feet, or even pluck a camera off the table beside you and make a dash for it, or for someone to kick, bump, or spill a beverage on it. Don't let yourself be a victim of ne'er-do-wells, and just generally try to be mindful and not place your camera in unnecessarily hazardous situations.