Google Photos Just Made Its Best AI Features Free: Here's How To Use Them
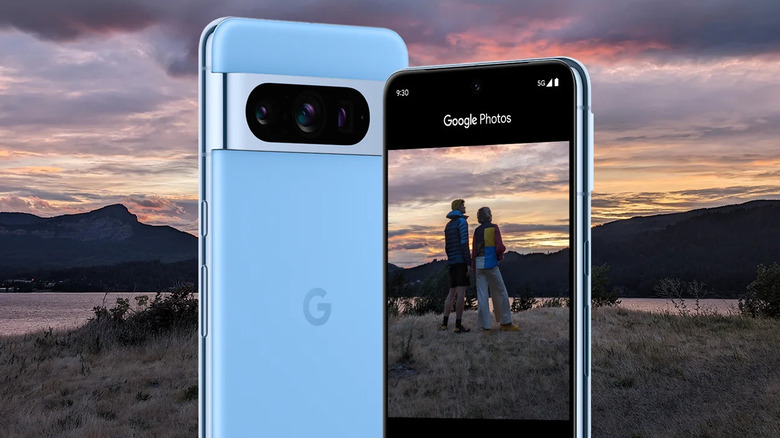
Google Photos, one of the best photo storage and management suites around, just got a lot better. For some time, Google Photos has been adding handy AI tools to make it easier for users to edit photos. Now, Google has announced that some of its best AI image editing tools will be made available to all Google Photos users free of charge.
Included among the newly accessible tools are generative fill features like the Magic Editor, which lets you reposition objects; and Magic Eraser, which removes objects from photos; as well as algorithmic enhancement features like Photo Unblur and Portrait Light.
Some of these features have traditionally been exclusive either to Pixel owners or Google One subscribers, but Google has now opted to open the doors of its AI stable. Maybe it's a bid to draw more users to its services, since the more pictures the AI works on, the better it will get. Whatever the case, you can start using these features on May 15 according to Google's announcement post. They're an excellent addition to an app that already has some of the best Android photo management on offer, including an incredibly robust AI search function and automatic photo and video backups.
If you haven't spent any time with Google Photos, or simply haven't had the opportunity to explore the newly free AI suite of editing tools, there's no need to be overwhelmed. Here's how to use all of the AI editing tools that will soon be free for Google Photos users.
Magic Editor
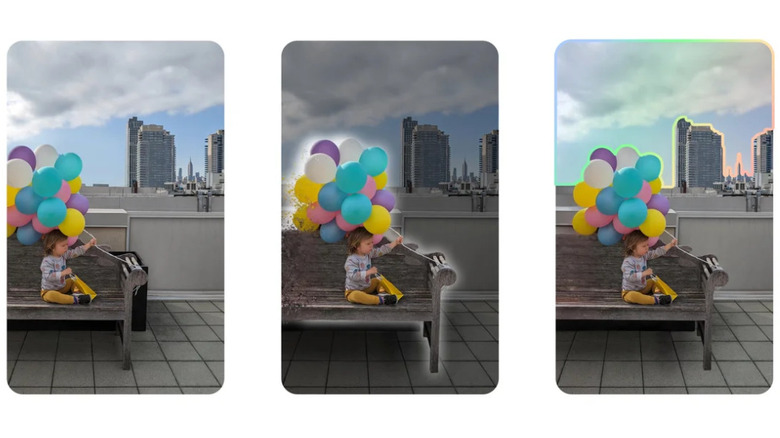
Unveiled alongside the Pixel 8 series of smartphones in 2023, Magic Editor is a Google Photos feature that allows you to move and manipulate objects in a photo, even using generative fill to account for portions of the object which were out of frame. For example, Google demonstrated the feature by moving a child holding balloons further into frame.
Unlike other AI editing tools being made available to the public, Google is being a bit more stingy with Magic Editor. Free users can only get 10 uses per-month, with additional uses being paywalled behind a Google One subscription. Additionally, Magic Editor is only coming to hardware that can support it, which probably means it will be limited to newer smartphones.
To use Magic Editor in Google Photos:
- Tap on the photo you'd like to edit inside of Google Photos.
- Tap on the Edit button, which looks like a set of dials.
- Tap on the Magic Editor button, which is a tiny icon that looks like a photo with a star in it near the bottom left of the screen.
- Tap or circle the object you'd like to manipulate. Once highlighted, the object can be moved freely around the screen.
- Tap the continue button, which looks like a right-facing arrow at the bottom of the screen. After a few moments, Magic Editor will generate the changes.
- Tap the checkmark icon in the bottom right of the screen to save your changes.
- Tap the Save button.
Keep in mind that Magic Editor works best on photos with predictable backgrounds, such as skies, beaches, or grass. If you get weird or bad results, try again, since the AI may not work the same way each time.
Photo Unblur
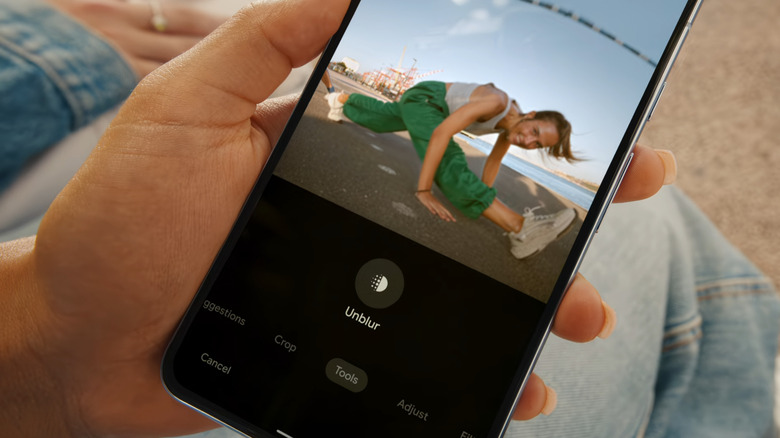
First introduced with the Pixel 7 in 2022, but now available to all Google Photos users, Photo Unblur does exactly what its name implies: it makes blurry photos sharper. We've all taken that perfect picture while out with friends, only to look at it later and sadly realize it came out blurry. Photo Unblur will analyze the picture to figure out how it would have looked if taken correctly, then apply those characteristics.
To use Photo Unblur in Google Photos:
- Tap on the photo you'd like to unblur inside of Google Photos.
- Tap the Edit icon, which looks like a set of dial sliders, to enter the editing suite.
- Navigate to the Tools tab near the bottom of the screen.
- Tap "Unblur" to apply the effect. You can use the slider at the bottom of the screen to adjust how much processing you'd like applied to the photo.
- Once you're satisfied with the results, press Done.
- Press Save at the bottom right of the screen.
Magic Eraser
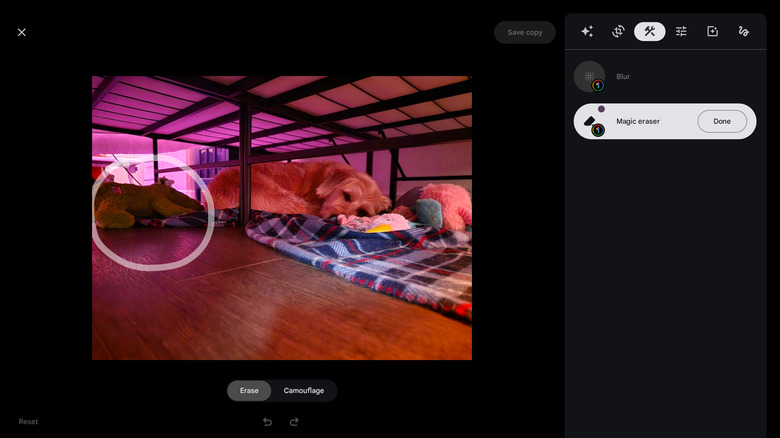
Magic Eraser is one of Google's most mind-blowing AI editing tools. It allows you to remove objects, or even entire people, from a photo, then uses generative AI to fill in the empty space left behind. The feature was initially launched in 2021 alongside the Pixel 6 lineup, and was released for all Google One subscribers last year. Now, anyone with the Google Photos app will be able to experience it.
Before trying Magic Eraser, be forewarned that in general, it works best on photos that have predictable backgrounds like skies, beaches, or grass. When faced with removing a person or object from a photo with a more complex background, such as a cluttered interior, the tool often struggles to leave behind anything but a blurry mess.
To use Magic Eraser:
- Tap on the photo you'd like to edit inside of Google Photos,
- Tap on the edit button, which looks like a set of slider dials. This will bring you to the editing suite. By default, the editor opens to a Suggestions page.
- At the bottom of the screen, scroll from Suggestions to Tools.
- Tap Magic Eraser.
- Magic Eraser will start by analyzing the photo to look for suggested things to remove.
- Tap or circle objects you want to remove from the image.
- If you tapped something by mistake, or Magic Eraser did a bad job erasing it, tap the undo button at the bottom of the screen. You can also tap Reset to undo all erasures.
- When you're done erasing things, tap Done.
- Tap Save at the bottom right of the screen to save the edited image.
Portrait Light

When shooting photos with your phone, it's uncommon to have perfect lighting, so Google Photos added the Portrait Light feature to improve the lighting in post. The feature adds simulated, dynamic digital lighting sources, then lets you place them in an imagined 3D space. In order to achieve that effect, it analyzes the photo to determine the subject's facial geometry, as well as which sources of lighting were present in the original photo.
Out of all the AI features in Google Photos, Portrait Light is one of the most impressive simply because of how well it works. In most instances, photos it's used on look like they were actually taken with professional lighting. Be aware, however, that it only works on human subjects, so Fido can't get a face lift.
To use Portrait Light in Google Photos:
- Tap on the photo to which you'd like the Portrait Light effect applied in Google Photos.
- Navigate to the Tools tab at the bottom of the screen.
- If a human face is detected, the Portrait Light button will be present. Tap it.
- Drag your finger around the screen to adjust the angle of the simulated light source. You can adjust the brightness of the effect using the slider at the bottom, or tap the Auto button to let Google's software make the decisions.
- Once you're done applying the effect, tap Done.
- Tap Save in the bottom right of the screen.