5 Accessibility Features For Android Worth Knowing About
In an effort to be inclusive and make it easier for people with disabilities to use Android phones, Google has introduced a slew of accessibility features to the OS. There's the classic TalkBack, which is essentially a screen reader that dictates the texts found on screen. You also have the magnification for zooming in on certain parts of the display, as well as the font and display size adjustments for enlarging or shrinking your text and app icons.
However, these aren't the only accessibility features you can find in Android devices nowadays. Android has changed over the years, especially on the accessibility front, and now includes a wide range of functionalities that make navigating and controlling your mobile phone more convenient than ever. If you haven't opened your Accessibility Suite in a while, we'll introduce you to five Android accessibility features you should know about to make the most out of your phone.
Flash notifications
No matter how loud your phone rings or beeps, you're still bound to miss a notification, especially when you're in a particularly noisy location like a train station or busy restaurant. This, however, isn't an issue with iOS devices, as they have long had an LED flash to visually alert users of any app notification.
Modern Android phones, on the other hand, aren't as consistent in offering the feature. Some leading manufacturers integrate flash notifications in custom interfaces, while in most other Android phones, you'd have to install third-party apps like Flash Alert and Flash Notification On Call.
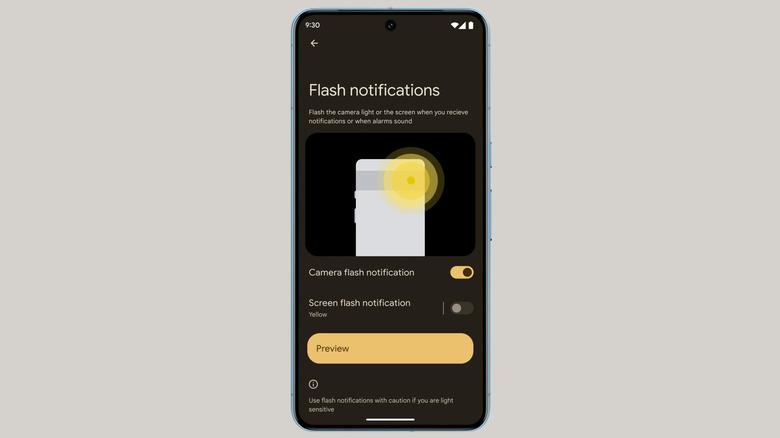
Fortunately, since the release of Android 14 in October 2023, you no longer have to wait for your manufacturer to include built-in flash notifications, or turn to apps to enjoy that feature. If your device supports Android 14, you'll likely get flash notifications right in your accessibility settings. Here's how to turn it on for most Android phones:
- Launch the Settings app.
- Scroll down to Accessibility.
- Under Audio, select Flash notifications.
- Turn on Camera flash if you want to use your rear camera's flash.
- Enable Screen flash if you want your display to flash as well.
- (Optional) Change what color your display flashes by tapping on Screen flash, and picking a color from the preset ones. At the moment, you have 12 shades to choose from, including cyan, yellow, and red.
- Press Preview to see a demo of how your camera and screen will flash after receiving a notification.
Voice Access
While Google Assistant can help you with basic tasks like creating a new email in Gmail or opening Facebook, its control over your device is pretty limited. You can't use it to interact with all the options in the currently opened app, so you won't really get a fully hands-free experience. Some apps also don't support the Assistant, and won't even open with a voice command.
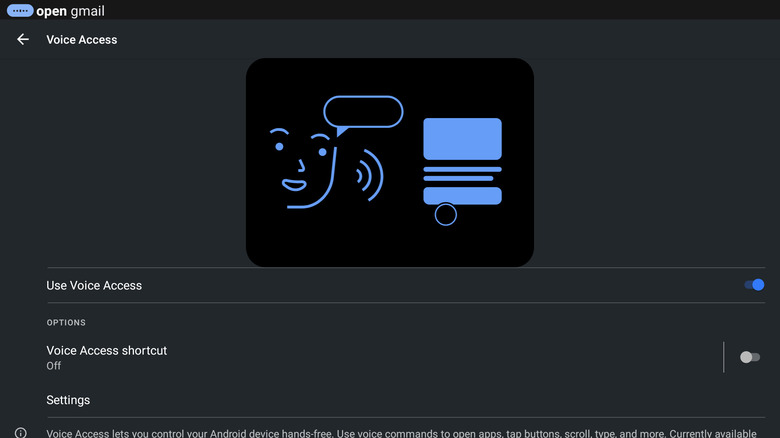
That's where Voice Access comes into the picture. With just your voice, Voice Access allows you to scroll up or down the page, navigate to different screens, and even lock your device. This makes it one of the best Android features for those with mobility issues or who otherwise have their hands busy with other tasks. Here's a step-by-step on how to use Voice Access:
- Make sure your device language is the same one you'll be using for Voice Access. Go to Settings > System > Languages & input > Languages. Currently, Voice Access only supports English, German, French, Italian, Spanish, and Portuguese.
- Change the Google Assistant language to the same language. In the Google app, head over to Profile > Settings > Google Assistant > Languages.
- Go to Voice Access settings. If you're on a Pixel phone, it's under Settings > Accessibility > Voice Access. Otherwise, download Voice Access and navigate to Settings > Accessibility to open its settings.
- Turn on "Use Voice Access."
- Start the service by tapping the notification in your notification panel.
- Configure Voice Access to stay active as long as the screen is on.
From there, you can start controlling your device. You can see all applicable commands in the Voice Access app, or the Google Support page.
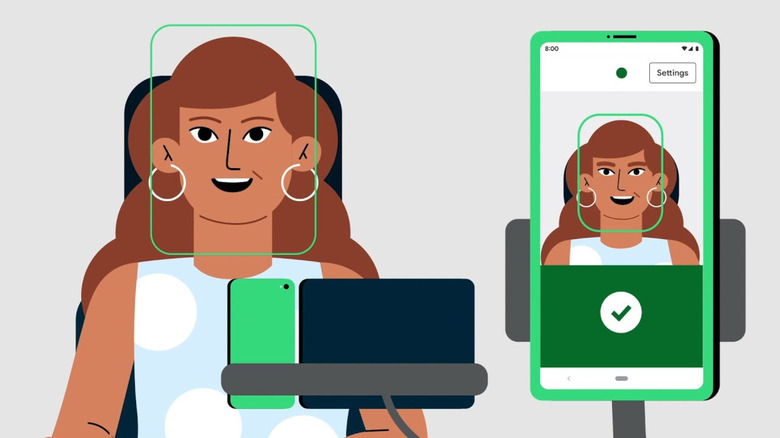
Camera Switch
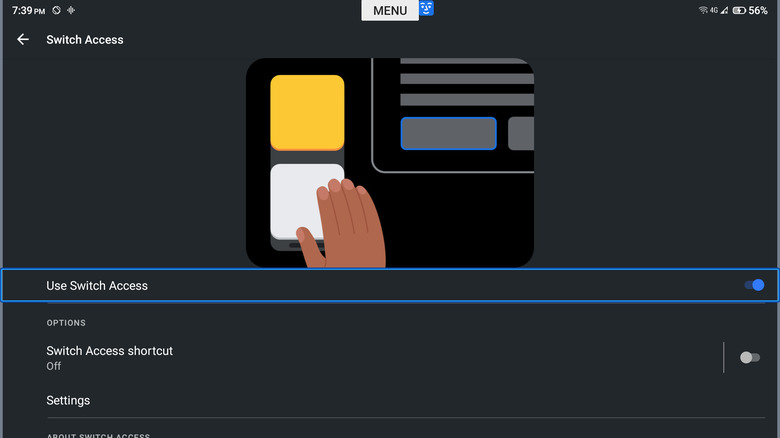
If Voice Access isn't suitable for your situation, Android comes with another accessibility feature for controlling your device: Camera Switch. This uses your front camera to detect certain facial gestures, such as looking left or right, raising the eyebrows, and opening the mouth. Depending on your gesture, you can then navigate your device, select buttons on the screen, and even type messages. To get Camera Switches started:
- Open the Switch Access settings. In the Settings app, navigate to Accessibility > Switch Access. If you don't have it built-in, install Switch Access from the Play Store and enable it in Settings > Accessibility.
- Toggle on Use Switch access.
- When prompted, grant the service access to fully control your phone.
- In the "Choose a switch type" screen, select Camera Switch, then press Next.
- Tap Two switches to use more than one gesture. Otherwise, select One switch, and select Next.
- Set your scanning mode (linear, row-column, and group selection), then select Next.
- Pick a gesture to do the actions next and select. Options include Open Mouth, Smile, Raise Eyebrows, Look Left, Look Right, and Look Up.
- Assign a different gesture to start or pause Camera Switches.
- Test your gestures by playing Tic-Tac-Toe.
- Press "Keep setup" to save your gestures or "Start over" to select new gestures.
- Hit Next and Finish to exit the setup.
- Control your device using your chosen gestures. You'll know that Camera Switches is active when there's a blue smiling face at the top of your screen.
Extra dim
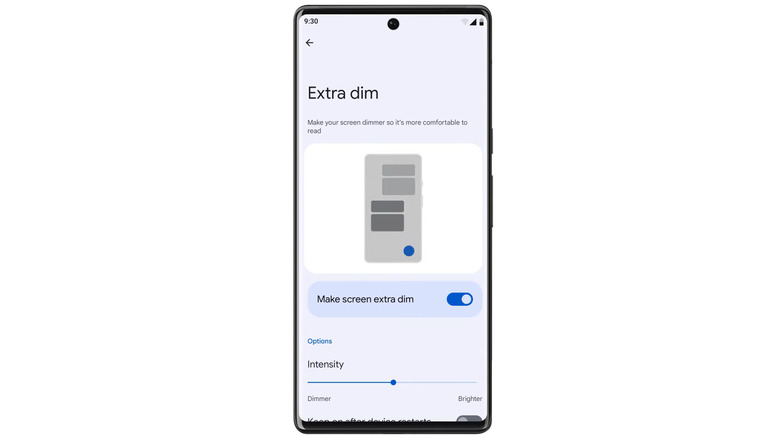
You already know you can adjust your Android device's brightness to whichever level you prefer. However sometimes, the lowest brightness can still be too uncomfortable for your liking. Even if you enable Dark Mode, it can be too bright to your eyes, or disrupting for others. That's the last thing you want when you're using your phone in dark settings like in your room at bedtime, or on a long-haul flight at night.
In such cases, the Extra dim feature can come in handy. Introduced in Android 12, this accessibility functionality decreases your screen's brightness to an even lower level to help you get your preferred soft and mellow glow. Follow these steps to activate this feature:
- Open Settings.
- Select Accessibility from the options.
- Scroll down to the Display section.
- Turn on Extra dim. This then adds it as a new tile in your Quick Settings for easy access.
- Open Quick Settings by swiping down from the top of the screen.
- Drag the brightness slider to the lowest setting.
- Return to the Accessibility settings.
- Tap on Extra dim.
- Adjust the Intensity to your desired level.
- Turn off the option "Keep on after device restarts." This allows you to quickly disable Extra dim by simply restarting your phone should the screen get too dark for you to see the controls.
Sound Notifications
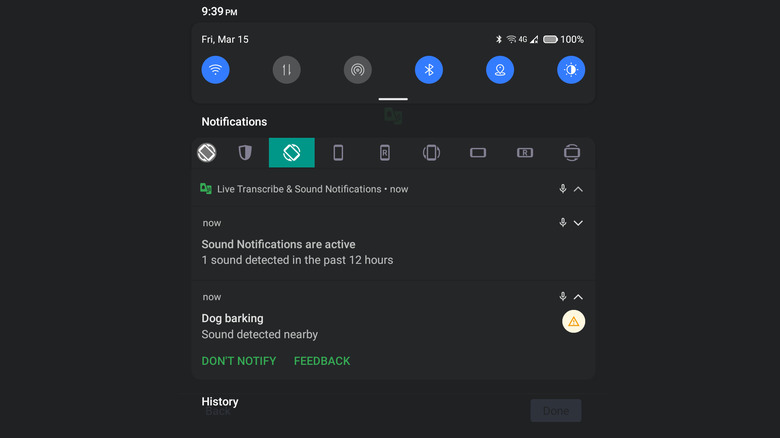
It's easy to miss the beeps of the washing machine, the barking of your dog, or the buzz of your doorbell when you're too engrossed in what you're doing or have your headphones on. Although it's okay not to attend to those things right away, some sounds like the water running or the smoke alarm blaring require your urgent response. If you miss such important sounds more often than you'd like, you'll be glad to know that Android can help you stay aware of them.
The Sound Notifications feature is designed to keep an ear out for the different sounds in your home. As soon as it detects these noises, it sends an alert to your phone. To activate Sound Notifications on your device:
- In the Settings app, go to Accessibility > Sound Notifications. If you don't see it there, you'd need to install Live Transcribe & Notification.
- Tap on Open Sound Notifications.
- Press Turn on to enable it.
- Grant the app necessary permissions.
- Press Try a demo to see how the service works.
- Tap on Got it to open the History/Live view of all the sounds detected in the past 12 hours.
- Configure the sounds you want to be notified about:
- Select the gear icon in the upper right corner.
- Under Preferences, press Sound types.
- Disable any sound you like to ignore.
- Add your own sounds to the library:
- Navigate to Settings > Accessibility > Sound Notifications > Open Sound Notifications > gear icon.
- Select Custom sounds.
- Press Add sound.
- Hit Record to start.
- Record the sound for 20 seconds.
Now, every time your phone hears one of the sounds you've specified, you'll get a notification. To temporarily disable Sound Notifications, press Pause in the notification panel.