5 Ways To Customize Your Apple MacBook Just For You
Apple MacBooks are undeniably some of the best high-end laptops out there. Typically starting at $999, MacBooks often set new benchmarks for the industry, boasting incredible battery life, are known to last for years if treated right, and have a minimalist and sleek appearance. MacBooks are also extremely customizable, with many built-in features that allow you to easily personalize your device to your preferences.
Whether you use your MacBook to binge-watch shows on Netflix or reply to emails throughout the day, the Daily Mail reported that one study found an average person spends eight hours and 41 minutes daily using their electronic devices. Regardless of whether you exceed that threshold, it's a good idea to take time to personalize your MacBook with software and settings that make it feel like it's yours. Not only will personalizing your device help you stand out from the crowd, but it is also a great way to make the most of your MacBook.
So, whether you're tired of working on a laptop with a boring appearance day after day, or recently saw an image of an aesthetically pleasing MacBook on Pinterest, here are ways you can customize your Apple MacBook.
Personalize your MacBook's appearance
While tweaking your device's internal settings according to your liking is certainly important, setting a new wallpaper or screensaver only takes a couple of seconds and can go a long way toward making your MacBook feel like your own. Many websites offer free HD wallpapers for your Mac, so begin by finding a wallpaper that matches your personality, whether it's of your favorite comic book hero, a beautiful vista, or inspirational art.
If you'd like to make your wallpaper even more personal, you can also use an app like Photoshop, or one of its many alternatives, to create a unique wallpaper just for you.
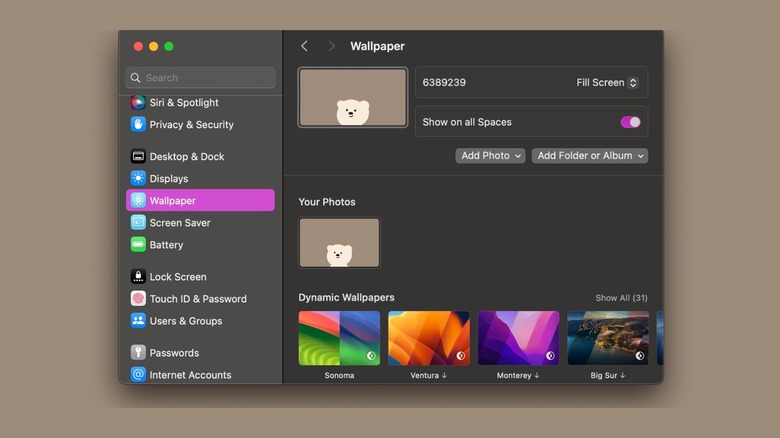
Once you've chosen an image, click the Apple logo in the top-left corner of the menu bar and select System Settings from the dropdown menu. Now, select Wallpaper from the sidebar on the left. If you'd like to add a custom wallpaper, click the Add Photo button. You can also select from Apple's wallpaper collection or simply pick a solid color as your wallpaper under Colors.
Take this opportunity to also pick a Screen Saver from the sidebar on the left. Apple offers built-in ones in categories such as Landscape, Cityscape, Underwater, and Earth.
Tweak your MacBook's trackpad settings
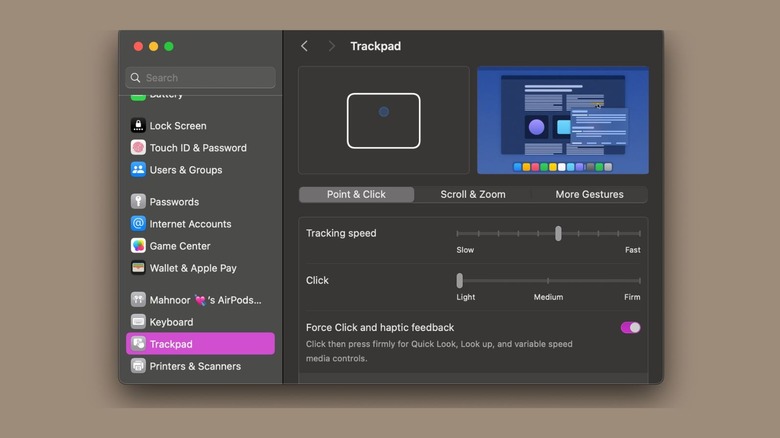
The MacBook's built-in trackpad is loved by many, in part because of its many gestures from two-finger scroll to four-finger swipe between full-screen apps. One more reason to love the trackpad is how customizable it is. If you aren't a fan of a certain trackpad gesture and happen to find yourself activating it by accident often, you can adjust how it works or turn it off entirely. To do so, click the Apple Menu from the top left of the screen and select System Settings from the dropdown menu. Now, select Trackpad from the sidebar.
You'll now see three different tabs on the screen: Point & Click, Scroll & Zoom, and More Gestures. When you select the Point & Click tab, you can adjust the Tracking speed, and how firm your click is. You can also disable or enable Tap to click, among other features. You can also adjust how a right-click (known as a "secondary click" on Mac) is performed on your MacBook or turn it off entirely.
When you select the Scroll & Zoom tab, you can change settings like the direction scrolling works, zoom in or zoom out with a pinch gesture, or zoom in and out with two-finger taps. Finally, when you select the More Gestures tab, you can configure gestures that allow you to open your Launchpad and the Notification Center, swipe between pages and full-screen applications, and more. If you're ever confused, Apple has animations on the screen in the Settings app that show how each gesture works.
Tweak your MacBook's keyboard settings
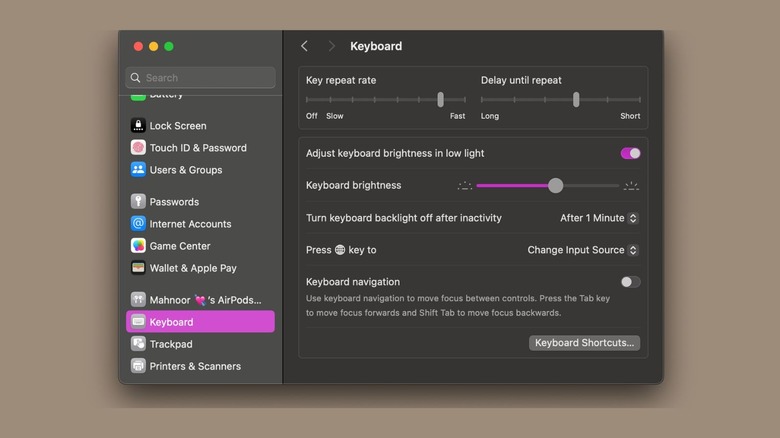
Similar to how you can adjust a MacBook's trackpad settings, you can also do the same with your keyboard. All you need to do is go to the Apple menu, click System Settings, and select keyboard this time from the sidebar. The first thing you'll probably notice are two sliders at the top of the screen labeled "Key repeat rate" and "Delay until repeat." As the names suggest, "Key repeat rate" is how quickly characters repeat when you long-press a key. "Delay until repeat," meanwhile, sets the amount of time it'd take a key's character to begin repeating when you press and hold it for a while.
The backlit keyboard is something most people love, especially if you're someone who tends to work late at night. But turning this feature off, or adjusting the brightness down, is one of the settings you need to change to improve your MacBook's battery life. To enable or disable it, simply click the toggle next to "Adjust keyboard brightness in low light." To adjust your keyboard's brightness, click and drag the slider next to the keyboard brightness toward the left or right. To turn the backlit keyboard off entirely, drag the slider all the way to the left. You can also choose the time that you'd like to elapse before the backlit keyboard turns off automatically.
Another handy feature to set up is Keyboard Shortcuts, which will make your life dramatically easier. One popular way to personalize this setting is to create a shortcut for a word or phrase you type frequently.
Customize your MacBook's dock
One macOS feature that you probably use daily is the Dock, which is at the bottom of the screen by default. Along with showing apps of your liking, it can also display three applications you used recently. Apple sets the Dock to display native macOS applications by default, like Notes, Photos, FaceTime, News, and the company's free Microsoft Office-like apps.
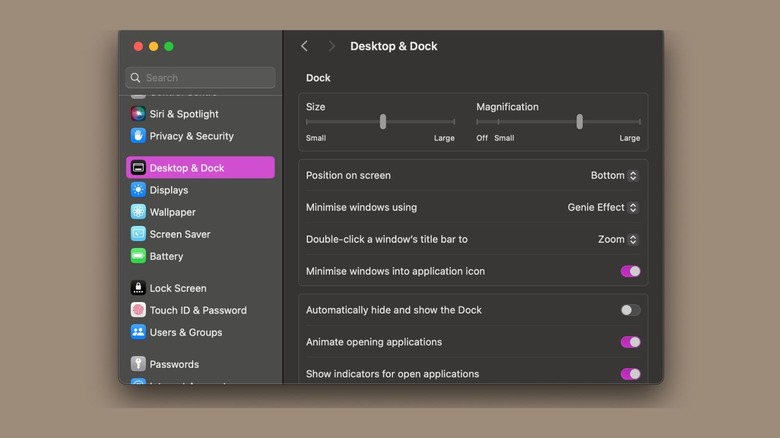
You can remove or add apps to the Dock depending on your preferences. You can also change where the Dock is located, putting it on the left or right side of your screen rather than the bottom. To do so, click the Apple menu at the top-right of the menu bar and select System Settings from the dropdown. Then select Desktop & Dock from the sidebar.
If the Dock's size seems too big or too small, you can change its size by dragging the slider under Size. If you'd like the size of an app on the Dock to magnify when your mouse hovers over it, all you need to do is drag the slider under Magnification.
To add an app from your Applications folder or the Launchpad to your Dock, simply drag it to the Dock, and the other apps will make room. To remove an app from the dock, simply drag it out of the Dock. You can also remove an app by holding a click on it in the Dock, which should bring up an options bubble above.
Switch to Dark or Light Mode
If you prefer darker backgrounds to lighter ones, you can enable the Dark Mode setting on your MacBook. This feature not only adjusts your device's appearance by switching many of the border and page colors from lighter to darker in supported applications, but your MacBook's Dock, menu bar, and sidebars will also switch to Dark Mode.
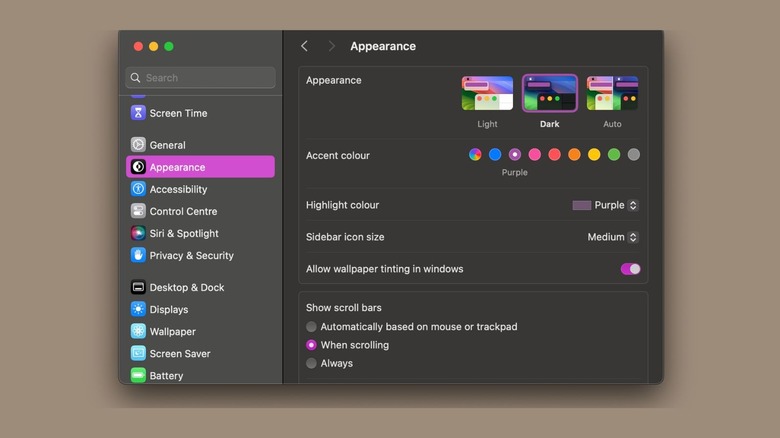
To enable Dark Mode, simply head to System Settings and select Appearance from the sidebar. Now, you'll see three different options next to Appearance: Light, Dark, and Auto. Finally, choose either Dark or Auto. The latter choice will automatically switch your MacBook's colors between Dark and Light Mode depending on the time of the day.
On the same settings page, you can also change the Accent and Highlight colors, which are essentially the color of buttons, menus, and the text when highlighted. By default, MacBooks ship with a Multicolor accent. All you need to do is pick one of the color options next to Accent color: Blue, Purple, Pink, Red, Orange, Yellow, Green, and Graphite. Your Highlight color will automatically be changed to your Accent color. However, you can change that by expanding the dropdown menu and picking a color of your choice.