How To Enable The Dark Mode Setting On Your Mac
As of macOS 10.14 Mojave, Apple lets users enable Dark Mode on a system-wide basis. This means that as long as your apps support Light and Dark Mode switching, you can enable Dark Mode for all of your apps with a single click of the mouse or trackpad. In addition to Dark Mode, you can also set your Mac to permanently stay on Light Mode, and on later versions of macOS, you're able to set it to automatically change based on the time of day.
The system-wide Dark Mode is also available on iPhones running iOS 13 or later, iPads running at least iPadOS 13, and Apple TVs running tvOS 10 or later. According to Apple, Dark Mode eliminates the window chrome and other distracting user interface elements to help your content stand out and stay in focus. If you want to take it a step further, you can enable Focus mode to get rid of excess notifications on your Mac, as well, for an even more tailored experience.
Make sure your Mac is compatible and up to date
Because the Dark Mode feature arrived with macOS Mojave, your Mac computer will need to be running that version of the operating system or a newer version. As is always the case, some older Mac computers aren't compatible with the latest versions of macOS, so if you're running High Sierra or older, you'll need to see whether your device qualifies for the software update that'll give you access to the Dark Mode feature.
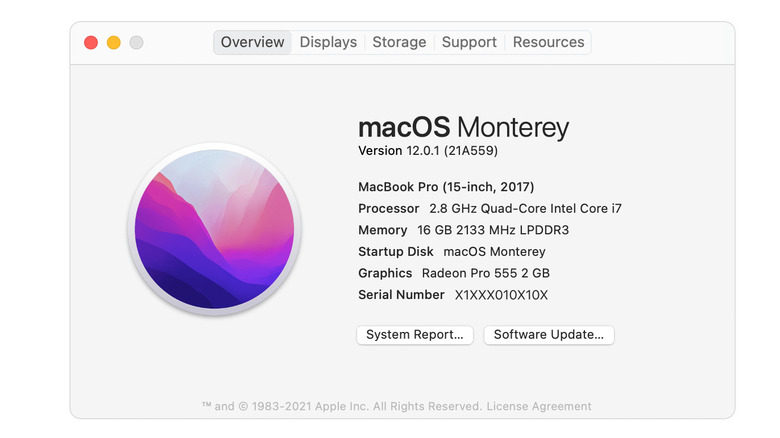
To check which version of macOS your computer is running, you'll need to:
- Click on the Apple logo in the top left corner of the menu bar at the top of the screen.
- In the drop-down menu that appears, click "About This Mac."
- In the pop-up that appears, select the Overview tab. You'll see the macOS version listed alongside which Mac model you have.
If the system reveals that you're running a version of macOS that was released before Mojave, you'll need to check on Apple's website to see whether your Mac is compatible with macOS 10.14 or later. According to the Mojave support document, you must be using, at minimum, an early 2015 MacBook, mid-2012 MacBook Air, mid-2012 MacBook Pro, late-2012 Mac mini, late-2012 iMac, 2017-iMac Pro, or select Mac Pro models that feature Metal-capable graphics cards, some of which date as far back as 2010. Of course, Macs released after these models are also compatible.
To update macOS, you need to:
- Click the Apple logo in the top left corner of the menu bar.
- Click on System Preferences.
- Select the Software Update option. Your Mac will check for any updates and will prompt you to update macOS if there's one available.
- Click on Download Now if there is a macOS update available and wait for it to be installed.
Even if your Mac is already running macOS 10.14 Mojave, it's always a good rule of thumb to keep your software up to date, as updates often include security and bug fixes.
How to enable Dark Mode on your Mac
Assuming your Mac is updated to macOS Mojave 10.14 or a newer version of macOS, you can easily enable Dark Mode — as well as change the accent color and more — with a few simple clicks, according to Apple.
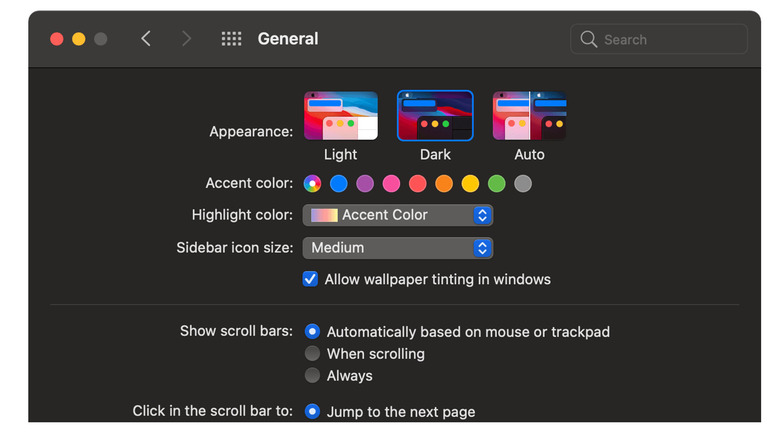
- Click on the Apple logo in the top left corner of the menu bar.
- In the drop-down menu that appears, click on System Preferences.
- Within System Preferences, click on General.
- Select the Dark Mode option.
If this is your first time turning on Dark Mode, your Mac is likely set to Light Mode by default. When you click on the Dark option, the macOS menu bar and dock, along with all of your apps and windows, should then switch to the Dark appearance. Keep in mind that some apps will require you to restart the app or manually go into the app's preferences to change them to Dark Mode. Apps that haven't been updated in a while may not support Dark Mode. In more rare cases, some modern apps may choose to not support Dark Mode. Likewise, some applications (such as Final Cut Pro and Logic Pro) may only have a Dark appearance.
How to use automatic Light and Dark Mode switching on macOS

If your Mac is running macOS 10.15 Catalina or later, you have the option to set your appearance to Auto Mode. If you will enable this feature, it will automatically set your Mac to Light or Dark Mode depending on the time of day. If you're using your Mac later in the day or at night, it will automatically switch everything to Dark Mode. Likewise, if you're using your Mac during the day, it will set everything to Light Mode. Of course, you can always set your Mac to Light Mode, which will permanently set your Mac to Light Mode until you change it to either Dark Mode or Auto.
Dark Mode is most beneficial at night as it will help you focus on your content and decrease the number of bright UI elements. Things such as your menu bar, dock, windows, and controls will darken and fade into the background. Light Mode removes that contrast and puts everything at the forefront alongside your content. Light Mode is beneficial if you're outside in direct sunlight and having a hard time seeing your screen, for example.