6 Things You Didn't Realize You Could Do On The Windows Photos App

Although you'd normally take photos using your phone, more often than not, you'll end up transferring them to your computer sometime later. After all, you get to appreciate your photos better when they're displayed on a larger screen, and if you're viewing them with others, they won't have a hard time huddling around your tiny phone display. It's also easier to access the image's metadata and edit photos on a computer as you have more tools at your disposal.
When it comes to photo-viewing apps on Windows, the native Photos is most people's go-to, and for good reason. It makes opening your pictures a lot less of a hassle because it's the default app, and it's a great tool for basic photo editing too. However, there's actually more to Photos than meets the eye. Here are six of Photos' lesser-known features you probably don't know about but should be familiar with to get the most out of the app.
View your iCloud photos
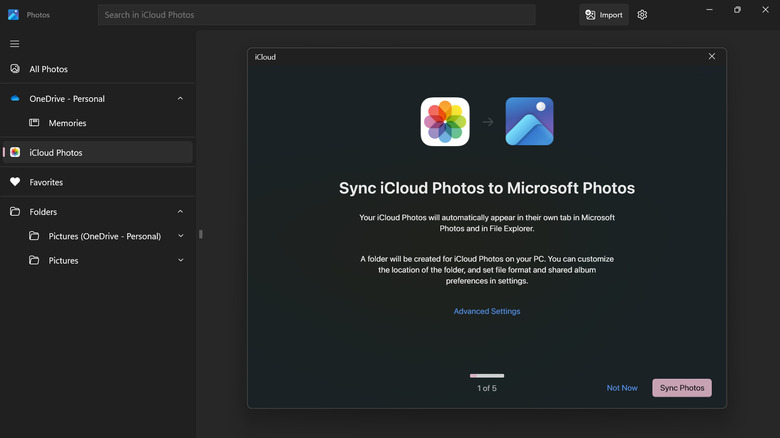
The Windows Photos app doesn't only display the images on your local storage but also those from your Microsoft OneDrive (provided you have an account and are logged in on your computer). But on top of OneDrive, Photos also allows you to access your iCloud pictures right on your Windows PC without having to manually transfer them. This feature was announced back in late 2022 and here's a step-by-step of how to get this set up on your computer:
- Install iCloud from the Microsoft Store.
- Set up the iCloud app.
- After installation, launch iCloud.
- Click Get Started.
- Enter your Apple ID and password on the sign-in screen.
- When prompted, type the verification code sent to your Apple device.
- (Optional) On the "Sync iCloud Photos to Microsoft Photos" screen, press Advanced Settings and change the Windows folder where you want to save the sycned iCloud photos. By default, it will be saved to C:/Users/[your username]/Pictures/iCloud Photos.
- Proceed with the synchronization by pressing the Sync Photos button.
- Select Not Now on the other sync options (syncing iCloud Drive to File Explorer, passwords, bookmarks, calendars, contacts).
- Hit Finish Setup to finalize the setup.
- Wait for iCloud Photos to finish syncing your images.
- To view your synced images, launch the Photos app and head over to the iCloud Photos tab.
- (Optional) Start editing your iCloud pictures using Photos' editing tools.
Erase objects seamlessly
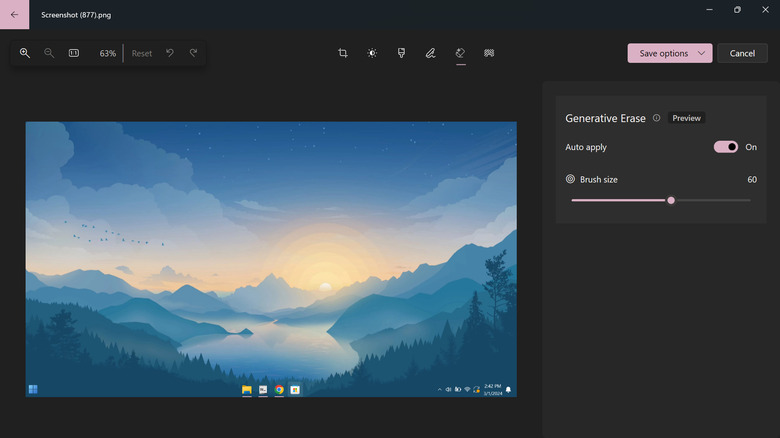
There's always that one photo that's almost perfect if not for the distracting people or objects in the background. To clean it, you'd normally use Photoshop's generative fill feature which uses AI to remove unwanted objects. However, there's actually a free alternative if you're on a Windows machine: the Generative Erase feature on the Photos app. This is also powered by AI and spruces up your photos better than the previous Spot fix tool. Generative Erase, however, is currently only available for Windows Insiders, so you'd first need to join the Insiders program, set up your PC, and update the Photos app to access it. After doing so, follow these steps to use the feature:
- Open the Photos app.
- Double-click on the image you want to edit.
- In the new window, select the Edit tool (picture with a pen icon) in the upper right.
- Press on Generative Erase (eraser icon) in the top-left of the screen.
- Change the Brush size to fit the object you want to erase, smaller if it's a fine detail and bigger if it's large enough.
- To remove only a single object, keep the Auto apply on. If you need to erase multiple, separate objects, turn it off.
- Cover the object with your brush. If it's a single object, make sure not to lift your brush until you cover the entirety.
- After brushing over the object, lift the brush (for single objects) or press Erase (for multiple objects) and wait for it to be erased automatically.
- Press Save options > Save to finish.
Remove and replace image background
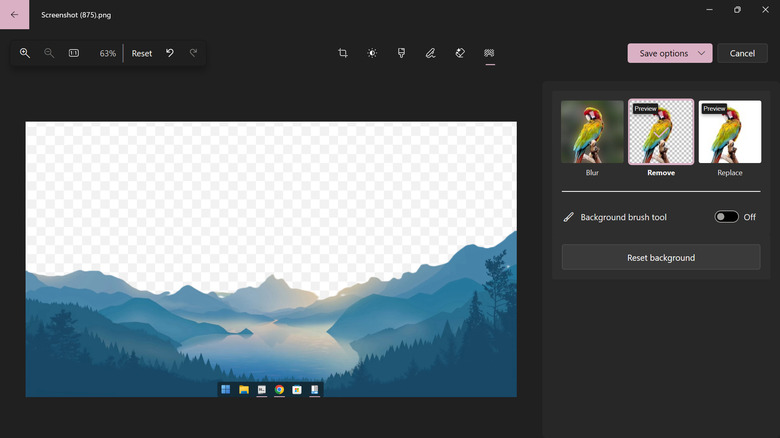
Sometimes, you need your image's background to be transparent like when you're turning it into a sticker or adding it to a new design. Other times, you need to replace the background with a solid color, such as when making a photo ID or a poster. You can easily find some free image background removers online, but they often reduce the resolution. Fortunately, the Photos app on the Windows Insiders build comes with a free tool for removing and replacing backgrounds without any degradation in quality. You do need to sign up for the Insiders program to access this feature, though. Once that's done, here's what you need to do to remove and replace an image's background in Photos:
- Open the picture you want to remove or replace the background of in the Photos app.
- Press the Edit button on the top ribbon.
- Head over to the background tab on the upper left.
- Wait for Photos to automatically detect the background of your image. If it made a wrong or incomplete selection, turn on the Background brush tool and adjust the size of the brush as needed. To include a new area in the background selection, go to the Add mask option and cover those areas. To remove a part of the background selection, click the Remove mask and brush over the areas to deselect them.
- Once you're satisfied with the background selection, do one of the following:
- To remove the background, simply hit Remove. It will automatically turn the background transparent.
- To replace the background with a solid color, select Replace and press your color of choice from the color picker or type the color's hex or RGB code.
- To set the image back to the default background, click Reset background.
- Save your image.
Convert to JPEG, PNG, or BMP
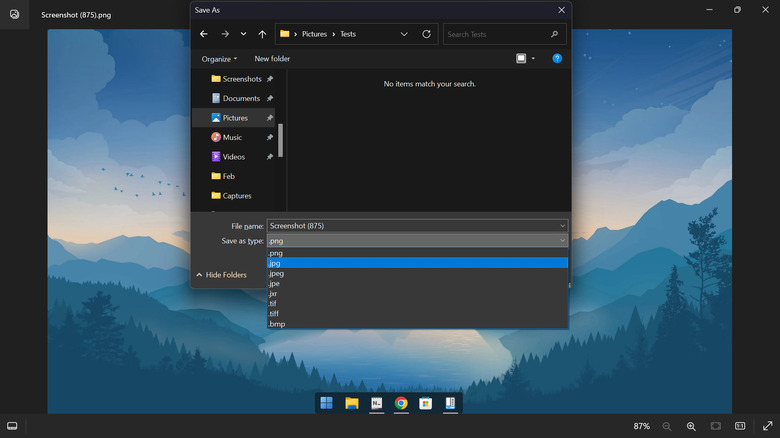
While you normally wouldn't give much thought to what your image's file extension is, there are instances when you need specific image formats. For instance, if you're using a photo on your website, JPEGs are the better option as they're smaller in size and capable of loading quickly. When it comes to creating graphics, you might want to use PNGs since they support transparent backgrounds. For printing photos, on the other hand, BMPs stand out as they can retain the image quality even after multiple edits. If you need to convert your images to another format, you can just use the Photos app on Windows. Here's a quick step-by-step of how to do so:
- Open Photos on your computer.
- Browse through your gallery.
- Select the picture you want to convert.
- (Optional) Edit the photo as you normally would.
- Press the Windows keyboard shortcut Ctrl + S.
- In the Save As window, expand the "Save as type" menu.
- Select your new file extension from the drop-down menu. Options include not only JPG, TIFF, and BMP but also JPEG, JPE, JXR, TIF, and PNG.
- Choose where you want to save the converted image.
- Hit Save to finish.
Copy an edited image to your clipboard
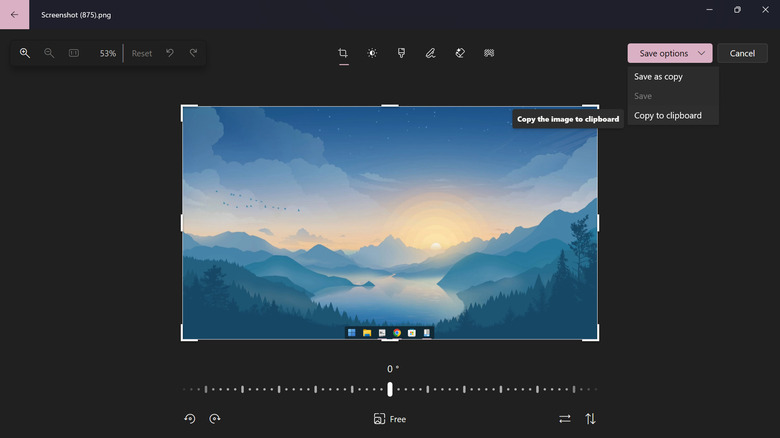
So you need to edit an image on your desktop and use it on the presentation you're making on Google Slides. Sure, you can just go ahead with modifying the photo, saving it, and then uploading it to Slides. But what if you want to avoid cluttering your storage with duplicate files and edited pictures you'll only need once? The good news is there's an option not to save every picture you edit on the Photos app. You can just copy the edited image to your clipboard to be used anywhere else. To do so, follow these steps:
- Open your image in Photos.
- Click on Edit to go to the editor screen.
- Start modifying your image as you wish. The Photos app features basic photo-editing tools like crop, flip, rotate, light and color correction (e.g., brightness, saturation, tint), filters, markup, Generative Erase, and background editor (blur, remove, replace).
- After editing the photo, click on the Save options button at the top.
- Select Copy to clipboard.
- Exit the Photos app without saving the edited image.
To use the copied image, simply press Ctrl + V where you need it, such as a Word document or a social media post. If, however, you copied multiple images and need them all, you can pull up the Windows clipboard by pressing Win + V and select the edited photos from there.
Search with keywords
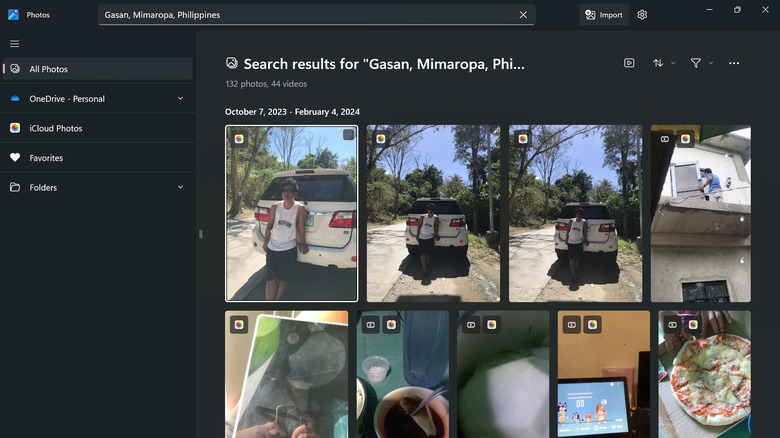
If you're like most people, chances are you have hundreds, if not thousands, of photos on your computer. This can be quite a nightmare when you're searching for a specific photo and don't know what the file name is. Lucky for you, Photos lets you look up images (backed up on OneDrive) using only keywords. This content search feature was released to Windows Insiders program participants last September 2023, so if you aren't part of the program yet, you have to join and get your PC set up with the Insiders build to use the feature. Afterward, follow these steps:
- Launch the Photos app on your PC.
- Navigate to the OneDrive – Personal tab.
- Click on Sign in to OneDrive.
- Log in with your OneDrive email and password.
- Set up your OneDrive folder.
- Choose which folders on your PC you want to back up to OneDrive. Alternatively, select "I'll do it later" to skip the backup.
- Continue pressing Next on the Get to know your OneDrive screens.
- Download the OneDrive mobile app or hit Later to skip this process.
- Go back to your Photos app.
- Select the OneDrive tab.
- Type your keyword in the search bar. It can be objects like shirt, cat, or bottle. You can also look up a location or date to narrow down the search.
If you didn't get any results, OneDrive is likely still processing your photos. Use the search functionality again after a couple of hours.