Windows 11 Keyboard Shortcuts That Will Increase Productivity
Keyboard shortcuts are essentially combinations of keys that can help you perform an action with your keyboard fast and without the need to use your mouse or touchpad. If you've been using Windows for any number of years, you probably already know a few of them.
In fact, everyone from your grandparents to the neighbor's 10-year old kid knows how to use Ctrl + C and Ctrl + V on Windows to copy and paste stuff. However, apart from these staple shortcuts, Windows offers a ton of other useful shortcuts that can help you perform actions faster on Windows.
Think about it. Wouldn't you love it if you could access your paste history to check what you've copied and pasted without having to go into a few windows and click through icons? With shortcuts, you can do this, and plenty of other things in a jiffy. In this guide, we walk you through X shortcuts that can boost your productivity as you use Windows 11.
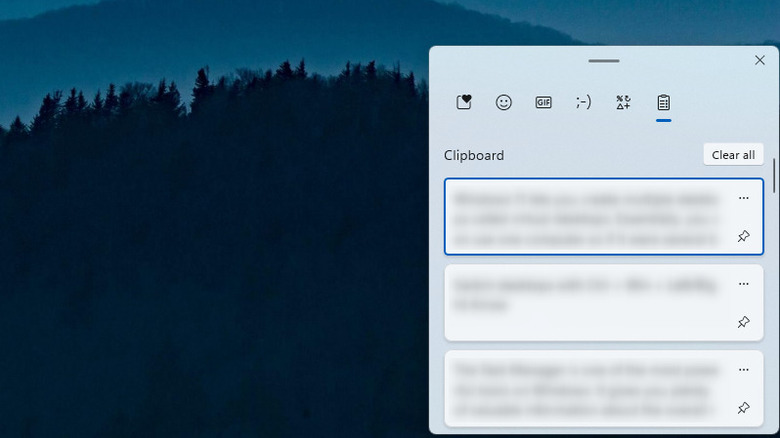
View paste history with Win V
Do you get dizzy when you're copying things over from one file to several, and you need to revisit one of the things you pasted earlier to one of the files? It's almost impossible to be able to track everything you're pasting, especially when you're copy-pasting content multiple times and across documents.
The good thing is that Windows creates a history of everything you've pasted. The paste history stores up to 25 previous entries, so if you've been copy-pasting something on Windows, this is where you'll find it.
To access paste history, you need to press the Windows key + V on your keyboard. Pressing the shortcut opens a small window with a list of entries. If you want to use one of these entries, start by placing your cursor where you want to paste the entry. Then press Win + V and click on the entry.
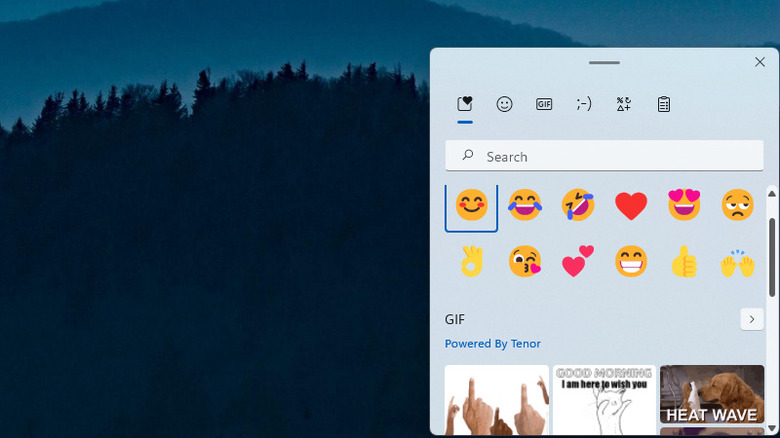
There are several other options here too. You can also type in emojis or kaomojis, or select from one of the many GIFs sources from Tenor.
Access emojis and GIFs with Win .
Both individuals and businesses are increasingly using tools like Slack and VoIP phone systems as remote teams continue to become the norm. Of course, there are also other messaging platforms that can be accessed via a desktop or laptop like Facebook messages and WhatsApp.
Texting on the phone is always fun because emojis are easily accessible. They're right there at the tip of your thumb. However, it takes an extra click or two on computers. That's usually enough for people to skip using them altogether.
What if you like using emojis and GIFs when you use Windows, though? Well, you don't need to give up on fun conversations. Pressing the Windows key + . (a full stop) opens a small window from which you can access emojis and GIFs.
It's the same window we discussed in the previous shortcut, just that this shortcut opens a different tab in that same window from where you can access emojis and GIFs.
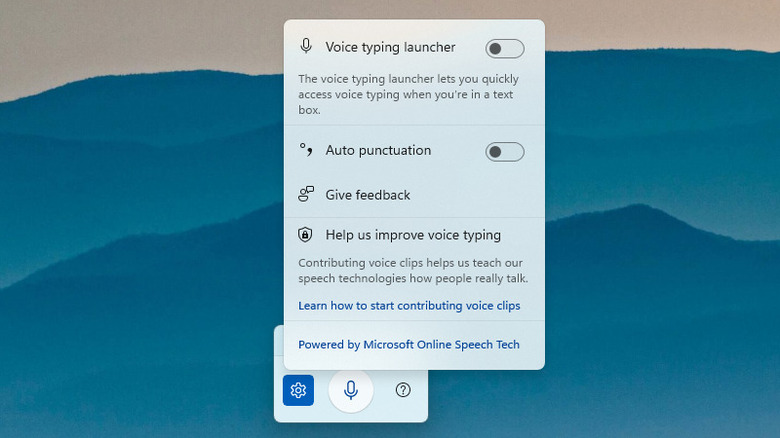
Start voice typing with Win H
Have you ever been too tired to type? That's when you can use the built-in voice typing tool in Windows. You can use the voice typing tool on Windows 11 as a dictation tool that's pleasantly accurate to work with. The voice typing tool not only improves accessibility but also makes you more productive because most people can generally speak faster than they type.
Whenever you're using a program like Microsoft Word or Google Docs on a Windows 11 computer, you can press the Windows key + H to launch the voice typing tool. Currently, the tool supports almost all popular languages including English, Croatian, Czech, Danish, Finnish, Hindi, Japanese, Spanish, and more. The full list of supported languages is available on Microsoft's website.
Once you press Win + H, you'll see a small window pop open. You can directly start voice typing by clicking on the mic icon, or you can change settings by clicking on the cog wheel icon. From Settings, you can enable auto punctuation or add quick access for voice typing by enabling voice typing launcher.
When typing, you can also use commands like "new line" for creating new paragraphs. Once you finish dictating, you can stop voice typing just by saying "Stop dictation." If you only want to take a break, just say "Pause dictation."
Take a screenshot with Ctrl Shift S
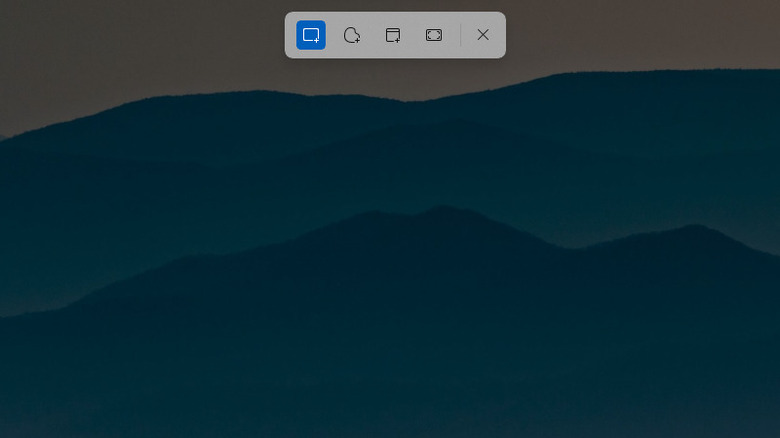
Remember when you had to use the PrtScn key, paste screenshots in Microsoft Paint, crop them and save them to your PC? Thankfully, that's no longer a problem since Microsoft introduced the Snipping tool.
The Snipping tool lets you take a screenshot of a specific portion of the screen, the full screen, a specific window, or any selected area (even with curves). There's no need to paste the screenshot.
You can use this tool to take screenshots by pressing the Ctrl + Shift + S. Once you select the area and release the left-click button, you'll see a notification in the notifications panel showing the screenshot. Click on it and you'll see a Snipping tool window pop open. Make final adjustments (crop, erase, rotate, or draw) and press Ctrl + S to save the screenshot.
If you don't want to save the screenshot, you can also press Ctrl + C while you're in the Snipping tool window and then paste the screenshot into a document or elsewhere. You also get the option to directly share the screenshot via the apps installed on your PC.
While there are several other ways to take screenshots on Windows 11, using the Snipping tool shortcut is the easiest.
Launch Microsoft Teams chat with Win C
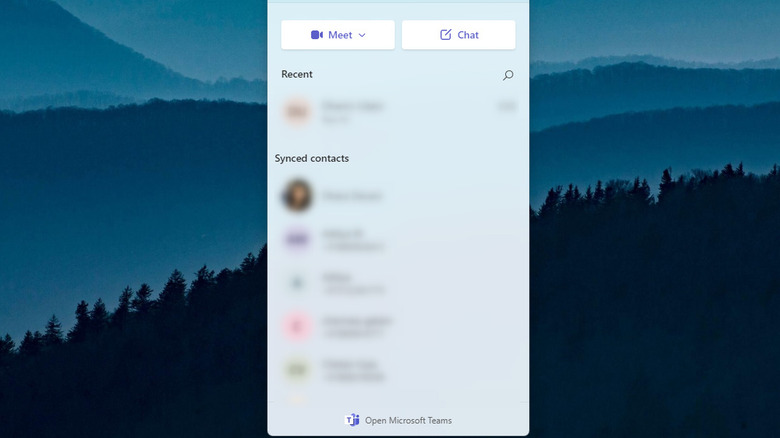
Microsoft Teams is Microsoft's team collaboration app that helps remote teams stay connected with text and video-based interaction. When your team uses Microsoft Teams, you'll likely be using it frequently throughout the day for collaborating with teammates and sharing updates with your seniors.
However, instead of having to click through the icon from the taskbar, launch the app, and then close it again, you can just use the shortcut. Pressing the Windows key + C pulls up a docked window of Microsoft Teams chats.
You can view both individual and group chats here. You can quickly read the chat or add a response and press Esc to exit the window. No clicks are required. The docked window also has the option of starting a meeting right away or scheduling a meeting for later. If you need to start a quick meeting, using this built-in Windows 11 feature might come in handy.
Cast your screen with Win K

Say you're sitting on the couch enjoying a movie on Netflix and your sibling asks you to share the screen. Or you're at the office and you need to quickly show your team something on the big screen.
You can cast your screen, but you might think, why go through all that trouble? I'll just point the computer's screen to the entire team.
Well, now you don't need to worry about the lengthy process of going into the settings app and connecting with your wireless display. Pressing the Windows key + K on Windows 11 pulls up a small window where you'll find all wireless displays around you.
Just pick one to quickly cast your screen. If you can't see any devices, check if Bluetooth is enabled on your computer. You can just press the back button at the top-left of the small window you opened with the Win + K shortcut and see if Bluetooth is enabled.
Once you're done casting the screen, you can use the same window to stop sharing your screen as well.
Open snap layouts with Win Z
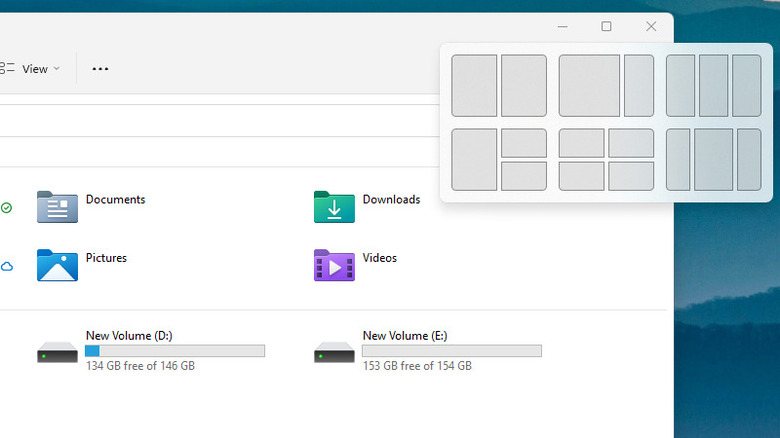
This shortcut works differently on Windows 10 and Windows 11. On Windows 10, the shortcut shows the commands available in an app in full-screen mode. When used on Windows 11, though, the shortcut opens snap layouts allowing you to quickly select a layout for stacking active windows.
Snap layout is a new feature introduced in Windows 11, so you won't find it at all in Windows 10. Of course, you could stack windows horizontally and vertically on Windows 10 too, but there was no built-in function like snap layouts. Snap layouts essentially give you a way to quickly organize multiple screens throughout your screen.
For instance, if you're trying to get input banking information into a window, the banking website won't let you paste any details. So you can stack two windows side by side and copy your account details manually into the browser window.
There are two layouts for stacking two windows, three layouts for stacking three windows, and one layout for stacking four windows. There's no built-in way to change the dimensions of the snap layouts, though. For that, you'll need PowerToys FancyZone, a tool by Microsoft that inspired snap layouts.
Open the widgets panel with Win W
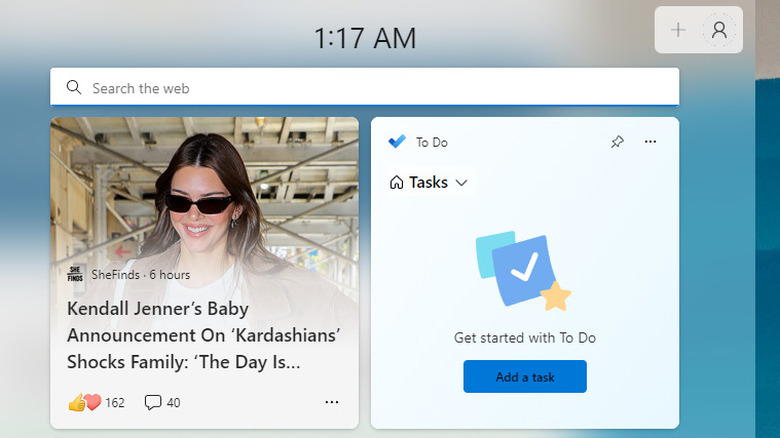
The widgets panel in Windows 11 allows keeping the desktop clean. Widgets are laid out in a panel that pulls in from the left edge of your screen. When you need to check the stock market's movement or just the weather, a quick peek into the widgets panel can give you an overview of all the information you need.
On Windows 11, you can pull the widgets panel by pressing the Windows key + W. If you need to add more widgets, you can do that by clicking the plus button at the top-right of the widgets panel.
You'll see plenty of news stories populated by default, but you can click "My interests" at the bottom of the panel and select topics that better suit your interests. There aren't many widgets available at the moment, though. At the time of writing, there are 11 widgets. Hopefully, Microsoft will soon add third-party widgets to the list soon. The current options are fairly limited.
Open Xbox Game Bar with Win G
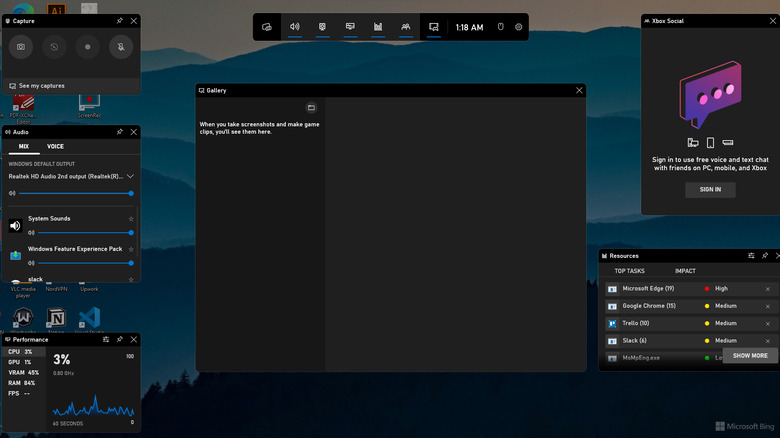
Windows added the Xbox Game Bar to Windows to allow gamers to capture gameplay videos and take screenshots on the go. It's an efficient tool because gamers need a way to start recording gameplay without having to exit the game and launch a third-party screen recording app.
To make things easier for gamers, Windows added a shortcut that allows gamers to quickly launch Xbox Game Bar. When you press the Windows key + G, you'll see several small windows pop open. In addition to screen recording, you'll also see options to control volume, get an overview of the PC's current performance, and a list of apps sorted by resource usage, among other things.
Of course, you don't necessarily need to use the Xbox Game Bar only when playing a game. You can also use it for recording your screen for other purposes, such as creating a tutorial or explaining something from a document to an employee.
Open Task View with Win Tab
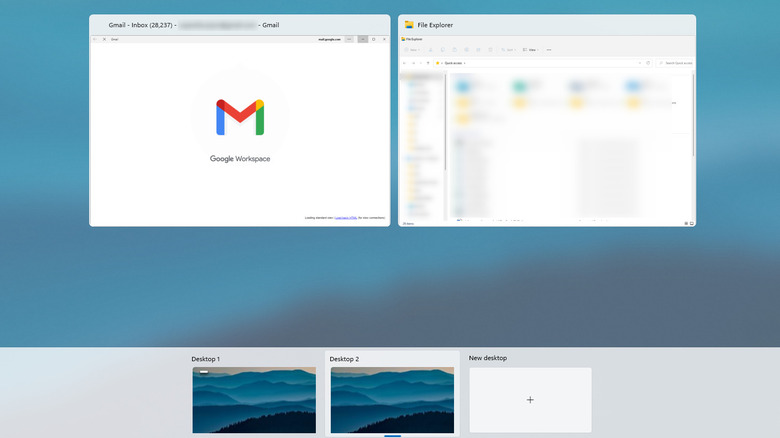
Windows has come a long way in allowing users to organize their workspace. From snap layouts to virtual desktops, Windows users now have more options to ensure a clutter-free interface for keeping their windows organized.
Task View is one of the several workspace organization features that lets you organize your windows among multiple virtual desktops. For instance, if you're working on two projects at a time, you can create two virtual desktops and open relevant windows (documents, browser tabs, and other things) in separate desktops. Doing this makes it easy to switch between projects without having to waste time sifting through tons of windows where it's hard to figure out which project you opened the window for.
While there's also a Task View icon in the taskbar, pressing the Windows key + Tab shortcut makes it easier to switch between Task View and desktops. You can also operate under Task View entirely from the keyboard if that's your jam.
Launch the Task Manager Ctrl Shift Esc
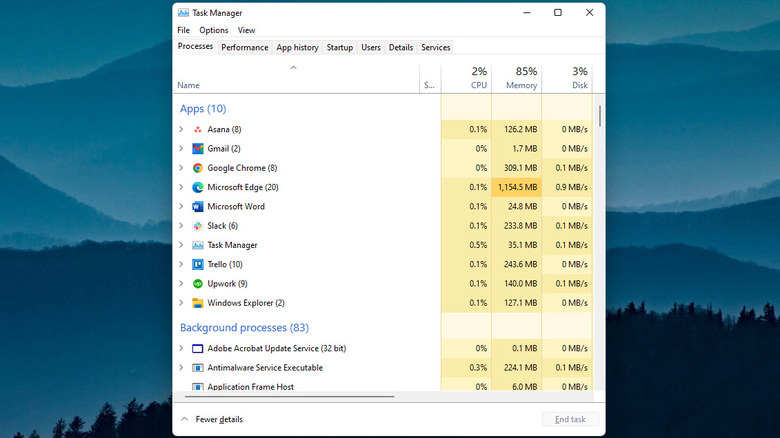
The Task Manager is one of the most powerful tools on Windows. It gives you plenty of valuable information about the overall resource usage of your system as well as process-wise data. If you're like most people, you use the Task Manager most of the time either when your system hangs or when an app becomes unresponsive and you need to "End task."
There are several ways to launch the Task Manager, but when your system isn't responding, almost all of those methods will take frustratingly long to open the Task Manager. This is where the shortcut for Task Manager comes in handy.
Pressing Ctrl + Shift + Esc launches the Task Manager. By default, it opens in the Processes tab where you can check the resource used by all processes and end the ones that are using excessive resources. Of course, you can also perform several other actions with the Task Manager like switching to a specific window, opening the location of a specific program's .exe file, or running a new task, among other things.
Switch desktops with Ctrl Win Left/Right Arrow
Windows 11 lets you create multiple desktops called virtual desktops. Essentially, you can use one computer as if it were several by grouping windows desktop-wise. If you run dozens of windows and work on multiple projects at a time, virtual desktops can help keep everything organized so you can find the window you need quickly.
You can switch virtual desktops by going into Task View and selecting the appropriate virtual desktop from the bottom. This requires either clicking the Task View button in the taskbar or using the Task View shortcut.
What if you could quickly switch virtual desktops without having to go through the Task View first, though? Fortunately, you can do that on Windows by pressing Win + Shift + Right Arrow. Using the right arrow key takes you to higher desktop numbers (i.e., takes you from desktop 1 to desktop 2), while the left arrow key takes you to lower desktop numbers (i.e., takes you from desktop 2 to desktop 1).
All shortcuts discussed above can help you increase productivity, and if you like these shortcuts, you might also want to learn a few Windows 11 tips and tricks to make the best of the new operating system from Microsoft.