How To Take Screenshots On Your Windows 11 PC
Screenshots are nothing short of a lifesaver, especially when it comes to capturing and sharing on-screen content quickly and efficiently. Screenshots, or as some like to call them screengrabs, save users the multi-step hassle of downloading webpage content, saving works-in-progress, and navigating file managers for attachments. On phones, a triple-finger downward slide or volume-power button combo press does the job, but that luxury is not available on a PC. But that's not necessarily a bad thing. Depending on your chosen method — and the quality of your short-term memory, it can be easier to take a screenshot on a Windows 11 PC than on a smartphone.
Moreover, the best part is that there are a ton of ways in which users can capture a screenshot on a Windows 11 machine. And as a sweet bonus, one can choose the method that only saves a screenshot to the clipboard without eating up the internal storage, or go with the technique that conveniently saves a copy in a dedicated folder. There are options galore, each with its own set of features that'll assist you in grabbing your desired output.
The Print Screen button to copy

The quickest and most reliable method for capturing a screenshot is the trusty Print Screen button. On a keyboard, it can be labeled as PrtSc, PrtScrn, or PrtScr. The linguistic diversity for labeling the humble Print Screen button can be slightly baffling, but it does appear on most keyboards in one form or another. To take a screenshot, just tap on the Print Screen button and your on-screen content gets saved to your clipboard. You can now perform a paste gesture (or Ctrl + V) directly in an open document or image editing software like Paint.
This method only works for temporary copy-paste work and doesn't save a copy of the image unless you do so manually. If you rely on the in-built Windows 11 clipboard — accessed with the Windows + V command — or a third-party clipboard app such as Ditto, you can access the screenshot for a tad longer. But there's a limit here. For example, the Windows 11 clipboard only saves up to 25 items at once. So, if you've copy-pasted more content than the aforesaid number, your earliest screenshot will be gone from the clipboard.
Print Screen plus Windows button to save

The more trusty, long-lasting method of capturing a screenshot is using both the Print Screen button and the Windows button. This combo saves a copy of your screenshot locally on your PC.
- Hit the Print Screen and Windows (labeled with the Windows icon or Win text) buttons together.
- The screen will blink momentarily to gesture that the screenshot has been taken, just like a camera shutter.
- To access the image, tap or click on the This PC or Windows icon in the lower-left corner of your screen.
- Tap or click on Pictures or Photos
- Open the Screenshots folder to find your screengrab — or in Photos, your screengrab should appear right at the top of your collection.
If you have a desktop setup with multiple screens, hitting the Print Screen button or the Print Screen + Windows combo saves a collage of all screens in the same order as they've been arranged in the display settings. In order to save a screenshot of your active window alone, press Alt + Print Screen. But do keep the mind in that this combo won't save a copy in the Screenshots folder and only saves it temporarily on the clipboard. You can manually paste it into any editing app and save that as a JPEG or PNG for later use.
Windows 11's Snipping Tool
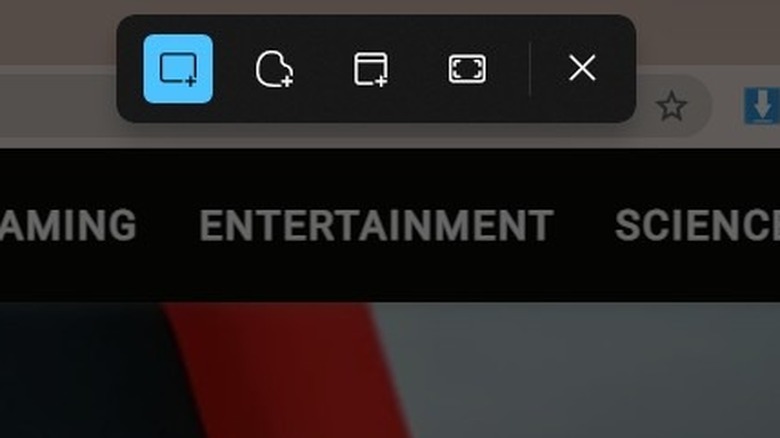
Capturing screenshots is one thing, but one doesn't always share a raw copy of the on-screen contents, especially if it contains sensitive content. Instead of capturing a screenshot, opening an editing app, trimming, and re-saving, Windows removes all the hassle with the native snipping tool. To bring up the snipping tool, press the buttons Windows + Shift + S. Once you hit the aforementioned button trifecta, your screen will blink and you'll find five buttons centered up top.
The first button is a rectangle select tool that lets you drag and adjust the screen portion you want to save as a screenshot. Next in line is the free-form select tool. The third one is window capture, which only saves a copy of the active window. The fourth option is full-screen capture, which captures a collage view of all the connected screens.
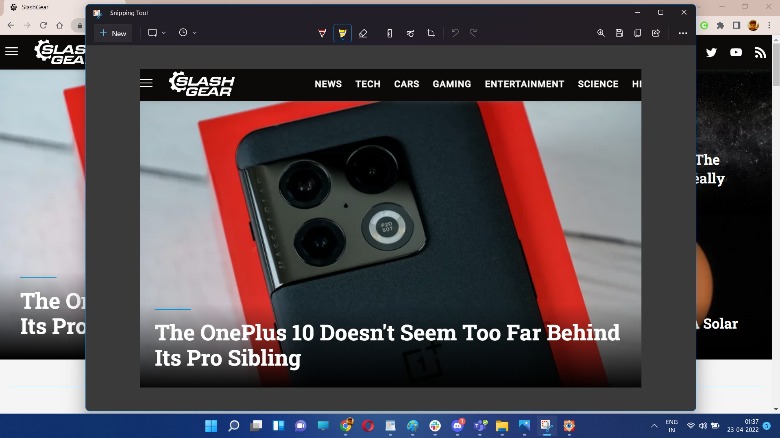
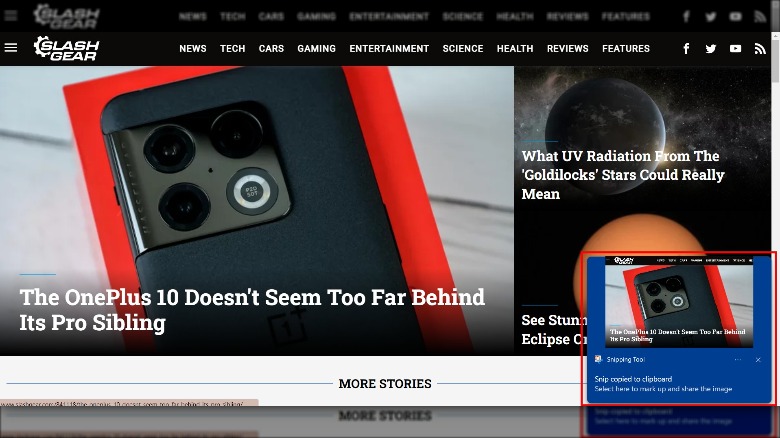
Once the screenshot has been snipped and adjusted, a pop-up appears in the bottom right corner of the screen. Clicking on it opens the Snipping Tool app where you can further tweak it with highlights, annotation, and save a final copy. However, you still need to save it manually in the app by tapping on the save icon in the upper right corner. The snipped version is saved to your clipboard as well. Just paste it directly into an email, document, or image editing app to save it locally.
Combine the Print Screen and Snipping Tool
The Print Screen gesture is handy, but it only does the job of saving an image. Any required edits, as basic as adjusting the frame size, need to be done in a separate editing app. The Snipping Tool can handle editing, but it requires a three-button press to spring into action. But who wants to press three buttons simultaneously when there's an easier way to summon the Snipping Tool with a single button tap? Here's how you can set it up:
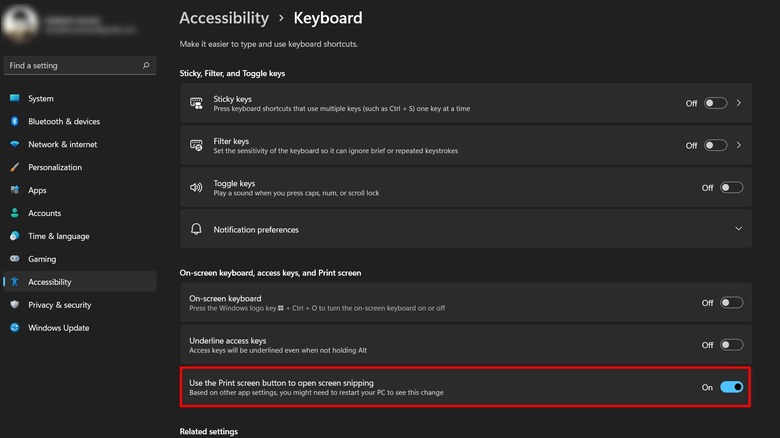
- Click on the Start button (depicted by a Windows icon) at the bottom and select Settings. Alternatively, you can launch the Settings menu directly by clicking on the Search icon at the bottom of your screen and typing Settings followed by a tap of your Enter button. Or just hit a combination of the buttons Windows + I to open the Settings app.
- In the Settings app, click on Accessibility in the left window pane.
- On the accessibility settings page, scroll down to find the Keyboard option under the Interaction section.
- On the keyboard page, enable the toggle that says Use the Print screen button to open screen snipping. Now, you can launch the Snipping Tool with just a tap on the Print Screen button.
Screenshots with the Xbox Game Bar
Microsoft has also baked a native Xbox Game Bar tool into Windows 11 that allows gamers to capture their in-game skills and share gameplay clips with the greatest of ease. However, the Xbox Game Bar also offers a nifty screen capture tool that non-gamers might not be aware of. Here's how to use it for capturing screenshots:
 SlashGear
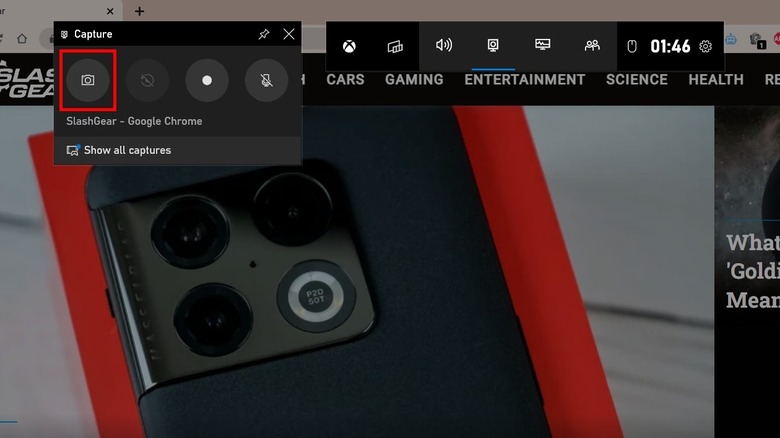
- Click Windows + G to open the Xbox Game Bar toolbar at the top of your screen.
- On the floating window titled Capture, click on the camera icon to take a screenshot.
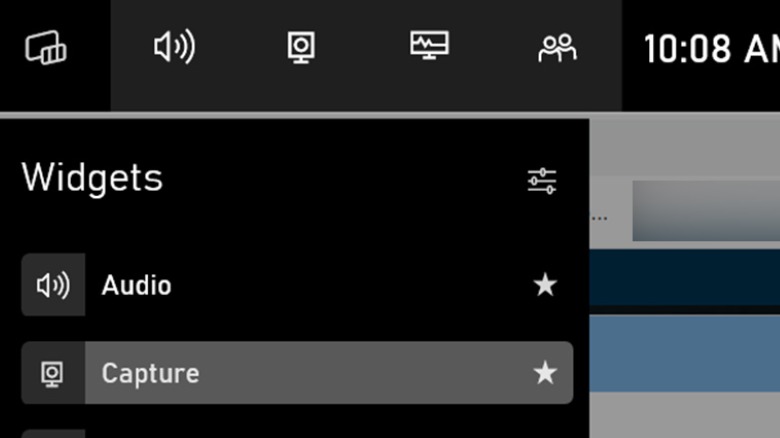
- In case you don't see the floating window for Capture, click on the Widgets icon (image above) in the rectangular toolbar at the top, and then select the Capture option in the drop-down menu.
- Once a screenshot has been saved, it can be found by following this path: C drive in This PC > Users > [Username] > Videos > Captures.