How To Back Up An iPhone To Your Mac Or PC

Your smartphone holds a massive amount of personal information, from address book contacts and downloaded apps to photos and videos you've accumulated since you purchased your mobile device. Apart from ensuring that all this data is properly protected from unwarranted access or accidental deletion from a reset, you may also want to make transitioning to a newer gadget a hassle-free experience. Having a backup of everything stored in your mobile phone is a great catchall solution.
In the event that your iPhone is lost or stolen — or especially if it is damaged — having it regularly backed up is essential. It's also very helpful if you're planning to pass it on to a new owner or trading your iPhone in for a newer unit. There are several ways to back up your iPhone, mainly through an iCloud subscription or through a computer. The former is often a preferred method among Apple users as it saves all your data completely online. However, it's important to note the differences between backup methods to ensure you pick the one that's best for you.
Backing up an iPhone via iCloud vs. a computer

Having an Apple account affords you 5 GB of free iCloud storage, which can be used to back up and sync your data across Apple devices, but that isn't enough to cover an at-capacity iPhone, so you'd need to pay for additional storage.
iCloud backups can be done from anywhere with stable WiFi. They cover all the information and settings on your iPhone that aren't already independently syncing to iCloud. They also contain your device settings, home screen layout, app organization, and any data from downloaded apps. Data backed up via iCloud will always be encrypted. The process can be done manually or automatically run on your iPhone at regular intervals.
Meanwhile, computer backups don't sync across other Apple devices. Instead, they are stored locally on a Mac or a PC and include almost all your iPhone's data and settings, but won't have certain content from iTunes or the App Store.
To create a computer backup of your iPhone, you'd need physical access to the machine you're manually saving it on. The necessary space won't cost extra but would depend on how much is available on your computer. Data encryption is also available but needs to be enabled.
For convenience purposes, it's smart to back up an iPhone using iCloud. To avoid spending on a subscription or to have a backup of your backup that doesn't live on the web, storing one on your computer is a wise option.
How to back up an iPhone on a Mac

If you own a Mac computer and want to store a copy of your iPhone's contents, make sure your macOS is up to date before starting. As long as your machine runs on macOS Catalina or later, you should be able to run the process through the Finder. Here's how:
- Launch a new Finder window.
- Connect your iPhone to your computer using a compatible USB cable. If you have a newer Macbook, you may need a USB-C adapter or a USB-C-to-Lightning cable.
- If a "Allow accessory to connect" box pops up on the computer screen, click Allow.
- On your iPhone, tap Trust on the "Trust This Computer" box. You may need to provide your device passcode.
- On the Finder window on your computer, select your iPhone from the left side panel.
- Hit the Trust button to see your iPhone's contents.
- Next to Backups, select "Back up all of the data on your iPhone to this Mac."
- To back up Health and Activity data from your iPhone, make sure the box next to "Encrypt local backup" is checked. You may also need to create a password for this.
- Hit the Back Up Now button to begin.
You should be able to keep track of the progress through the status bar below the page. Expect this to take a while, and As soon as the process is complete, you should see "Last backup to this Mac" update to the current date and time.
Does iTunes still work for backing up an iPhone on a PC?
As of this writing, Apple's own support page on the process — as well as a number of guides written by other tech publications — suggests using iTunes to back up your iPhone on a Windows PC. Based on testing, however, the previously outlined steps no longer work. Despite updating all the operating systems and drivers involved, rebooting both the computer and the mobile device, trying different USB cables, and re-downloading iTunes, our initial attempt to back up an iPhone 14 Pro Max to a laptop running on Windows 11 was unsuccessful.
After speaking with a senior advisor through Apple Support, though, a working solution was found. Rather than use iTunes — which hasn't received an update since 2020 — you can use the Apple Devices app instead. Specifically designed so that you can transfer photos, music, and other data from your Apple device to a Windows computer, this is ultimately the better way to create a local backup of your iPhone.
How to back up an iPhone on a PC
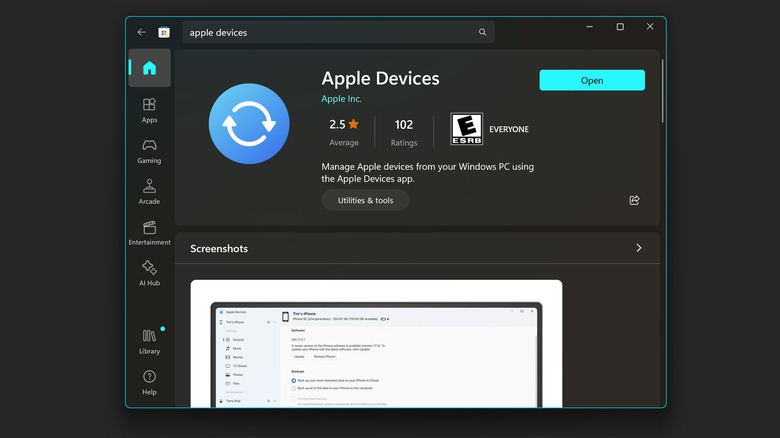
To get started, you must first download the Apple Devices app. To do this, launch the Microsoft Store app on your computer, search "Apple Devices," click on the correct result, and hit Get. Once installed, follow these steps:
- Launch Apple Devices on your PC.
- Connect your iPhone to your computer using a compatible USB cable.
- On your iPhone, hit Trust on the "Trust This Computer?" popup. You may need to enter your iPhone passcode.
- Do the same for the Apple Devices app.
After this, your iPhone should show up on Apple Device's left-side panel. Select it. Once you see the settings on the right-side panel, do the following:
- Under Backups, select "Back up all of the data on your iPhone to this computer."
- To back up Health and Activity data from your iPhone, ensure the box next to "Encrypt local backup" is checked. You'll need to create a memorable password.
- Hit Back Up Now to initiate the process.
You should see the backup progress on the bottom half of the window. It may take a while if you have a lot of data to back up. To ensure that you don't run into interruptions, if you have an iPhone lock screen, temporarily disable it:
- Launch the Settings app on your iPhone.
- Go to Display & Brightness.
- Select Auto-Lock.
- Pick Never.
Once the process is complete, you should see "Last backup" on the Apple Devices app update to the current date and time. Remember to turn auto-lock back on — just follow the same steps and choose your preferred time interval — if you previously had it enabled on your iPhone.