6 iPhone Features You Need Know About For Your Next Camping Trip

Anyone who enjoys being outdoors can tell you that spending a night sleeping in a tent underneath the stars is worthwhile. However, being off the grid requires a lot of preparation. You need to make sure that you have the necessary hiking and camping tools that you'd need. You'll also want to verify that all your emergency equipment is charged up and ready to go, including your smartphone — there are plenty of things you can do with the device while you're offline.
On an iPhone, there are a lot of settings and apps you can preload prior to your camping trip that could potentially help you and enrich your experience overall. While there are certainly a lot of third-party apps that are great to have on a backpacking adventure, Apple has several built into iPhones that are incredibly useful.
Below is a roundup of Apple apps that you ought to explore, prepare, and test before you leave on your excursion as well as iPhone features that you should enable before and use during your trip.
1. Built-in Apple apps that would be useful while camping

Off the bat, there are a few apps installed by default on your iPhone that you should tinker around with before camping, for obvious reasons. The Camera app is primarily something you'll want to access with regularity, if only to take pictures of the people you're camping with; the beautiful plant life, landscapes and bodies of water; animals from a distance, and the sky with everything in it. Make sure you test different settings and familiarize yourself with all the available controls.
Other apps that you'll probably want to have shortcuts to on your iPhone home screen include the Weather app and the Flashlight app. Although the Compass app may seem overwhelming to use if you're an inexperienced hiker or camper, you can at least use it to find out which position points to the east and west and position your tent so it can face the sunrise and sunset accordingly.
There are also some built-in iPhone apps that you may not realize are good to have while you're in the wilderness. For instance, you can use Voice Memos as a journal of sorts. You can record yourself describing things you see as well as stating thoughts and observations that come from being in the presence of nature. Another one worth looking into is Apple's own Books app, which has a lot of free content you can preload before you lose signal and enjoy when you have some downtime.
2. Download offline maps on Apple Maps
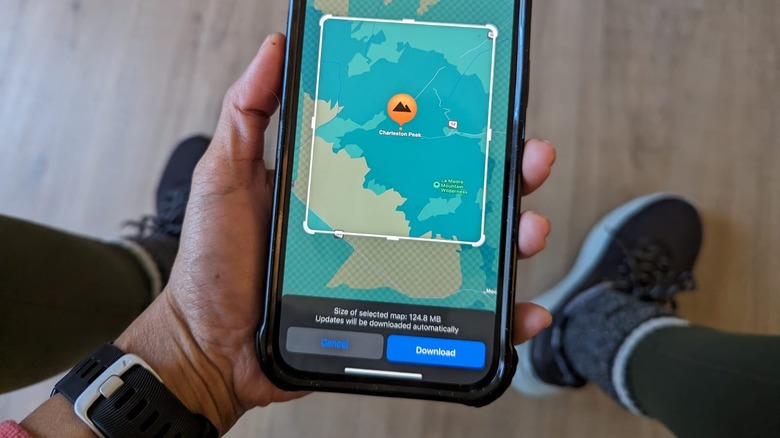
While Apple Maps is a built-in iPhone app, it deserves more attention because it recently got an upgrade that now allows you to save sections of a map so you can check them even without internet connectivity. There are three ways to download map areas for offline use on an iPhone running on at least iOS 17:
- By searching for a location: After you tap the place you want in the search results, tap the Download button if you can see it, or hit More and then tap Download Map. A resizable rectangular grid should then appear onscreen for you to manipulate before tapping Download once more.
- By dropping a pin: Long-press on an area on the map and then tap Download. Adjust the rectangular grid to cover the section you want to see offline and then tap Download again.
- By accessing the app settings: After launching Maps, tap your profile photo or initials next to the search field and then go to Offline Maps. There, you can tap Download New Map or use a previously accessed or suggested map, enter a location, and adjust the rectangular area selector before you hit Download.
Before you leave for your camping trip, test if all your downloaded offline maps work by accessing them through the Maps app settings while Wi-Fi and cellular data are temporarily turned off.
3. Emergency SOS via satellite
The iPhone is an essential item to have in the wilderness in case you find yourself in an emergency situation and are in need of some assistance. Provided that you've installed the latest version of iOS on your mobile device, you can access several potentially life-saving features, such as the ability to call 911 without access the phone's dial pad or the option to make a call for emergency services discreetly. You can also set up your Medical ID so first responders have your relevant health information. In addition, people who have an iPhone 14 or newer can enable Crash Detection which'll trigger an automatic call to emergency services and message to emergency contacts in an automobile accident. However, one crucial emergency feature that is also included in all iPhone 14 models and newer iterations that could be beneficial to have access to while camping off-grid is the capability to make an emergency satellite call.
In order to take advantage of this feature, you'd need to have one of the iPhone 14 units running on at least iOS 16.1 and actually run the Emergency SOS demo while you're still at home with good cellular signal. Follow these steps:
- Launch the Settings app.
- Go to Emergency SOS.
- Scroll down to the bottom.
- Under Emergency SOS via Satellite, hit Try Demo.
- Follow onscreen prompts.
Note that this is only a practice run of what a satellite call would be like once you're offline. To access the feature when you need it, all you have to do is call 911 at your location. You may have the added option to send an emergency text if there are no networks available to make the call work.
4. Visual Look Up
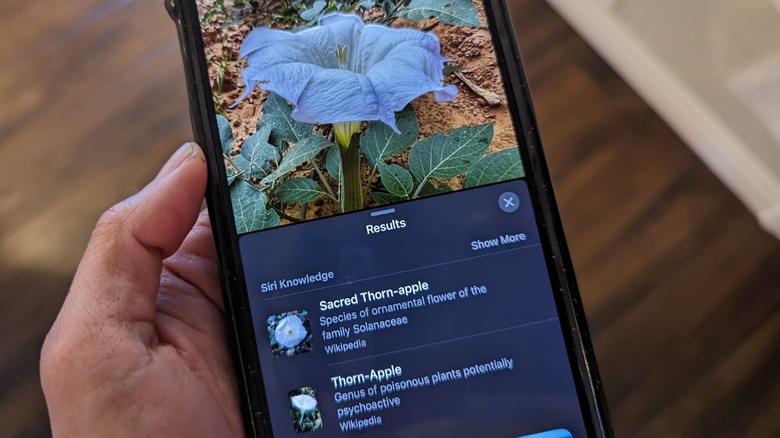
Supported iPhone models running on the latest iOS should have access to Visual Look Up, an incredibly useful, AI-powered Camera app feature that automatically detects what subjects in photos and videos could be and provides more useful information about them. In everyday life, you can use the iPhone's Visual Look Up feature to research restaurants, food recipes, popular landmarks, and artwork, to name a few. Out in the wilderness, though, this hidden function is great to use in order to identify and learn more about a particular tree, plant, fruit, or flower you come across and figure out if any of them are poisonous, OK to touch and pick, or even safe enough to cook or eat raw. You can also use it to find out more about an insect or animal you've photographed. For the sake of safety, it should go without saying that not coming closer to a wild animal (especially big ones) is highly recommended.
An important thing to remember about Visual Look Up is that you actually need cellular connectivity for the feature to work properly. In case your connection is spotty where your camp is set up, you'll have to take photos now and find out more about the subjects in your images later when you're back in an area with network coverage.
5. Find My
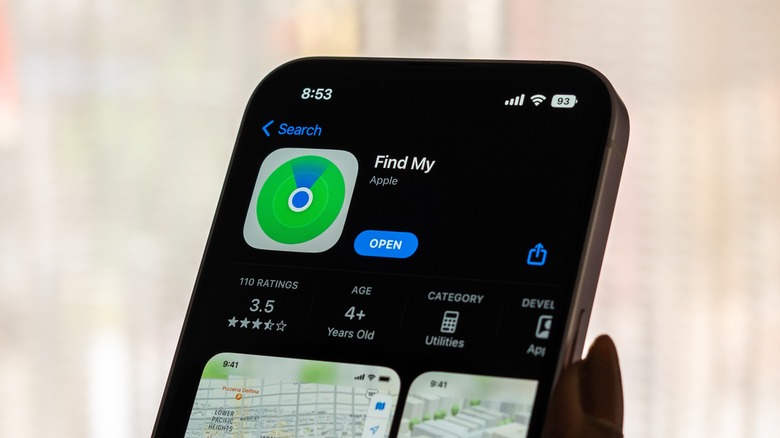
You can utilize Find My to share your location with contacts saved on your iPhone. If the recipient also has an iPhone on at least iOS 15, you can even share your Live Location so they can see where you are in real time.
For camping-in-the-woods, the Find My app lets you share your location when you don't have internet connectivity. In order to take advantage of this special feature, you'd need to have at least an iPhone 14 running on iOS 16 or newer and do the following steps before you leave an area that has cellular coverage:
- Launch the Find My app.
- Tap Me from the bottom navigation bar.
- Enable Share My Location.
- If your iPhone isn't currently sharing your location, tap Use This iPhone as My Location.
- Go to People on the bottom navigation bar.
- Hit Start Sharing Location and pick an iPhone contact to share your location with, followed by your preferred share duration. Alternatively, you can tap "+," hit Share My Location, and then pick an iPhone contact to share your location with, followed by your preferred share duration.
Again, for the ability to share your location via satellite to work, you must already have a location-sharing session ongoing, enabled while you're still within cellular range. Once you're off the grid, follow these steps:
- Make sure you're in an area with a clear view of the sky and horizon.
- Launch the Find My app and tap Me from the bottom edge of the screen.
- Hit Send My Location below My Location via Satellite.
- Follow onscreen prompts.
You can send your location via satellite every 15 minutes. However, you won't be able to see your friends' locations in the Find My app.
6. Low Power Mode
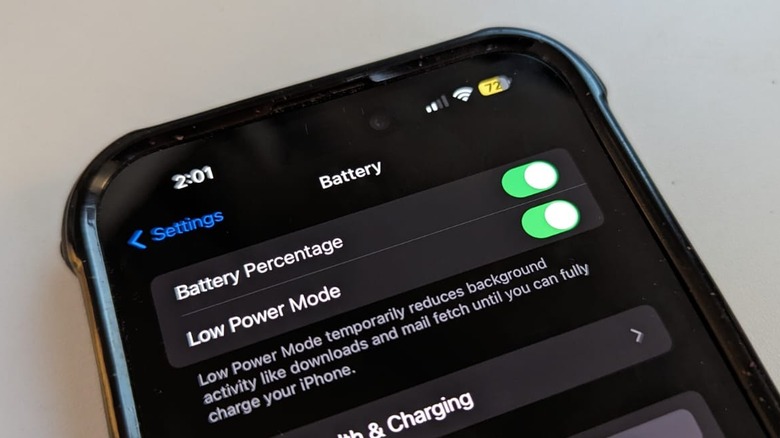
iPhones have a battery-saving feature that reduces the amount of power they consume when a device's battery is low called Low Power Mode. By default, this switch is disabled, but in some cases when your iPhone's battery goes below 20%, you may see an alert pop up onscreen giving you the option to enable it.
When Low Power Mode is in effect, your iPhone's battery symbol turns yellow in the status bar. Once the phone battery reaches critically low levels, it switches to red, whereas when it's plugged in to charge, it goes back to green.
If you're worried about your iPhone battery running out and the pop-up notification to switch to Low Power Mode has not shown up yet, you can manually turn it on by launching the Settings app, going to Battery, and enabling Low Power Mode. Do note that while this is turned on, certain iPhone features may be reduced, such as display brightness, visual effects, automatic downloads, email fetch, and background app refresh, to name a few. Once Low Power Mode is turned off or the battery gets charged up to at least 80%, all iPhone functionality should go back to normal.