5 AirPods Pro Lifehacks For Better Sound Quality
We may receive a commission on purchases made from links.
AirPods Pro are one of the most reliable wireless earbuds, especially for Apple devices. They are loaded with features, including noise cancelation, transparency mode, touch controls, and more. Although the original version was criticized for its sound quality, AirPods Pro (2nd Generation) offered a significant upgrade. However, not everyone loves the device's default audio profile.
Having the right sound quality matters for those who spend a lot of time listening to music or other audio-based content. While some may prefer a bass-heavy sound signature, others like clear vocals, and for them, tweaking the AirPods Pro can be a tedious task, especially if they don't know where to begin.
The good news is that there's a lot you can do to tailor the audio quality on AirPods. From taking the ear tip fit test to switching between different sound modes, there are several ways to customize how your AirPods sound.
But first, you should ensure that your AirPods Pro runs on the latest firmware version. Go to the Settings app and open the Bluetooth settings for your AirPods Pro. In the About section, check the number beside Version. The current firmware for AirPods Pro is "5E135." If your device already has this version, proceed with the following methods. Otherwise, learn how to upgrade the firmware.
Take the ear tip test
One of the most critical factors determining the sound quality of AirPods Pro is how well the ear tips fit our ears. Both the first and the second generation of AirPods Pro feature an in-ear design with silicone ear tips.
However, instead of using AirPods with the pre-applied ear tips, you should try the other sizes in the box to see which fits well.
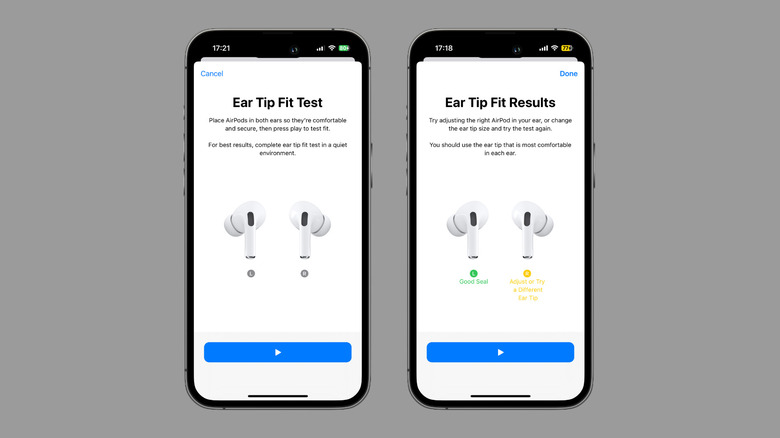
If you're unsure how well the ear tips fit, here's how you can take the built-in fit test.
- Wear your AirPods Pro (both earbuds) and ensure they connect to your iPhone.
- Head to Settings, and tap on your AirPods name. It should appear at the top, below your name.
- Select "Ear Tip Fit Test" and hit Continue.
- Tap the play button at the bottom. The test plays a sound to check the audio quality and noise cancelation.
- Once it is complete, it will inform you whether you need to change an ear tip.
If you aren't satisfied with the ear tips provided in the box, you can go for third-party memory foam ear tips that reportedly improve the sound quality, especially bass, and provide better comfort. Some popular options include Lanwow Premium Memory Foam Tips and Comply Foam Ear Tips.
Experiment with different sound modes
The AirPods Pro come with two sound modes – Noise Cancelation and Transparency. While the former reduces background noise, the latter redirects surrounding sounds to your ear. However, these modes might meddle with the audio you're listening to.
Hence, always experiment with these modes before you settle on one. We suggest you disable Transparency Mode while listening to audio tracks from your favorite singers, especially if you're not outdoors. Second, check whether the earbuds sound better with or without ANC turned on. You might also want to try the standard audio mode and see if you like it better.
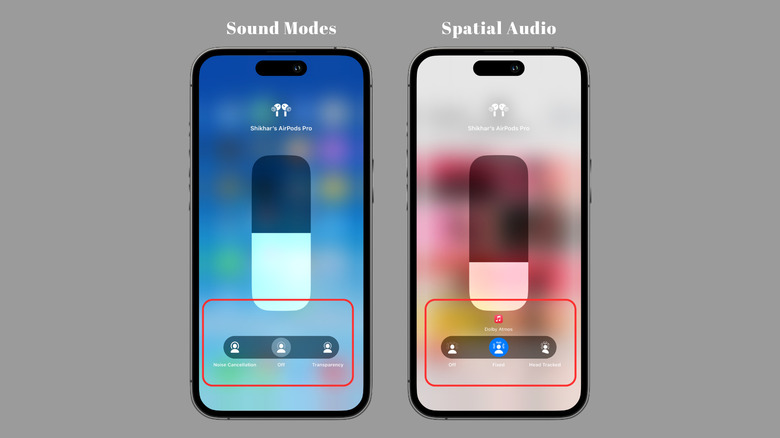
To toggle through the sound modes, press and hold the stem of your AirPods Pro until you hear a chime. Alternatively, open the Control Center, tap and hold the volume slider, hit Noise Control at the bottom left, and select the required option.
As long as we're talking about experimenting between sound modes, see if you appreciate the sound quality more with Spatial Audio on or off. While the feature replicates a surround sound audio system, some songs or videos might not sound as good with it.
- Swipe down from the top right corner of the screen to open Control Center.
- Tap and hold the volume slider.
- Check if Spatialize Stereo is on and tap once to switch off the feature.
Use the in-app equalizer
If you're listening to songs on a music streaming app like Apple Music, Spotify, or Amazon Music, these apps offer built-in audio equalizers that let you customize the audio to match your preference.
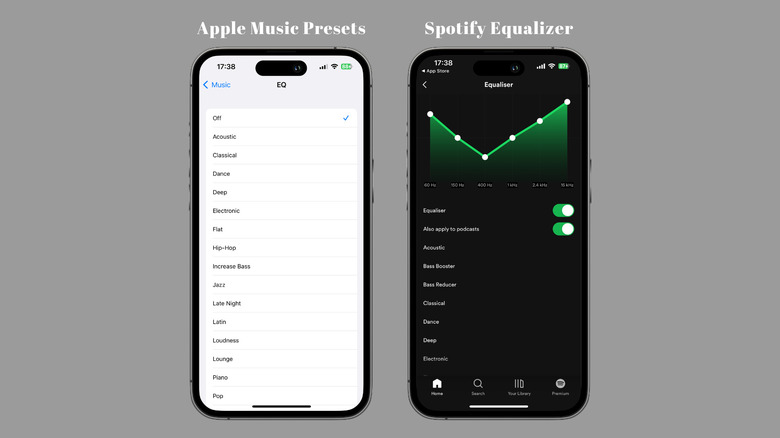
To modify the sound profile on Apple Music, head to Settings > Music > EQ and try the different presets, including Acoustic, Classical, Dance, Deep, Electronic, etc. If you like watching many TV shows or YouTube on your iPhone, the Treble Booster or Vocal Booster presets might help you. For listening to songs, the Increase Bass option might sound better.
In Settings > Music > Audio Quality, try enabling Lossless Audio and check if you notice a considerable difference. Compared to AAC, Lossless Audio carries more information, resulting in better sound but larger file sizes. However, what matters is whether you can discern a difference.
On Spotify, head to Settings > Playback > Equalizer and enable it. Then, you can select a preset or drag and adjust the dots on the equalizer to customize the sound. Additionally, head to Home > Settings > Audio Quality and choose High or Very High.
On Amazon Music, tap the cog icon in the top right, select Settings, and then choose Streaming Audio Quality. Here, select Standard under Wi-Fi and Mobile Data.
Tailor sound using Headphone Accommodations
Another effective way to tailor sound quality is Headphone Accommodations. It is an accessibility feature that allows you to boost soft sounds, increasing the overall loudness and clarity, which is ideal for someone who listens to songs with a lot of vocals.
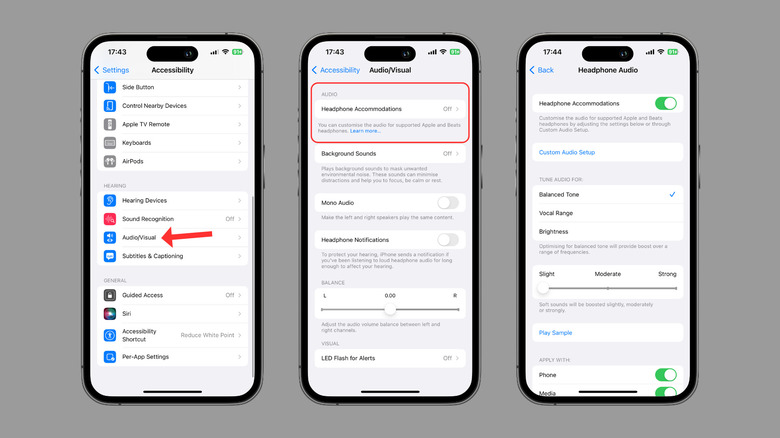
By default, Headphone Accommodations is turned off. To enable, head to Settings > Accessibility > Audio/Visual > Headphone Accommodations and enable it. With an audio track playing, switch between Balanced Tone, Vocal Range (boosts middle frequencies), and Brightness (boosts high frequencies) under "Tune Audio For." Also, try setting the Soft Sounds slider to Moderate and Strong and see if you like these settings better.
Generally, those who want a louder sound signature might set "Tune Audio For" to Brightness and Soft Sounds to Moderate. However, those who want a balanced sound might use a combination of Balanced Tone and Slight. If you think this is too complicated, simply press the "Custom Audio Setup" button and follow the on-screen instructions to let iOS determine your preferred sound profile.
At the bottom of the page, you can also select whether you want to apply these changes to your phone's sounds, which refers to the notification and other system alerts, or media sounds, which refers to songs, audio/video files, etc.