How To Generate QR Codes Embedded With AI Art
QR codes are ubiquitous and incredibly useful for quickly sharing small amounts of information. Although QR (short for Quick Response) codes were originally invented at a Toyota subsidiary company in the 1990s to replace barcodes in keeping track of automotive parts, they have proven to be handy for numerous use cases, ranging from sharing your Wi-Fi password to promoting your business, making contactless online payments, and more.
The pandemic has further fueled the popularity of QR codes for digital menus in bars and restaurants so people can avoid touching the virus- and bacteria-filled petri dishes that we call physical menus. Per a recent report by QR Tiger, QR code usage more than quadrupled in 2022 over the previous year, with the U.S. leading in the number of scans.
But despite the countless applications — and equally numerous opportunities for easy advertising, QR codes have barely undergone any significant visual evolution and still mainly comprise a grid of squares, circles, and dots. The advent of AI-generated art finally sets up QR codes for a substantial overhaul, and you can now tastefully create QR codes that completely camouflage with the AI artwork.
How can you merge QR codes with AI-generated art?
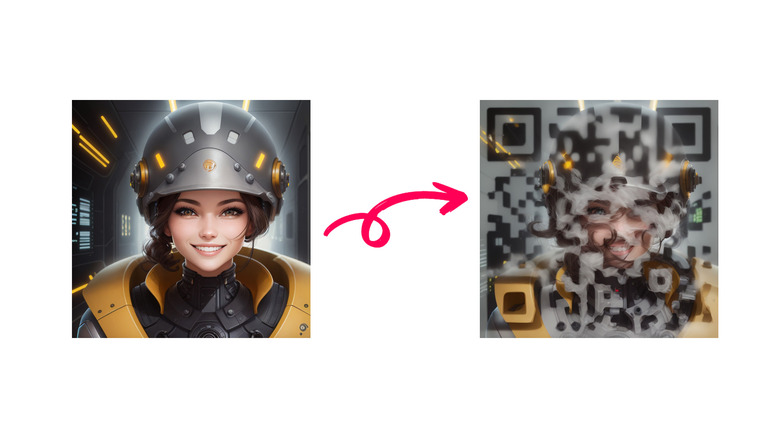
Creating unique and highly customized QR codes involves imprinting a basic QR code over an AI-generated image. While one can simply superimpose a semi-transparent version of a QR code on any image, AI comes in handy in seamlessly blending the crude matrix design into a new image.
This is possible through a text-based AI image generation model called img2img, part of the more diverse text-to-image deep learning model supergroup called Stable Diffusion. Unlike other popular AI image generators such as DALL-E, Stable Diffusion is free to use. It allows you to add a secondary input and multiple parameters to create the desired output with fewer permutations to the prompt. The img2img model lets you add an image as the starting point for the AI to enhance.
In addition to img2img, the process relies on ControlNet, another Stable Diffusion deep-learning model designed to trace edges from an existing image. While ControlNet is primarily intended to capture human poses and edges around the human body to create a sense of realism, it works flawlessly at embedding the QR code onto the AI-generated image.
Get a basic QR code
Stable Diffusion Art comprehensively outlines creating a personalized QR code embedded into AI art. To get started, you must first create a basic QR code in a digital format. While you can use an existing code, we suggest creating a new one.
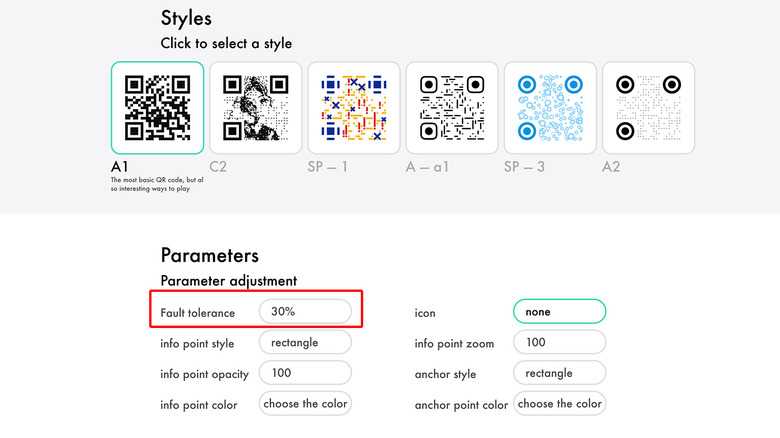
A simple online search for a "QR code generator" can lead you to countless options to create the initial design. However, since the QR code will be merged into the image, we must make one with a high correction level. A QR code's correction level (or fault tolerance) represents how much it can be damaged while remaining readable.
QRstuff and Qrbtf are free and easy-to-use tools that let you customize the correction level on a QR code. You can add whatever information you want and then choose the correction level of 30%. Avoid adding unnecessary frills and opt for a simple design with square bubbles and dots, as more complex designs may affect the code's readability when merged with the artwork. Once you have the QR code, we must use Stable Diffusion to create the AI art.
There are two ways to run Stable Diffusion: one method is more straightforward and requires minimal setup, but you must pay for your usage, while the other is completely free but more complex.
Create AI art with QR codes (Easy method) Part 1: Setup
We'll check out the paid method first, as the free method requires you to download files that take up to roughly 60GB on your PC's hard drive. It also requires a powerful setup, including a dependable GPU, or rendering images may take several minutes. The paid does not require any setup and can be run on any machine, even a smartphone or tablet, with access to a high-speed internet connection. For this method, we'll use "Think Diffusion," an online service that runs Stable Diffusion models on the cloud. Its pricing starts at $.50 per hour, and you get a free trial of 30 minutes. Here's how to get going:
- Head over to Think Diffusion and select one of the two machines; the cheaper one is good enough to generate images, and we recommend using that.
- Load your account with some funds using Cash App or a credit card.
There are different workflows for interlacing QR codes into AI images. You can either create images from text prompts directly while using ControlNet to embed the QR code into it or create an image and then combine it with the QR code. Both methods work, but we recommend the latter, as it produces more relatively natural blends than combining the process in a single step. While this makes the process longer, the results are much more satisfactory.
Part 2: Creating AI images
We'll start with the second workflow mentioned above, i.e., creating an image first and then combining it with the QR code. Here's how to get started in Think Diffusion.
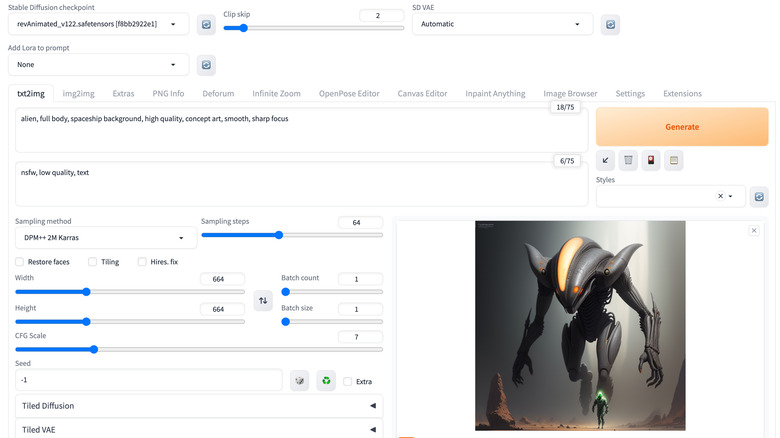
- Click "txt2img" to first generate an AI image using a text prompt.
- Select a Stable Diffusion checkpoint, i.e., the model for creating images. We created our example images using "realisticVisionV20" or "revAnimated" since the results looked best. You might experiment with different checkpoints, like "Counterfeit-V2.5" or "DiscoMix" to get the image style you prefer.
- Set the sampling method to "DPM++ 2M a Karras."
- Set the desired resolution of the AI image: make sure it is not significantly bigger than the QR code, as that might blur the QR code, rendering it unusable.
- Click Generate and save the final image if you like the results. Alternatively, tweak the prompt to get the desired result.
The next part of the process is to use the image as a reference to create something that blends well with the QR code. Follow these steps to accomplish that:
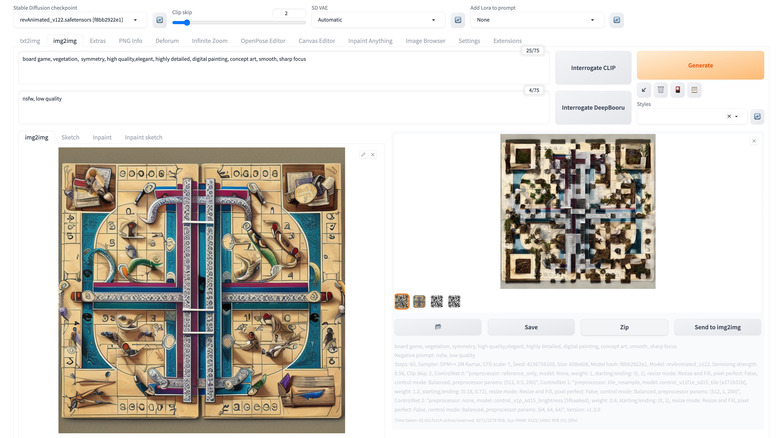
- Click "img2img" and enter the same prompt in the text box.
- Ensure you have the same checkpoint and sampling method as above.
- Upload the image you just generated into the "img2img" panel.
- Set the Denoising strength to roughly 50%.
Part 3: Blending AI images with QR code using ControlNet
The next part is to deploy ControlNet to integrate the QR code into the new image using these steps:
- Scroll down and click "ControlNet" to expand settings.
- Ensure multiple ControlNet panels are enabled since we will require at least two.
- Under "ControlNet Unit 0," check "Enable" and upload the AI image you created.
- Choose a Control Type. You may experiment with different Control Types to generate different results. We used "Scribble" to get a rough outline of our example image.
- Leave the Control Weight, Starting Control Step, and Ending Control Step to default values.
- Now, click "ControlNet Unit 1", enable it, and upload the QR code.
- Choose "Tile" as the Control Type.
- Set the "Control Weight" to 1.2, the "Starting Control Step" to 0.25, and the "Ending Control Step" to 0.75 as the starting values.
- Scroll back up and Generate.
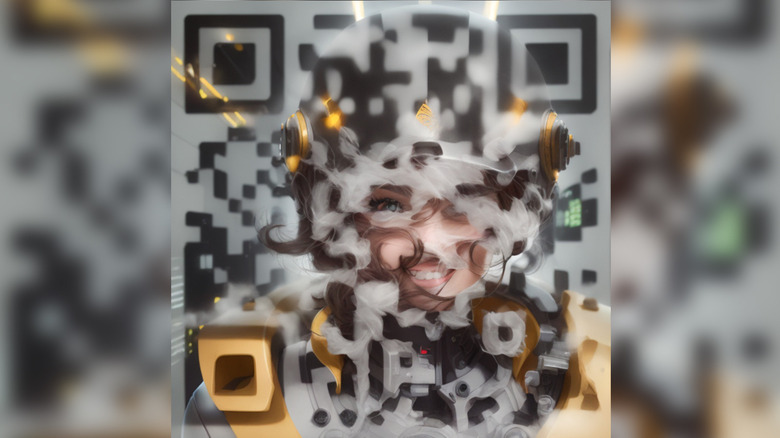
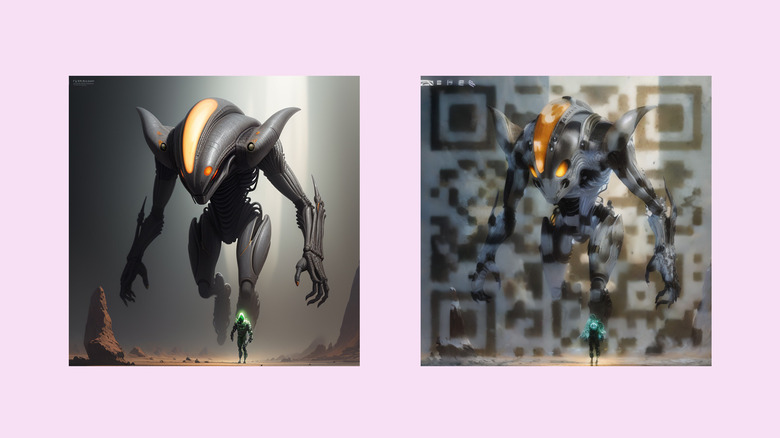
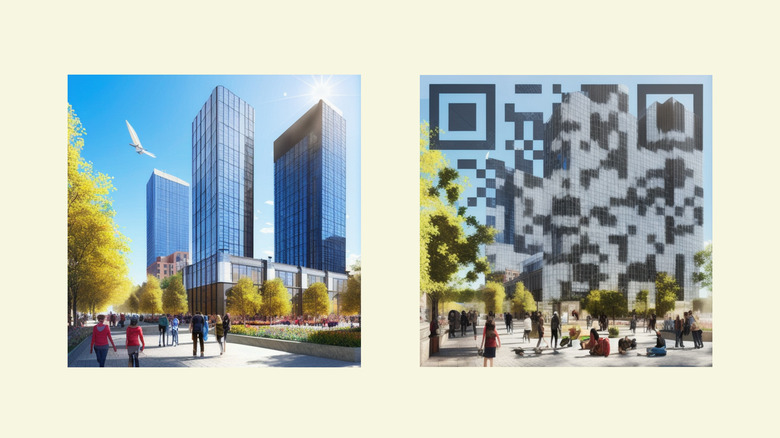
This is where the tricky part begins. You will be required to fiddle with multiple values for Denoising strength and the QR code's Control Weight, Starting Control Step, and Ending Control Step to get the desired result. As each of these values ranges from 0 to 100, it leads to hundreds of combinations, and you must go over many of those and sometimes still not reach the expected end goal, like this:
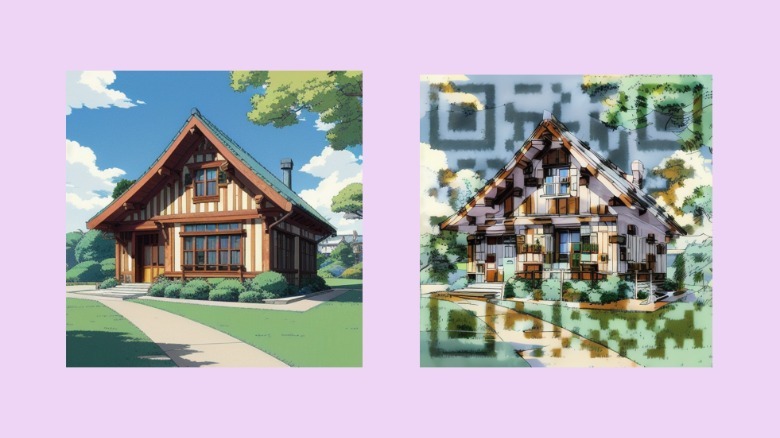 Tushar Mehta/SlashGear
If you're determined to create the perfect QR code, you may try the free method below to bypass limitations with time.
Stable Diffusion for Windows: Free Method
To run Stable Diffusion on your PC, you must download and install a web interface called AUTOMATIC1111. The PC version is free to use but requires experience with Windows's Command Prompt. Follow these steps to set up Stable Diffusion on a Windows PC:
- Start by installing Python 3.10 from the Microsoft Store on your PC.
- Test the installation by opening Command Prompt on your PC and typing the following, followed by the enter key:
python
If it shows the version and installation time, Python is installed correctly. - Download and install git, a code repository management tool.
- Then, open Command Prompt and enter this:
cd %userprofile%
This will bring you to your Windows user folder. - Now, clone the Stable Diffusion web repository by running this command in Command Prompt:
git clone https://github.com/AUTOMATIC1111/stable-diffusion-webui.git
- Using the Windows File Explorer, find the installation folder by entering: "%userprofile%stable-diffusion-webui" into the address bar at the top.
- Now, download the Stable Diffusion v1.5 as the base checkpoint file. Similarly, download other models like Realistic Vision 2.0 and ReVAnimated and place them in the above folder.
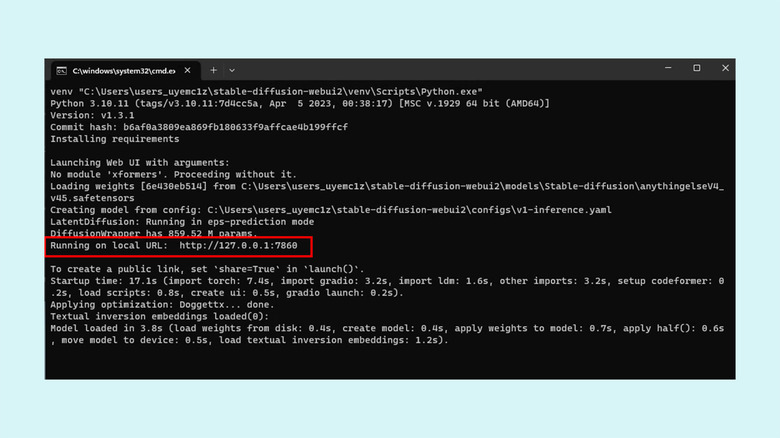
- To finish the installation, search for a file titled "webui-user.bat" using Windows File Explorer.
- Click the file once again to run Stable Diffusion web UI on your Windows PC.
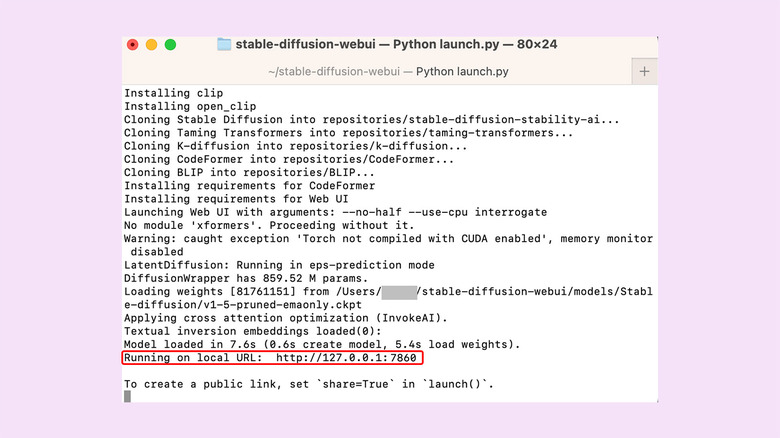
- Copy and paste the listed "local URL" into a web browser to start the interface.
Set up Stable Diffusion on Mac: Free Method
Like Windows, running Stable Diffusion on Mac involves installing Python, cloning the Stable Diffusion git, and installing checkpoint files.
Here are the steps for you to follow:
- Grab the official Python installer and run it.
- Once the installation finishes, head to the Applications folder, find the Python package, and right-click to show package contents. In this folder, open "IDLE" to verify the installation.
- Next, we need Homebrew, a code repository management tool similar to git on Windows. To install Homebrew, open Terminal on your Mac and run the following command:
/bin/bash -c "$(curl -fsSL https://raw.githubusercontent.com/Homebrew/install/HEAD/install.sh)" - Close the existing Terminal window and then open a new one. Run this command to download additional packages:
brew install cmake protobuf rust python@3.10 git wget - We need to clone the Stable Diffusion repository by entering the following into the Terminal:
git clone https://github.com/AUTOMATIC1111/stable-diffusion-webui - Then, download the Stable Diffusion v1.5 checkpoint file and copy it to a folder titled "stable-diffusion-webui" inside the Home directory on your Mac. You can find Home inside Finder by pressing Command + Shift + H. You may download additional checkpoint models such as Realistic Vision 2.0 and ReVAnimated.
- Now, run the following command to start the Stable Diffusion web UI:
cd ~/stable-diffusion-webui; ./webui.sh - Copy the local URL stated in the window, enter it in a web browser, and press Return to open the UI.
One final step before you start
You will see a simple interface for creating AI images once you open the Stable Diffusion Web UI. There is one last but essential step before creating images — installing ControlNet using these steps:
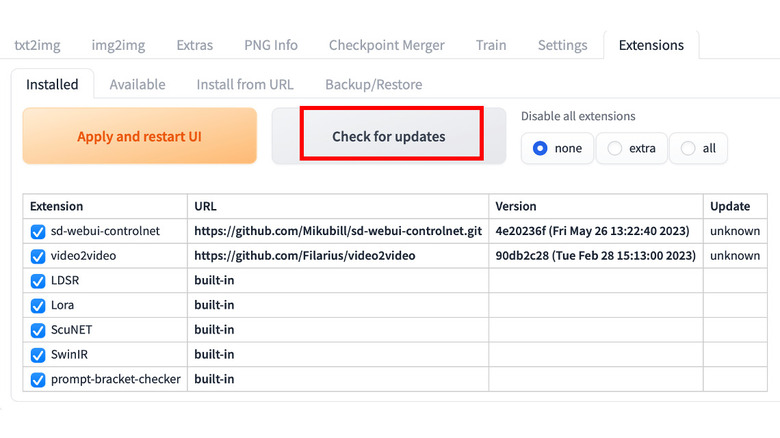
- To begin, click "Extensions" on the Stable Diffusion web UI.
- Copy and paste the URL
http://github.com/Mikubill/sd-webui-controlnetin the text box and click "Install." - Click "Installed" under Extensions, and make sure all the entries in the table are selected.
- Then, click "Check for updates" to ensure all files are up to date, and click "Apply and restart UI."
- Now, you must download ControlNet models separately. These files weigh in at 40GB but are vital to accurately trace the image and the dots on the QR code and, therefore, must not be skipped.
- Once downloaded, copy these files and paste them in the following location: stable-diffusion-webui > Extensions > sd-webui-controlnet > models. Remember that stable-diffusion-webui is the folder we created earlier.
With all the resources in place, you can begin using ControlNet inside Stable Diffusion.
Generate AI masterpieces with QR codes
The process is similar to what we described in the paid method above, with minor differences. Here's a quick refresher:
- Generate an image using the "txt2img" model. Use a checkpoint model of your choice and "DPM++ 2M a Karras" as the Sampling method. Once you're happy with the image, save it on your PC.
- Head to the "img2img" section. Here enter the same text prompt as earlier and upload the image. Define the required dimensions of the final image, choose the same sampling method as above, and set the "Denoising strength" to roughly 60%.
- Now, move to the "ControlNet" tab and check "Enable." In case your PC lacks a discrete graphics card or has one with less than 8GB of video RAM on the GPU, also check the "Low VRAM" option.
- Upload the same image in "ControlNet" and choose a Control Type.
- In the second ControlNet panel, upload the QR code again and select the "Tile" Control Type. Set the "Control Weight" to 1.2, the "Starting Control Step" to 0.25, and the "Ending Control Step" to 0.75 as the starting points.
- Click Generate to get the image.
You might have to tweak the Denoising strength and the ControlNet parameters before reaching the desired result. It may be a long and frustrating process, and it can be challenging to get perfect results, so brace yourself and keep trying.