8 Best Uses For An Old Raspberry Pi
The Raspberry Pi has become so ubiquitous that even people who aren't particularly interested in computers, outside of using them to surf the web or work, have heard of them. As TechRepublic explains, the Raspberry Pi was born out of a desire to create an affordable and easy to understand pocket computer to draw in a generation of kids who were intimately familiar with using computers but had little access to or interest in building them.
In the mid-2000s, Eben Upton set out, with a handful of collaborators, to build a machine that had all of the necessary components for fiddling with a computer and learning how to program at a price point that would encourage not only access but a willingness to make a mistake. The result, after years of tinkering, was the first Raspberry Pi, released in 2012.
In the decade since the world first got its hands on a Raspberry Pi, several subsequent versions have been released. Cumulatively, they sold more than 30 million units, (via ZDNet) largely because of how versatile they are. If you're interested in computers, you're likely you've got one shoved into a desk drawer or sitting unopened in a closet, waiting for the right project. Even if your Raspberry Pi is a little dated, there's no better time to crack it open and build something.
Home security system

To make your slapdash security camera work you're going to need a few additional components. The Raspberry Pi is a flexible piece of technology capable of a great many applications, but it can't see you or your surroundings, at least far as we know. Luckily, you probably have most of the additional supplies you'll need sitting in your house right now. If you don't, you can pick them up pretty cheaply online or at your local tech store.
In addition to your Raspberry Pi, you'll need a webcam to give your security system eyes, an SD card, and a power supply. Once you've got all your hardware handy, it's time to load your Raspberry Pi up with the necessary software. If you've never worked with code before or you're a little rusty, don't fret. The Raspberry Pi community has done all the heavy lifting. As long as you can follow directions, you shouldn't have too much trouble. Check out this step-by-step guide from Make Use Of for full instructions.
Depending on the type of webcam you choose to use, you might be able to run the whole thing on batteries, eliminating the need to connect it to your home grid, and allowing you to place it anywhere inside or outside of your home. You can even set the system to keep an eye out for motion, so that it only kicks on when something is afoot.
Retro gaming machine

Even the newest Raspberry Pis can't compare with modern gaming computers, but they really aren't intended to. That's kind of their whole point. However, no matter how old your Pi is, it should have more than enough power to bring the ultimate arcade machine into the palm of your hand. In fact, many of your favorite pre-built retro gaming machines are built on a Raspberry Pi.
Once again, the Raspberry Pi community has done all of the legwork on your behalf. Using the RetroPie software package will give you access to a seemingly endless list of arcade, console, and computer games ranging from the oldest games in existence to the moderately modern.
While using the latest Raspberry Pi will give you the best possible performance, RetroPie is supported on every version, so you can rest assured you'll get a working gaming machine no matter how old your Pi is.
As with most retro gaming machines, once you've got your Raspberry Pi set up, you're going to need to load it with games. There are many places online where you can find system emulators and game ROMs, but it goes without saying that you'll be treading into the legal wastelands. As explained by How-To Geek, depending on what you're downloading, you might be running afoul of the law. Have fun, but tread lightly.
Social network notification hub

It feels as though there are new social networking sites all the time. If you're the kind of person who is perpetually online, you might be balancing profiles on Facebook, Twitter, Instagram, TikTok, YouTube, and more. Not to mention personal and work emails. The sheer number of notifications can become overwhelming and more than a little cumbersome to keep on top of.
This cool project, posted to Hackster, gathers up all of your notifications and alerts and puts them all in one place not in cyberspace, but right on your desk, countertop, or nightstand. Better yet, it runs on the Raspberry Pi 1 Model B, released all the way back in 2012.
The prototype shown in the tutorial (linked above) shows notifications for email, Facebook, and Twitter, and taps out at a maximum of 99 alerts for each, but it's infinitely customizable. You can design yours to suit your needs by adding alert boxes, increasing the maximum number of alerts, and programming your Pi to grab data from the sources most important to you.
With an old Raspberry Pi, a quick trip to the hardware store, and a little gumption, you'll never have to wonder how much traffic your latest blog post is getting or if your clever tweet has gone viral yet ever again.
Network-wide ad blocker

For better or for worse, ads are what fuel the digital economy. There are times, however, when you just need to read an article or watch a video without ads populating your screen. Depending on the site you're using, a paid option might get rid of the ads in exchange for a direct monetary transaction. You could also install an ad blocker plugin on your browser, but your Raspberry Pi can do the job better.
As noted on Raspberry Pi's own blog, a software package called Pi-hole serves as a network-wide ad blocker that seeks out ads from known ad servers and blocks them from downloading. That means you'll have an effective ad blocker not just on one device but on every device on your network. Any site you access will load normally, just without the ads.
Pi-hole's low resource requirements make it the perfect use for an old Raspberry Pi which might not but up to running more complex tasks. Best of all, the process for setting up Pi-hole on your Raspberry Pi is easier than most of the other options on this list. With just a few steps, outlined on the Pi-hole website, you'll be up and running, and ad-free.
Extend your Wi-Fi

The emergence of Wi-Fi meant that we were no longer tethered to a physical modem or cables to get an internet connection. You can easily cart your laptop from your bedroom to your living room or kitchen without worrying that you're going to lose connectivity. At least, that's the case most of the time.
Depending on the strength of your signal and the layout or size of your home, you might find yourself with a spotty connection or no connection at all in certain parts of your home. Your best solution is to boost your Wi-Fi signal so that it reaches even the furthest corners of each room. You could go and buy a Wi-Fi extender from a big box store, or you could build one yourself with your old Raspberry Pi.
As explained in this tutorial from PiMyLifeUp, you're going to need a micro-SD card, a power supply, two Wi-Fi dongles, and of course, your Raspberry Pi. The project utilizes the Dnsmasq software package, which you can find here, and requires that you work your way through a couple dozen steps to get the whole thing up and running. The PiMyLifeUp walkthrough, linked above, will take you through the process step-by-step. When you're finished, you'll have a functional Wi-Fi extender that you built yourself.
Custom streaming device

The age of physical media is almost at an end, for the most part we all get our content digitally.
There are a number of commercial devices which let you access streaming services on your TV. Those devices often have limitations with respect to their interface and the available streaming apps. Not to mention you're throwing down some hard-earned money on a piece of tech you could make at home, at least if you have an old Raspberry Pi.
You'll get the best results out of your homemade streaming box by using a Raspberry Pi 4, but it will also work on a Raspberry Pi 3, released in 2016. If your Raspberry Pi is older than that, it might still work but could be more trouble than it's worth.
To get started, you'll want to grab OSMC (Open-Source Media Center) a version of Kodi which is compatible with Raspberry Pi, and install it on your SD card. Then boot it to your Raspberry Pi. From there, you can add all of the major streaming services from Netflix to Hulu, Amazon Prime, Disney+, and HBO Max. You can also load a Plex server and gain access to any media from your personal digital collection, on your network, (via Make Use Of).
You'll need to install each service one at a time onto your Pi, which can be a little laborious, but when you're done, you'll have an all-in-one streaming device and a cool conversation piece.
Automatic plant waterer

If you got a little too into plants during the pandemic (don't feel bad, you're not alone) you might find yourself in a position where the maintenance is getting ahead of you. The near-constant inspections, watering, fertilizing, and pruning can build up pretty quickly. Using an old Raspberry Pi, you can offload at least some of that work and make life a little easier for you and your plants.
Once you've got your parched plant picked out, you're going to need a vessel for holding water, a submersible pump, a moisture sensor, a flexible water line, a relay, and of course your Raspberry Pi. This project works with Raspberry Pi 3. There's also some wiring work for this project, posted to Hackster, so you're going to need access to a soldering iron and a screwdriver, but those are likely things you have on hand if you're tinkering with a Raspberry Pi.
If you follow all of the instructions in the tutorial (linked above) you'll be off to the races. Your new automated plant waterer will take real-time measurements of the moisture level in your plant's soil and add water as needed. While this project setup only waters a single plant, it can be modified to care for as many plants as you want. You'll never have to wonder if your plants are thirsty ever again.
Wearable smart glasses
When Google Glass was announced in 2013, many of us had visions of a new technological future in which our virtual lives would seamlessly merge with the IRL world. Aside from a beta release, that didn't end up happening and no one else has really stepped in to fill the gap in a meaningful way. The jury is still out on whether or not that's a bad thing. However, if you find yourself wishing for an alternate present with wearable smart glasses, you can build them yourself with a Raspberry Pi.
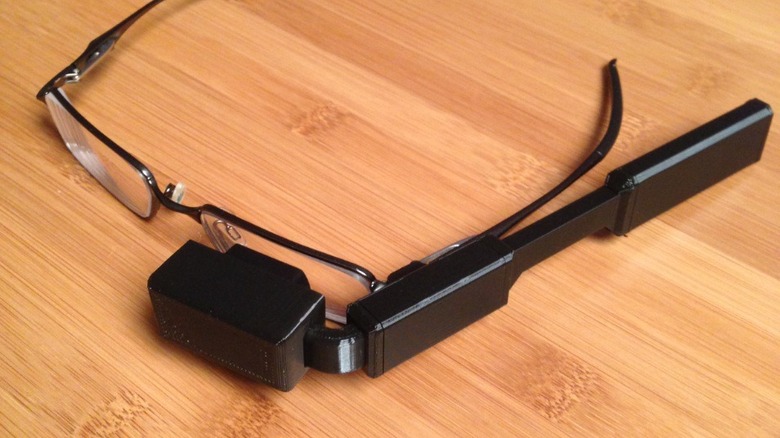
This DIY project from Adafruit runs on a Raspberry Pi 1 Model B, the original product released in 2012 although there's no reason to think you couldn't make it work with a more modern version. Fair warning, you're going to need some additional supplies, some of which might be moderately expensive, and access to a 3D printer.
Building your wearable glasses requires that you strip down a pair of video glasses and repurpose their components to run video from your Raspberry Pi. You'll house your cannibalized components in a 3D printed mount. The STL files are available from Thingiverse.
Admittedly, the end result isn't quite as sleek as an all-in-one device. You're going to have some trailing wires leading to the Raspberry Pi, but that almost adds to the cyberpunk charm.