Want To Change Your MacBook Username? Here's How To Do It

Apple's Mac lineup of desktop computers and laptops is well-praised for its diversity, ranging from the highly capable $999 MacBook Air to the fully specced-out Mac Studio, designed to handle 3D rendering and software development. Regardless of which machine you choose to go with, you get to experience the highs and lows of macOS. On the one hand, it looks and often runs more optimally than Windows does on custom hardware; however, there are a few elements that can make it harder to switch from Windows to macOS.
Freedom of customization is a big example. macOS does offer the essentials, like toggling between light and dark themes, changing app icons, and customizing the Control Center. Like Windows, you can also create different user profiles if you share your Mac with another person or multiple people in your family — a functionality that is still not available on the iPad. When you create a new account, you get to pick a username, associate an Apple ID with it, and pick a profile picture.
Although changing your password or swapping in a different picture for your account is straightforward, changing the name of your user account on macOS isn't a streamlined experience at all and requires a bit of messing around. There are several steps involved, but fortunately, changing your username on macOS is relatively straightforward if you follow the instructions carefully.
Preparing your Mac for a username change
Although changing your username on macOS is not going to tamper with any of your files, Apple recommends you make a backup anyway in case things go south or your file permissions break. You can back up your Mac to iCloud to ensure you don't lose any important data.
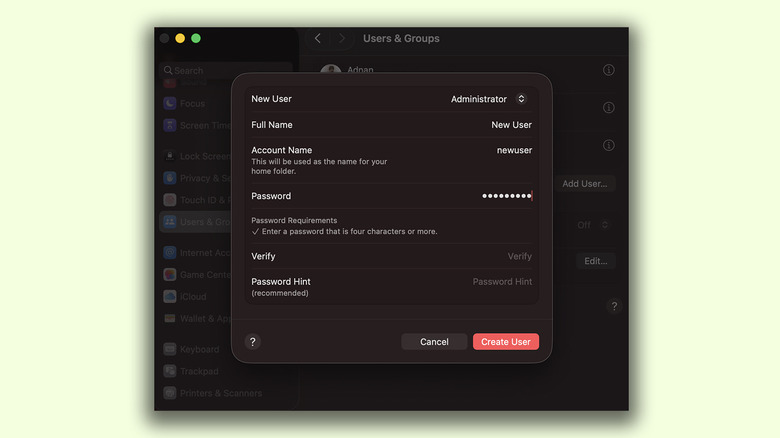
Next, you will need to create another user account if your Mac currently only has one configured. This account will also need to be set up with administrator privileges. This unconventional approach is required since you can't make system-level changes to the same account that's logged in. To create a new account on your Mac, follow these steps:
- Open the System Settings app.
- Navigate to the "Users & Groups" section.
- Click on "Add User" and confirm your password when prompted.
- Fill in the details for this temporary account, including a full name, account name, and a password.
- Change the account type for this new user from "Standard" to "Administrator" by clicking on the drop-down menu at the very top.
- Click "Create User."
Next, log out and switch to this newly created account and set it up with the bare essentials that the setup process asks for. You should now be successfully logged into a different administrator account on your Mac and are prepped up to change the username of your main account.
Changing the username of your profile on macOS
Swapping in a different username for your primary account on macOS requires a few steps, and the process can be divided into two parts. First, we will manually rename the home folder.
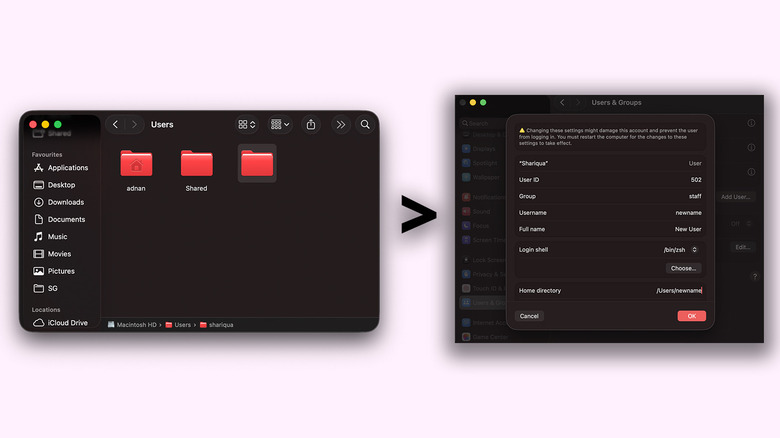
- While logged into the new administrator account, open Finder.
- From the menu bar at the top, navigate to Go > Go to Folder, then type in "/Users" and press enter. This will display a list of folders, each associated with a user account on your Mac.
- Right-click or press return on the folder of your primary user account and type in the desired new username. Make sure to avoid any spaces, and it's best to stick with an all-lowercase username.
The next few steps will have you changing user account options to match the new home folder name.
- Launch the System Settings app and navigate to the "Users & Groups" section.
- While holding down the Control key on your keyboard, click on the user account you're in the process of renaming.
- Select "Advanced Options" and, if prompted, enter the password for the new account you're logged into.
- From the list of options, change the "Username" field to match the same string you used for renaming the home folder earlier.
- Scroll down to the "Home directory" field, and change this to the renamed home folder as well.
- Optionally, you can change the "Full name" field, but this is not required. Click on "OK" to confirm the changes and restart your Mac.