Samsung Chromebook Not Charging? Try This
Chromebooks are renowned for their impressive battery life, which often lasts more than 10 hours on a single charge. And with a few tweaks, you can stretch your Chromebook's battery life even further. Still, no matter how efficient the battery is, you'll eventually need to plug it in. That's usually simple enough, but what if your Samsung Chromebook won't charge, and the LED light just keeps flashing?
First, make sure the wall outlet you're using actually works. It might seem obvious, but it's best to rule out any issues with the wall outlet or power strip if you're using one. Next, unplug the charging cable from your Chromebook and plug it back in. While you're at it, check the charging port for any dust or debris. If you see anything, clean it with a soft brush or a can of compressed air. Once you've plugged everything back in, check the LED light. A red light indicates the device is charging, a green light means it's fully charged, and a blue light means the Chromebook is powered on but not charging.
Sometimes, accessories can interfere with your Chromebook's charging. To rule this out, disconnect all the external devices like a mouse, keyboard, headphones, and even an SD card. Then, try charging your device again.
Check the charger or use recovery mode
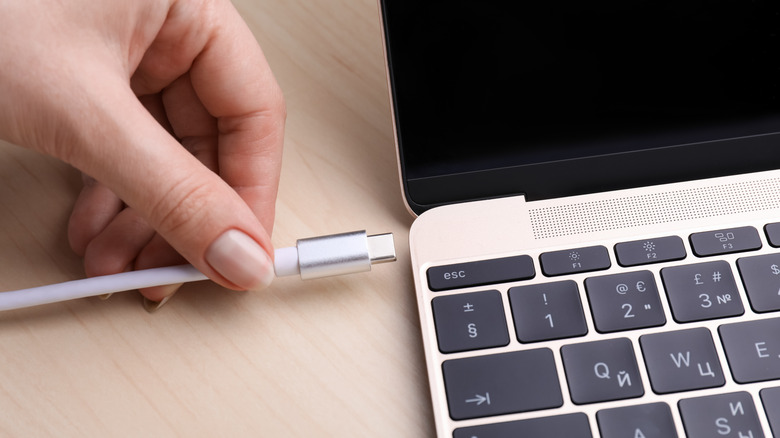
If you're using a different charger than the one that came with your Chromebook, that could be why it's not charging. Even though your Chromebook may support charging via USB-C, not all USB-C chargers are the same. If the charger you're using doesn't meet your Chromebook's power requirements, it may not charge properly. ChromeOS usually shows a "Low-power charger connected" alert in such cases, but if your device is off, you won't see the warning. Samsung Chromebooks typically require a 45W charger, so ensure the one you're using is capable of delivering this power. Even the original charger of your Chromebook can wear out over time. If you have another charger on hand, it's worth trying it to see if it works.
You can also try charging your Chromebook in recovery mode. To do this, press and hold the Esc and Refresh keys, then the Power button. Let go of the Power button first, and once you see a message on the screen, release the other keys. If you're using an older device, unplug the power adapter first. Then, use a paperclip or something similar to press the recovery button located at the bottom of Chromebook while reconnecting the power adapter. After that, turn on the Chromebook.
Once your device is in recovery mode, let it charge for about 10 minutes. Then, restart your Samsung Chromebook and check if the issue is fixed.
Check the battery health or reset the device
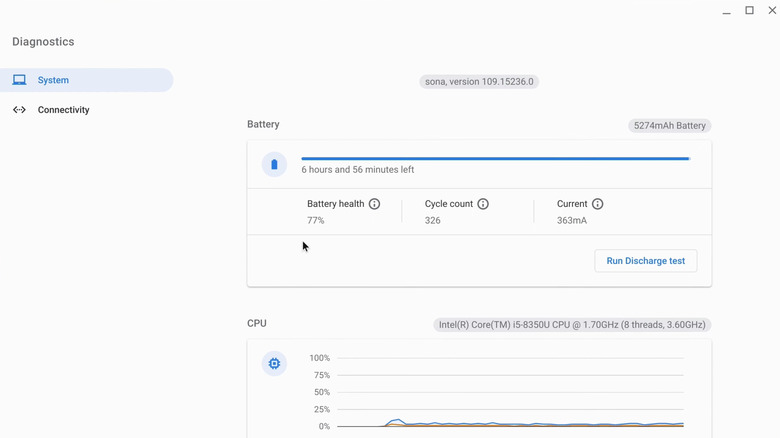
If your Samsung Chromebook is a few years old, it's worth checking the battery health. Like all rechargeable batteries, its ability to hold a charge can decline over time. ChromeOS includes a built-in Diagnostics app that can help you determine if the battery needs replacing. Here's what you need to do:
- Click the time in the bottom-right corner and select the gear icon to open the Settings menu.
- Select About Chrome OS, then click on Diagnostics.
- Go to the System tab and check the Battery health.
- Finally, click the Run Discharge test button.
If the battery health is too low, it's time for a replacement. If the rate of discharge is low, the problem could either be with the battery or the charging port. Your best option is to contact Samsung Support and schedule a repair.
If your Samsung Chromebook won't charge despite having a healthy battery, resetting it might be your best option. If the issue is software-related, performing a Powerwash should fix it. Note that this will erase all data on your device, so ensure you back up any important files before proceeding.
- Open the Settings menu on your Chromebook.
- Select the Advanced tab in the left sidebar.
- Click the Reset Settings option.
- Click the Reset button next to Powerwash and hit Restart to confirm.
Wait for your Samsung Chromebook to restart, then go through the setup process. Once done, your device should charge as usual.