How To Clean Your Lawn Mower's Carburetor In Less Than 5 Minutes

We may receive a commission on purchases made from links.
For those who have experienced the frustration of a mower that just refuses to start or struggles to idle, it could be a result of a dirty carburetor. The carburetor is where oxygen and gasoline mix to facilitate the combustion process. On small engines like those found in lawnmowers, the carburetor is found next to the fuel tank near the top of the engine.
Unfortunately, gasoline has a shelf life, with regular gasoline lasting between three and six months. This means that if you've left a mower sitting over the winter with fuel in it, chances are, some of it has broken down and may contain contaminants. This is one of the reasons why preparing your lawn equipment for the winter is so important.
One of the areas affected by fuel contaminants is the part of the carburetor called the bowl, which is where gas is held before mixing with air. The bowl could be full of debris, which won't allow the engine to run properly and will cause innumerable problems. Fortunately, with a few common tools, you can gain access to the carburetor, apply a dedicated spray cleaner, and be mowing within minutes.
Basic steps to clean the exterior of your mower's carburetor
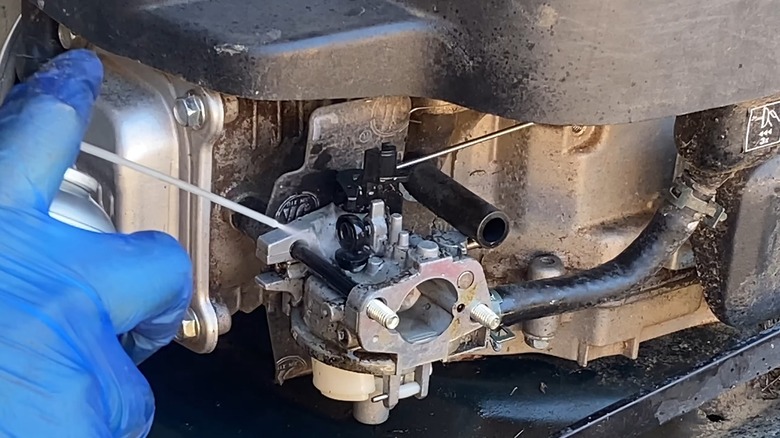
First, you may need to disassemble a few things in order to gain access to the carburetor. Remove the cover from the air filter and check that the filter is clean, not clogged up with dirt and gently remove any debris. Be mindful not to send any loose material into the carburetor. There is sometimes an outer shell over the engine that will need to be removed in order to access the internal components. On some small engines, such as the Briggs & Stratton 550EX, you'll need to loosen bolts behind the air filter to access the carburetor.
Now that the carburetor is visible, use a compressed air gun and wire brush to clean any grass particles and muck around the exterior, including the linkage. Next, use something like Gumout Carb and Choke Cleaner, and spray the area to help eliminate residue. Again, though, be careful not to send any particles into the carb, otherwise your efforts may be in vain. Now, you can put things back together and see if the engine starts and performs better. You may have heard that some common household products work well to clean out deposits on a carburetor. This has prompted many to question whether they can use WD-40 as a carb cleaner.
What about a more thorough cleaning?
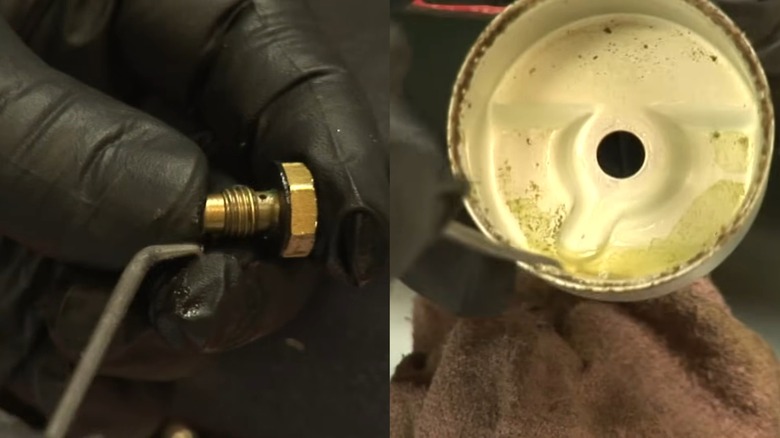
If you want a deeper clean on your mower's carburetor, there are a few additional steps you can take. First, you'll need to disconnect the fuel line from the carburetor and have a container below to capture the small amount of gas as it's emptied out. Notice the cylindrical piece on the bottom of the carb, which is the bowl that collects fuel. This bowl is held on by a bolt that features a small hole through the middle, known as the main jet. Place a shop towel beneath the bowl and unscrew the main jet, loosening the bowl and catching any gas still present.
Examine the main jet looking for any debris and remove it. You'll also want to ensure the hole on the main jet is clear as well. This can be done using a small piece of wire by sliding it through the hole and pushing any material out that may be causing a blockage.
Now, remove the bowl from the carburetor, check for any gunk along the edges or debris floating in the bottom, and remove it. Again, a wire brush and a carb cleaning spray can help break up stubborn sections of grit. Following cleaning, reattach the bowl using the main jet, then put the air filter and engine cover back in place. Routine maintenance is key for keeping equipment running smoothly, but it helps to start with the most reliable push lawn mower brands ever built.