The First 5 Things To Do After Upgrading To Windows 11
Windows 11 has been out since 2021, but for the past four years, you chose to stay on Windows 10 for personal reasons. Maybe you just hate the new user interface design, particularly the simplified right-click context menus and the centered taskbar. Or perhaps you're simply comfortable with Windows 10 and don't think the Windows 11 features are worth the trouble of upgrading.
Unfortunately, with Windows 10 already being ten years old and support officially ending in October, chances are you're now encouraged to finally make the switch. Luckily, upgrading to Windows 11 is painless and convenient. If your computer passes the minimum hardware requirements, you should see a Windows Update available in your Settings. Go to Settings > Update & Security > Windows Update and download and install the new OS.
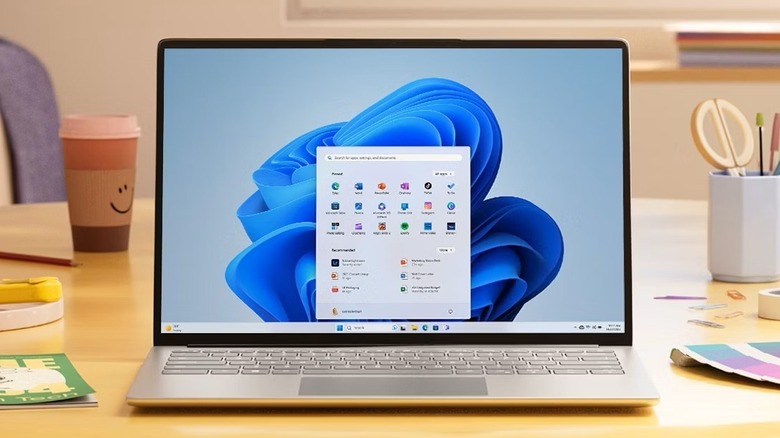
But then what happens once your PC boots, and you're now face-to-face with Windows 11? Well, to start you off, here are five of the first things you should do after upgrading to Windows 11.
Change how your taskbar looks
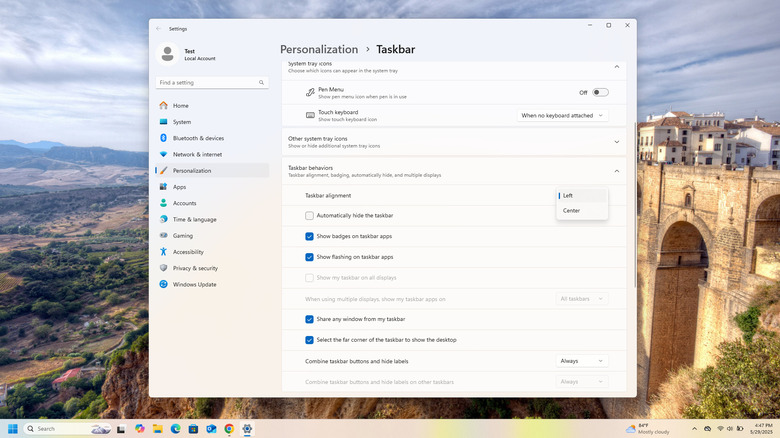
For the longest time, the Windows Start menu has been aligned to the left by default. And if you've been on Windows since forever, this is the layout you're likely most used to. Unfortunately, the taskbar alignment is one of the most noticeable new improvements in Windows 11 — it's now right in the center, similar to the macOS dock. Lucky for you, though, you can easily switch it back to the left and customize its pinned apps like how you would on Windows 10. Here's how to do so:
- Right-click on an empty space on the taskbar.
- Go to Taskbar settings.
- Expand the Taskbar behaviors menu.
- Next to Taskbar alignment, click on Center.
- Select Left.
- Under the Taskbar items menu, disable Task View and Widgets.
- Hide the search bar from the taskbar by clicking Search box and choosing Hide.
- Close the Settings window.
- Remove pre-pinned apps like Copilot, Edge, Microsoft Store, Outlook, and File Explorer from the taskbar. Right-click on the app icon in the taskbar and select Unpin from taskbar.
- To easily access your favorite apps, pin them to the taskbar. From the Start menu, search for your app of choice. Then, once the app pops up under Best match, right-click on it and choose Pin to taskbar.
Unfortunately, some settings, like changing the Windows 11 taskbar location to the left, right, or top, are no longer available. If you want such customizations, you can always install third-party apps like ExplorerPatcher, StartAllBack, and Windhawk.
Redesign the Start menu to your liking
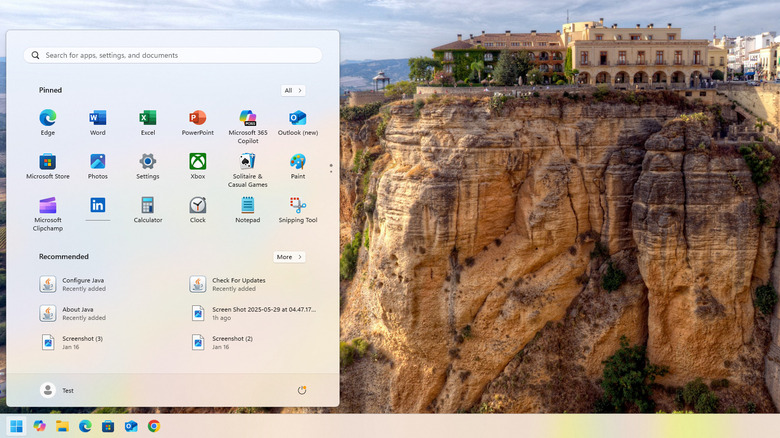
Unlike the Windows 10 Start menu, which shows both your pinned apps and all apps list in one panel, the Windows 11 Start menu offers a simpler design. Upon opening the Start menu, you'll only see two sections: Pinned apps and Recommended files and apps. The list of all apps is hidden in a different menu that you have to click to open. To make this simplified Start menu layout work best for you, follow these steps:
- Unpin the apps you don't need quick access to, primarily the ones that appear pinned to the Start menu but aren't actually installed. To remove them from the Start menu, right-click on the app icon and select Unpin from Start.
- Add new apps to the Pinned section. Enter the app name in the search bar and right-click on the result. Then, press Pin to Start.
- To group your pinned apps into folders like on Windows 10, drag and drop one app over another one. Then, click on the folder to open it. Press Edit name and enter a new name for the folder.
- To remove the Recommended section, navigate to Settings > Personalization > Start. Toggle off Show recently added apps, Show most used apps, and Show recommended files in Start.
- To add quick access folders next to the power button, open the Settings and go to Personalization > Start > Folders. Enable the folders you want to quickly access from the Start menu.
On top of these customizations, Windows 11 lets you change the layout and color of the Start menu too. You can find these options in the Settings.
Free up space
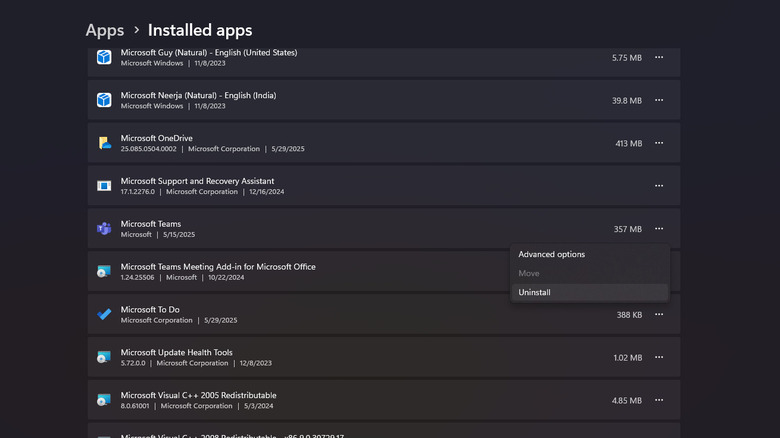
An OS upgrade is the best time to go through your PC for a little cleanup. Since a Windows 11 upgrade will keep all your apps (and files), you might have retained some that you no longer need. There might also be some new Microsoft apps that Windows 11 installed but you don't have any use for. In that case, go through your installed apps after your upgrade and uninstall the unnecessary ones. Here's what you need to do:
- Launch Settings.
- Click on Apps.
- Select Installed apps.
- Browse the list.
- Once you find one you want to delete, press the three dots next to it.
- Choose Uninstall from the menu.
- Confirm by hitting the Uninstall button.
Another way you can free up your disk space after upgrading to Windows 11 is to delete the Windows 10 install files. These are files Windows keeps for ten days in case you want to roll back to the previous version. If you're 100% sure you're sticking with Windows 11, you can manually delete these files even before the ten days are up. To do so, follow this quick guide:
- Head over to Settings > System > Storage.
- Click on Temporary files.
- Mark the option for Previous version of Windows.
- Press Remove files at the top.
- On the pop-up that appears, click Continue to confirm.
Do keep in mind that after deleting the previous version of Windows, you can't easily downgrade from Windows 11 to Windows 10 using the Go back option in Settings > System > Recovery. Instead, you'd have to do a clean install of Windows 10, which means all your files and apps will be wiped from the computer.
Disable unwanted Startup services
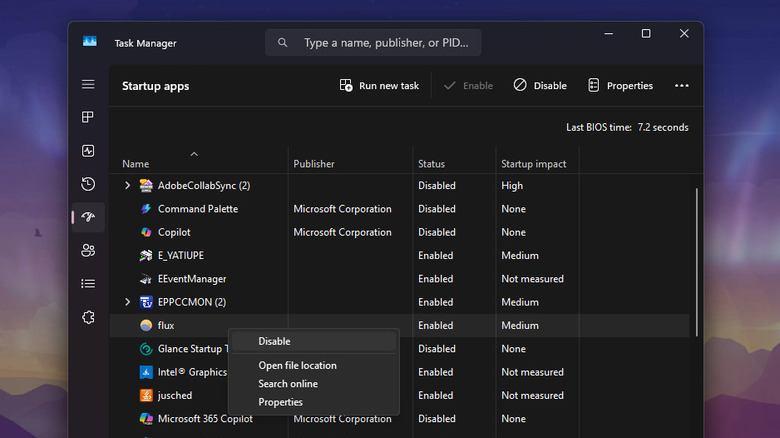
It's always a good idea to disable some unnecessary startup services on your Windows PC, especially after an upgrade, when some new ones might have been added. This way, you can optimize your machine and make it boot faster. Here's how to turn off unwanted apps at startup:
- Right-click on your taskbar.
- Open Task Manager.
- Press the speedometer icon on the left to view all the startup apps.
- Go through the list and look for the apps you're sure you don't use. These are the ones worth disabling, particularly if they're labeled as a Medium or High Startup Impact. A medium or high impact means the app is using more CPU power upon boot, making the boot time longer.
- To turn off your chosen apps, select each one individually and hit Disable in the upper-right corner.
- Feel free to also disable the Low Startup Impact apps that you're not using or don't need to load at startup right away.
Some of the apps you might want to stop launching at startup include Copilot (and Microsoft 365 Copilot), Phone Link, Skype, Xbox, Microsoft To Do, and Terminal. Don't worry, though — you'll have no trouble using these apps later even if you disable them.
Change the privacy settings
Upgrading your computer from Windows 10 to Windows 11 typically means your settings, including the privacy configurations, will be preserved too. However, if you're big on privacy and want to double-check that they're indeed disabled, here are some of the privacy settings to look at after installing Windows 11:
- Launch Settings.
- Select Privacy & security on the left side panel.
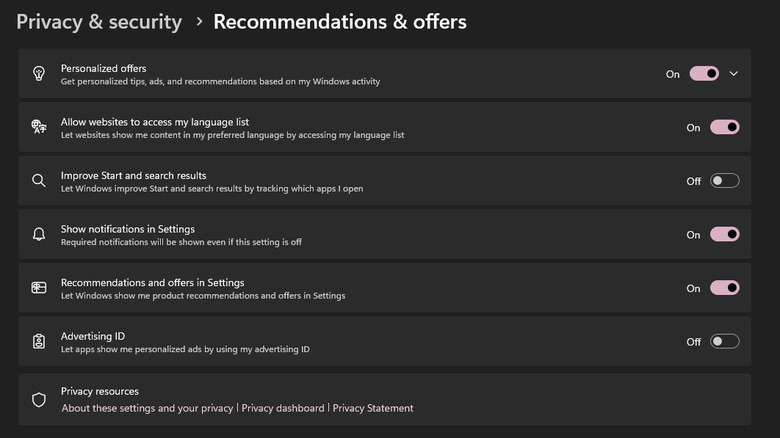
- Under Windows permissions, go to Recommendations & offers. You can opt to toggle off everything here, especially Personalized offers and Advertising ID, which both allow Windows to use your data/activity to show you relevant ads.
- Back on the Privacy & security main menu, open Diagnostics & feedback. Disable the option for Send optional diagnostic data. Then, expand Delete diagnostic data and click on Delete. Microsoft will then remove the collected diagnostic data from its end.
- Return to the Privacy & security main menu.
- Select Location under App permissions. Choose which apps you want to have access to your location, or turn location off altogether.
- Change the app permissions for Camera, Microphone, Contacts, and Account info as well.
Since you're already in the Privacy & security section, you might as well decide whether you want Microsoft to help you find your laptop in case it goes missing. This option is under Find my device. If you switch it on, Microsoft will automatically save the machine's location (when it was last connected to the internet) to your account.