How To Perform Rust Repair On Your Project Car (Without Welding)
We may receive a commission on purchases made from links.
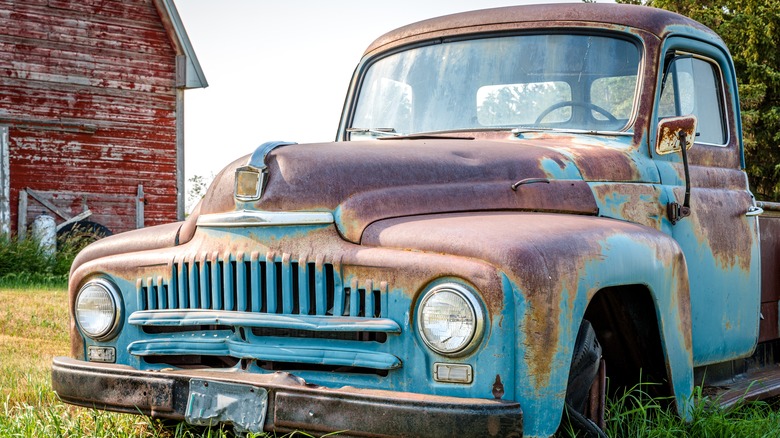
Home mechanics and car rebuilders far and wide often find themselves face to face with issues of rust — you can spend time employing all sorts of ways to protect your car from rust, but sometimes it still happens. The oxidation of steel is completely natural, and it happens often on older vehicles without discrimination of place or model — rust may also be something to worry about if you're a new Cybertruck owner. The trouble begins when paint starts to chip, wear, or bubble. Paint acts as a natural barrier between the bare sheet metal of a vehicle's body and the destructive force of the elements that cars spend their time weathering. When paint chips or otherwise breaks, it allows the interior metal face of the vehicle to become exposed to moisture. Naturally, cars that have been in collisions often suffer from rust damage since the crumpling of body parts leads to a breakage in the flat layer of paint that runs across the surface of the vehicle.
Project cars tend to be those that have seen better days for one reason or another. They may be old classics that have sat idle for many years, or new and athletic autos sold as a result of damage or other issues. In addition to rebuilding an engine or updating the transmission, handling routine rust repair is a skill that car enthusiasts should learn. Fortunately, many minor and moderate rust issues can be handled without the need to delve into welding. The process is actually quite simple — it's just a bit time-consuming.
Act quickly to avoid untreatable segments
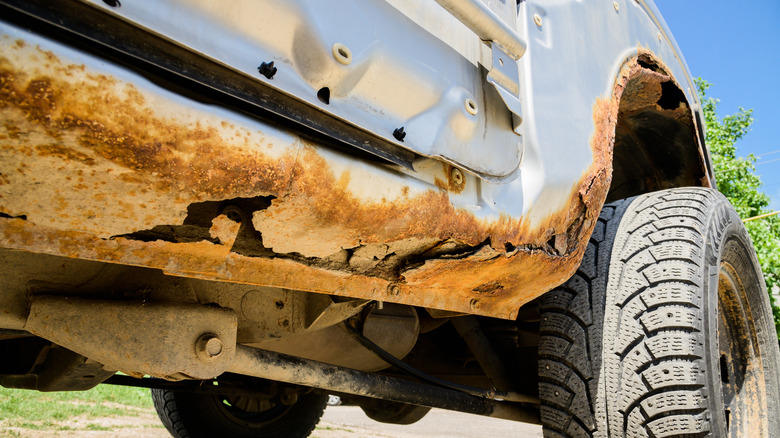
First and foremost, it's crucially important to remember that not all rusted bodywork can be repaired. Minor and moderate rust issues are easy, but if you let the problem sit for long enough you'll be looking at a much more comprehensive welding solution. Having to weld a new custom-fabricated piece onto your car adds a considerable level of difficulty to the job of rebuilding a project car. Not only will you have to precisely cut each segment to fit the contour of the rusted area, but welding itself is a much more demanding and skill-intensive process. Many home mechanics won't have the tools or the personal capacity to undertake this kind of fix. Therefore, anyone working on their own rust repairs will want to deal with the issue as soon as possible.
Small spot repairs and even larger segments of rust that haven't yet disintegrated into crumbling and structurally destroyed metal can be repaired without much trouble. The process is quite easy but takes a bit of time and patience. Setting aside an afternoon soon after identifying rust damage can mean the difference between a potentially expensive professional fix and one you can perform at home — especially important if you're worried about auto-mechanics overcharging you.
Gather your supplies
There are quite a few steps involved in rust repair, and many can be performed with little downtime between them. As a result, it's a good idea to gather all of the supplies you'll need before starting the project. With most of the day set aside for the job, you'll be able to finish almost the entire project in one session.
Rust repair involves successive runs of sanding and filling, followed by repainting and the application of a clearcoat. A Bondo fiberglass body filler — something every home mechanic will want to have around anyway — will do most of the heavy lifting here, but you'll also want finish filler, rust reformer, and rubberized spray primer, as well as a variety of dry and wet sandpaper grits. Dry sandpaper will range from 80 to 600 grit, while your wet sandpaper will run up to 5000 grit. You'll also need masking tape, a small hammer — ideally a ball peen hammer with both flat and round striking faces — spray paint that matches your car's existing color, and a clearcoat. Scrapers, a sponge, and perhaps even a can of compressed air will also make the job more manageable, and a Bondo glazing putty is necessary to complete the perfect repair. Lastly, it's a good idea to either tackle rust repair outside on a sunny day or bring a fan into the workshop to create good ventilation for both the work surface and your health if an outdoor environment can't be guaranteed. No matter where you'll be doing your rust repair, wear a mask to prevent the inhalation of potentially harmful dust.
Clean the area, remove nearby sections, and sand
Once you are ready to begin repairing rust damage on your car, the first step is to clean the area. With the sponge and some rubbing alcohol, wipe down the rusted surface and its surroundings in order to clear any dirt or grime that may be present away from your work surface. The idea here is to remove potential contaminants from the surface so that they can't be transplanted down to the bare metal beneath the paint. If you can, remove any components of the car that surround the work surface, too. You should remove bumpers, light covers, and any other removable parts that might get in your way or serve as something you will need to work around for safekeeping.
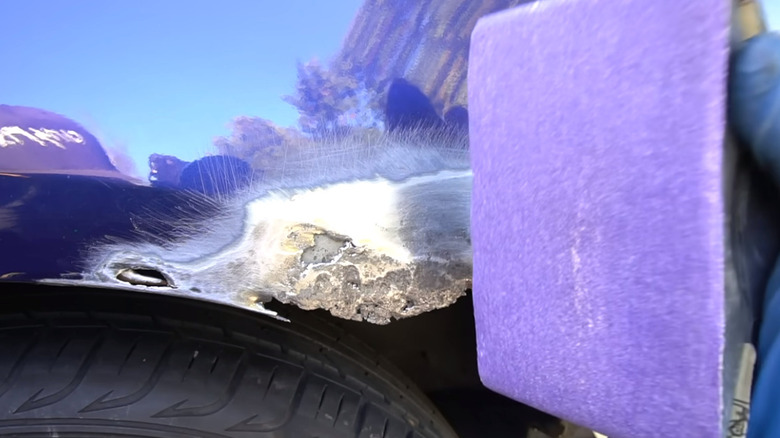
Now take your 80-grit sandpaper and begin sanding down the rusty segments. It's important not to stray too far from the rusted spaces, but working in the perimeter to expose some bare metal around the site itself will help ensure that you've tackled all of the rust. Keep sanding until the entire surface is free of rust and ready to be rebuilt. If you are hand sanding, using a sanding block is a great way to get a good grip on the sandpaper, but you could also use an electric sander of any variety to speed up the process. Sanding is a fundamental step in virtually all of this kind of work, whether you're working on a car or restoring rusty old tools.
Hammer in the sanded area to create space
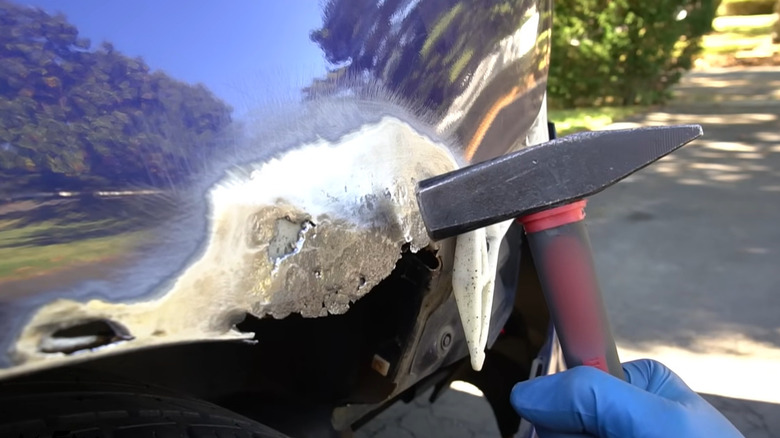
Next, you'll want to dent the area you've just sanded. Get your hammer out and begin to tap on the bare metal until you've created a small depression across the entire surface. Beating against a flathead screwdriver or any other similar tool can also create the small dents you'll be after at this stage. In later steps, you'll begin filling in this area to return the vehicle to its former glory. But your filler will need a space and without hammering in the sheet metal it will have to sit on top of the surface rather than run flush with the surrounding curvature of the car's chassis. A ball peen hammer is a versatile solution during this step. The rounded striking face on the back end of the hammer allows you to smash parts of the sheet metal in with a precise strike, while the flat face offers a wider contact surface for more general striking.
If you aren't able to find this kind of hammer, a light-duty claw hammer can work as well. A lighter hammer gives you greater control — it may not be ideal for driving large nails, but it's the perfect tool for this kind of precision divot creation.
Ensure both sides of the sheet metal are sanded
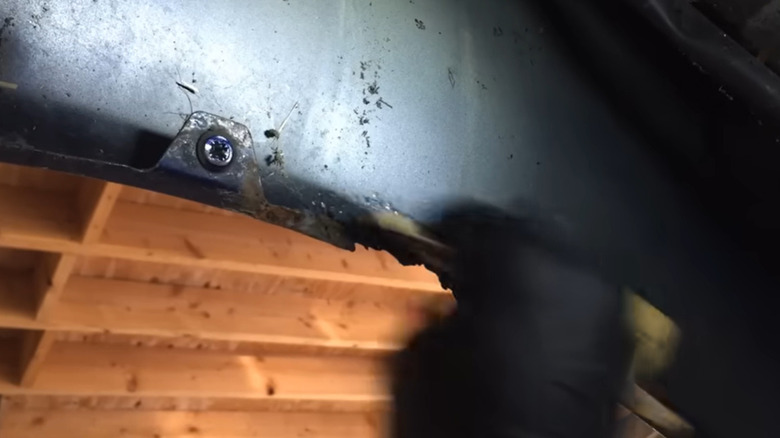
After you've created space for your filler, it's time to focus on the other side of the sheet metal. Rust found in wheel wells, on the hood, or in a side panel may exhibit damage on both the external and internal face. This is especially true for open areas around tires and in circumstances where new rust damage has created holes that run clean through the metal. Fixing only the outer face of your car will leave some of the rust in place, guaranteeing that you'll have to deal with rust issues again in the future: When tackling rust, it's crucial to chase down all areas of oxidation in order to prevent the future spread of rust.
Depending on where your target area lies on the car, sanding the inner surface may be a little tricky. Take your time and use mirrors, your phone, or a remote inspection camera to evaluate your progress. Continue sanding until you've eliminated all of the rust's spread.
Apply a rust reformer and rubberized primer

The inner surfaces of your vehicle won't get the same paint treatment that the outer face receives. However, you still need to treat any rusted surfaces you repair, regardless of where they are found on the car. A rust reformer is a type of undercoat that will ensure rust can't make a comeback where it's applied, even if you missed a spot or two. It bonds to any rust left over and creates a sealed and paintable surface. Spray a coat of this on any inner area you sanded to add an additional layer of security.
After this coat has dried, spray your rubberized primer in a thick coat along the area. It's important to use a rubberized variant because this will add immense durability to the inside portion of your vehicle. This kind of primer will resist chipping and flaking and therefore create a tough, cohesive layer to resist future rust issues with ease. As is the case with sanding, some areas you may be repairing can be difficult to reach. Take your time and make sure that you've coated the entire space thoroughly, and don't be shy with the primer.
Patch and fill the rust-affected area
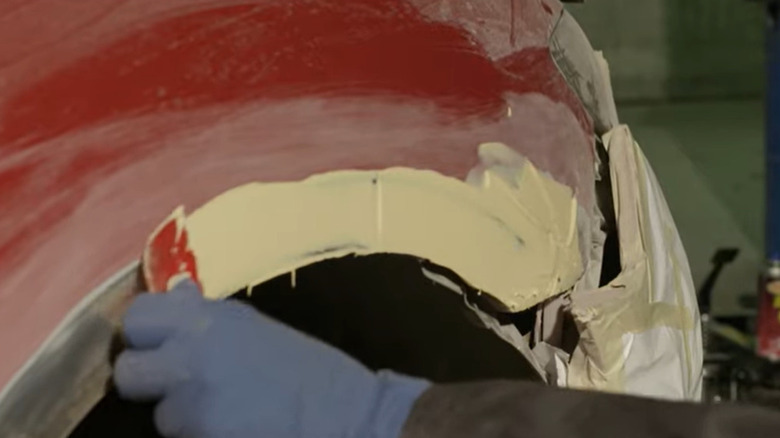
Now you're ready to begin patching and filling the outer face of the vehicle. Using a Bondo adhesive body patch, measure and cut the mesh patch on the outside of the car to make sure it covers the entire area. Then apply it to the inside of the metal section to create a sturdy surface for the filler to adhere. This is a crucial step for any rust repair work when there are holes involved. You'll often run into holes when performing this kind of body repair, but it isn't a guarantee. If you're lucky enough to not see any holes in the sheet metal surface, you won't need a mesh patch. Either way, clean the surface again with rubbing alcohol to prepare it for the body filler.
Mix your fiberglass body filler with the hardener that comes along with it. Using a plastic putty knife or scraper and a clean flat surface, mix the filler until the two components combine into a single color and you can no longer see streaks of either original tone. Then spread it out as flat as you can on your mixing surface to give yourself as much time as possible to perform the first coat. Spread your body filler on the affected area in a thin coat, covering over the entire surface of the formerly rusted space. Add another layer if necessary to achieve full coverage. Once you've finished, set down the scraper and allow everything to dry without trying to clean any of the filler putty. If you're using the Bondo fiberglass filler, it should be ready for the next step in about 15 minutes.
Sand your first coat and apply finish filler
Bend your putty knife and simply pull off the hardened filler before moving on to sanding the filled surface of the vehicle. Get your sanding gear back out and begin to run along the lines of the car's curvature. It's important to keep in mind that car bodies have a variety of lines, edges, and angles etched into their figure. You don't want to just sand blindly across the surface. Instead, take note of where any edges or lines may be and ensure that you're sanding flat against their arcs. This will give you a rough outline of the edges that existed before rust damage began to eat away at the vehicle.
It's important to take as much time as you need when sanding these lines accurately. However, the overall sanding job doesn't have to be perfect at this stage because you'll be applying more filler once you've flattened out this first coat. Once you've finished sanding, get your Bondo professional gold filler (or any other kind of finish filler) and repeat the steps above. Mix the finish filler and hardener together and then apply a thin first coat to the car before building up the repair surface with additional finish filler. Allow this filler layer to cure for 20 minutes before moving on to your next sanding task.
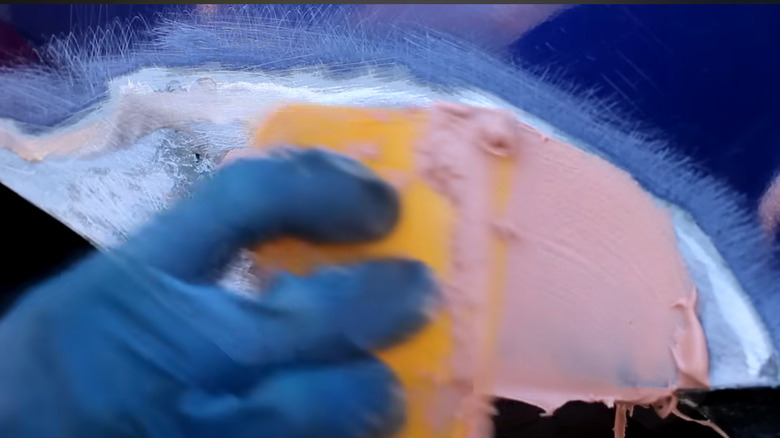
Sand the finish filler smooth, then apply glazing putty
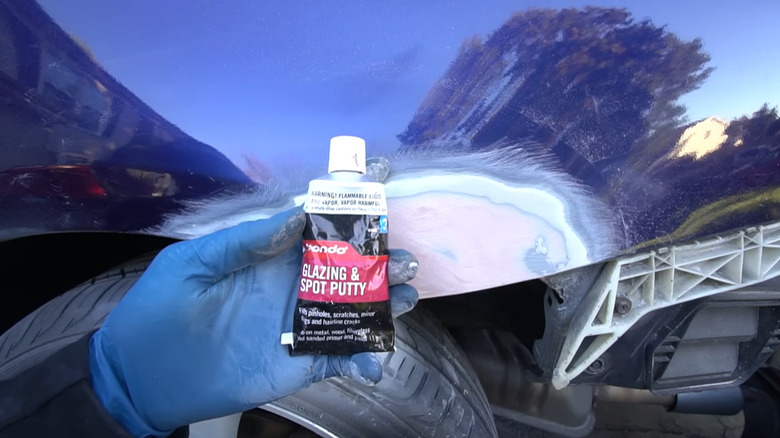
After your finish filler is dry, return to the 80-grit sandpaper and begin knocking off high spots across the repaired surface. After you've given the filler a solid sanding, move up to 180-grit sandpaper to smooth the surface even finer. After sanding with this higher grit paper you'll notice a huge difference in the texture of the sanded surface and the transition between painted metal and filled repair. However, the car still isn't ready to be painted yet. A glazing putty is your next step to create a truly seamless transition between the factory surface and repaired rust damage. Your sanding will have scraped tiny abrasions in the surface of the filler — if you painted over it now, it would catch the light at awkward angles, illuminating the scope of your repair.
Apply a glazing putty directly to a spreading knife and press it firmly into the repair's surface. Draw the plastic putty knife across your surface and continue adding the putty in thin coatings. Give this layer an additional 15 minutes to dry and then sand with 320-grit sandpaper to knock off any high spots and create a near-perfect face that's ready to paint. Clean off the surface once again and then move on to priming.
Apply filler primer and finish off the painting
Before any painting can be done, you'll need to apply a primer. However, it's important to use a filler primer rather than just any undercoat. Bondo filler primer is made specifically for this purpose and includes a little finalizing filler to smooth out any leftover micro-abrasions or imperfections in the repaired surface. This gives you just a bit of extra surface prep to continue smoothing out the repaired surface before applying your color.
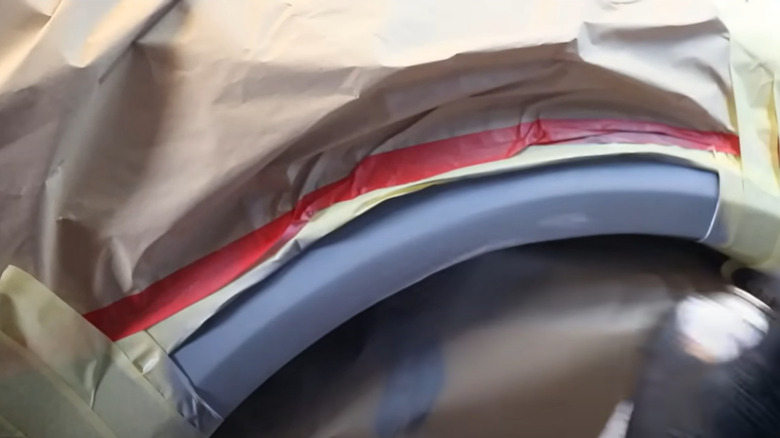
A tip that YouTuber ChrisFix offers up at this stage can be immensely helpful to anyone not particularly confident in their painting skills: Rather than taping off the area that will be primed and painted, gently fold over a few sheets of paper and tape them around the surface to create a rounded edge instead of a harsh tape line. This will make blending your repair into the surrounding car body a bit easier when you're sanding down the primer and later painting. Once you have the surface ready, including cleaning it once again, apply three coats of filler primer while letting each coat dry for the time specified on your can. Once the primer is dry, sand the surface with 600-grit sandpaper, making sure to work up into the original paint job by an inch or two. Then, apply three coats of your match color while allowing each to dry to a matte finish before starting again.
Apply clearcoat and wet sand the residue

Following the same primer and painting technique used before, apply three coats of clearcoat to protect the color and blend the visual effect seamlessly into the vehicle. After 24 hours of drying, the clearcoat layer will be cured. Then it's time to wet sand. First, soak your sandpaper in a warm soapy water mixture before preparing the car. Tape off any area that you don't want to touch with the sandpaper and wet the area with a mixture of warm water and dish soap, wipe down the surface, then start sanding with 1500-grit wetted-down sandpaper. It's a good idea to wrap your paper around a sponge rather than a sanding block for this step. This gives you a more even and forgiving pressure across the surface for this precision sanding step. Move up through 2000, 3000, and 5000 grit, and move in long, deliberate strokes across the surface.
Wipe down the surface between each sanding, and after the final phase, wipe it down once more and let the car dry off. The last step is to apply polish. This doesn't require any specialized technique and is done just as you would polish any other portion of the vehicle. Polish it up and then gaze in awe at your amazing repair work.