6 Fun & Easy Arduino Projects For Beginners

When you think of Arduino projects, your mind likely goes straight to RFID door locks, weather sensors, or automated plant watering systems. While these are undeniably pretty cool projects, you might not find them exciting enough to be your first-ever Arduino project, especially if they don't serve any immediate use to you at all. Perhaps you don't have indoor plants to take care of, or you're not interested in knowing what the current temperature and humidity levels are in your home.
In other words, you want to work on something more fun but still simple and easy enough not to overwhelm you as a beginner. Luckily for you, there are a host of such projects on the internet, and we've compiled six standout options for your convenience. All of these projects either use minimal components, short (and easily understandable) codes, or both. They're also perfect to do over the weekend and won't eat up too much of your time.
Animation display
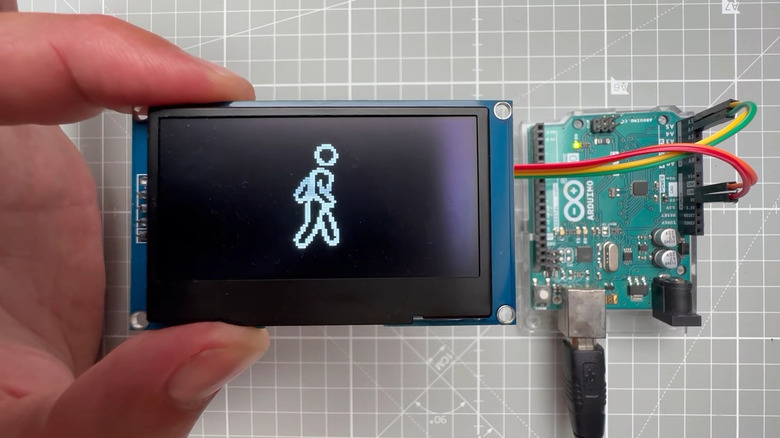
So you want to build a fun Arduino project, but all you have on hand is an OLED display and the microcontroller itself? Then, this animation display might be the project for you. The concept of this DIY creation is simple: display a basic animation like a sun rising/falling on the horizon, a rotating logo of the Chrome browser, and a store sign switching between OPEN and CLOSED.
For this project, you can choose one of at least 600 animations from a range of categories, including sports, emoji, weather, and web. Each animation has a different Arduino code, but you won't need to modify it yourself, as you can simply use the Wokwi Animator. It's specifically designed to generate an Arduino program for your animation of choice. You simply need to pick your preferred icon from the preset list, choose the animation size (32, 48, or 64 pixels), and voila! You have an Arduino program ready to be used on your board.
The project doesn't call for any soldering either. Just connect the OLED display and Arduino together with some jumper wires, and you're good to go. That said, you can easily build this project in under 10 minutes and display it on your workstation as a cute decor.
Buzz wire game

Admit it — every time you're at a carnival, amusement park, or county fair, you just can't pass the chance to try the ever-challenging buzz-wire game. It's the ultimate test of steadiness, hand-eye coordination, and, of course, patience. You likely won't win the game on your first try, but as the saying goes, practice makes perfect. Lucky for you, you don't need to drop by the carnival every day to practice. You can have your own buzz-wire game at home that even your friends can take a whack at.
This DIY version works like any other buzz-wire game — the goal is to get the metal wand (in this case, a lobster clasp) to the end of a metal wire bent into hoops and loops without making contact with it. To make things even more challenging, the project incorporates a counter that tells you how many times you touch the wire during the game. With each contact you make, the red LED lights up, the buzzer beeps and the seven-segment LED display counts up. After making contact ten times, the buzzer blares out an annoying sound — game over. You then have to reset the game to stop the noise and bring the counter back to zero.
To build this DIY buzz wire game, you'd need an Arduino Nano, a 9V battery, two LEDs (red and green), a buzzer, a seven-segment LED display, a shift register for the display, and resistors for the LEDs.
Gesture-controlled system for computer

If you're fond of watching movies on your computer, then you know the struggle of wanting to pause or rewind the show, but you're too lazy to scoot closer to your computer to grab your mouse or keyboard. Thankfully, there's an Arduino project to help you out with that — this gesture-controlled system for VLC. It features two ultrasonic sensors mounted on your computer's display monitor (much like how a webcam is placed). They constantly monitor what your hand movements are and how far your hands are from the sensor.
For every gesture, a corresponding action is then done on the VLC. For instance, when you put up both of your hands (one in front of each sensor) at about 40 to 50 centimeters from the sensor, the video is either played or paused. Similarly, when you move your right hand towards the sensor (at about 10 centimeters), the clip fast-forwards, and when you move it away (at about 20 centimeters), it rewinds. Other hand gestures you can do include putting up the right hand to fast forward one step, putting up the left hand to rewind one step, and moving the left hand closer to or away from the sensor to increase or decrease the volume.
While this may sound complicated, the software is actually beginner-friendly. It involves using two programs: Arduino and Python. The Arduino code mainly consists of function declarations and if-else statements. Meanwhile, the Python program, which is run on the computer, is meant to simply interpret the serial messages sent by the Arduino and output a keyboard shortcut to control the VLC. Both codes can readily be modified for all kinds of desktop apps as long as they can be controlled with keyboard shortcuts.
Moving tissue box prank
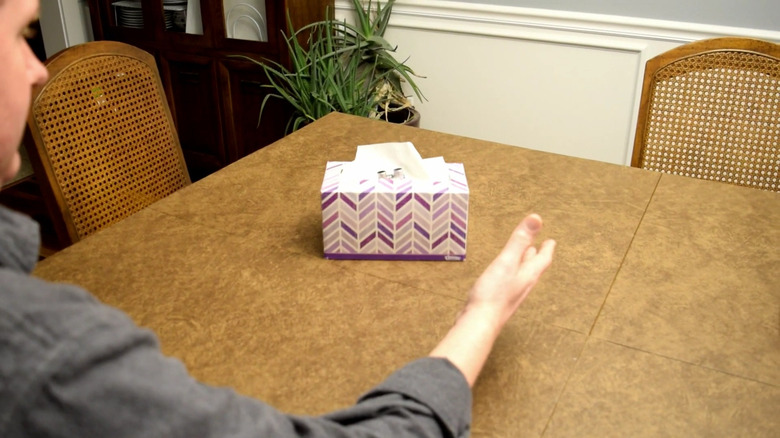
Pranking your family and friends with a whoopee cushion and fake spider is fun and all, but if you're looking to add a touch of electronics to your next practical joke, check out this Arduino-powered moving tissue box. This fun project fits inside a regular box of tissue that moves out of the way whenever someone approaches close enough and tries to pull out a tissue.
An ultrasonic sensor is positioned outside the box to detect the presence of a hand within a four-inch range. Upon sensing an obstacle, it then sends a signal to the Arduino UNO, which, in turn, triggers the motor driver (connected to two DC motors) to move the box either forward or backward for a few short seconds. On the software front, you'd be working with a code about 80 lines long, which makes it pretty easy to understand and modify as necessary. There are also no libraries used in the program, just straightforward if-else statements and function declarations, so this is one of the best Arduino projects for beginner coders to try.
For the prank to be effective, make sure to hide the sensor and wheels well so as not to raise suspicion. You might also need to place the box on a more spacious table, as it may fall off once it starts moving.
Mood lamp
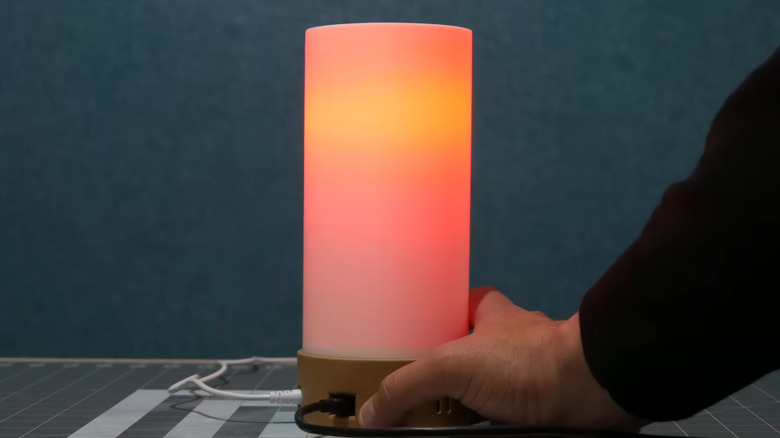
Looking for a fun but simple project for your bedroom that you can build over the weekend? In that case, you might want to consider this mood lamp. Just like a standard mood lamp, this DIY project emits a soft, pastel-colored light to create that cozy ambiance in your room. It also cleverly cycles through random color palettes for a dynamic effect. Hardware-wise, the project uses an RGB LED strip with at least 100 LEDs, connected to an Arduino Nano and powered via a DC jack. Save for the small DC fan for ventilation; those are primarily the only components you need (unless you're using a power supply greater than 5V, which then requires an additional component: a step-down board). With so few materials, you can surely complete this project in no time.
The best part is that you won't have to source the code elsewhere since it only uses one of the examples of the Arduino library FastLED. That means all you have to do is install the library from the Library Manager in the Arduino IDE, modify the values in the ColorPalette example to match the number of LEDs and your preferred brightness level, and upload the code to your board. That's all there really is to it. If you want to add more flair to the lamp, you can also install a push button to effortlessly switch to a different light pattern.
Ultrasonic piano
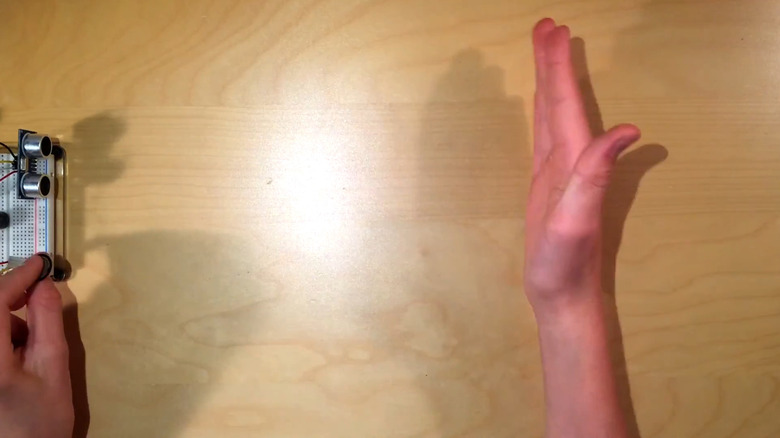
Arguably, one of the most fun things you can build using an Arduino microcontroller is a musical instrument. You'll easily come across plenty of tutorials like these online, from photoresistor-based piano steps to gesture-to-audio projects. But if you're after something simpler that requires minimal components, perhaps this ultrasonic piano is more your style.
What this project does is produce seven different tones (middle C, D, E, F, G, A, and B) with only an Arduino UNO, ultrasonic sensor, force-sensitive resistor (or push button), and piezo buzzer. The tone generated depends on how far your hand is from the ultrasonic sensor when you activate it with the force-sensitive resistor. The closest distance corresponds to C, the next being D, E, and so on, until you reach the farthest point, which generates a B. To play a song, you just have to position your hand at the correct distance before pressing the resistor, allowing the sensor to measure the distance and subsequently prompt the buzzer to emit the right note.
Since the project uses pretty basic components, the Arduino code is equally basic, too. It only has less than 50 lines and easily understandable functions and structures. You'll generally have no trouble editing the program if you wish to add more tones or hardware components.