6 Easy Arduino Projects For Beginner Coders

We may receive a commission on purchases made from links.
If you have an interest in electronics and have been hanging around DIY tech forums for a while now, chances are you already know what an Arduino is. This microcontroller is at the heart of countless impressive projects like RFID door locks, automated plant watering systems, and even robot cars.
Compared to single-board computers like Raspberry Pis and ODROIDs, which might be too overwhelming and complex for beginners, Arduinos are relatively easier to understand. You simply connect your components to the board, use a software called Arduino IDE to create your code, upload the code, and you're essentially done. No need for complicated OS installations and setups.
That makes Arduinos the perfect tool for practicing your programming skills. With the thousands of Arduino projects you can find online, which ones are the ideal starting point for beginners? We've compiled six of the best projects you can take on as a beginner coder.
Lie detector
While lie detectors aren't as useful in real-life crime scenes as they are in movies and TV shows, they're pretty fun to have for less serious reasons. However, if you're mainly using it for kicks and giggles, you probably don't want to spend way over $100 for commercial models, especially when you can just build one yourself.
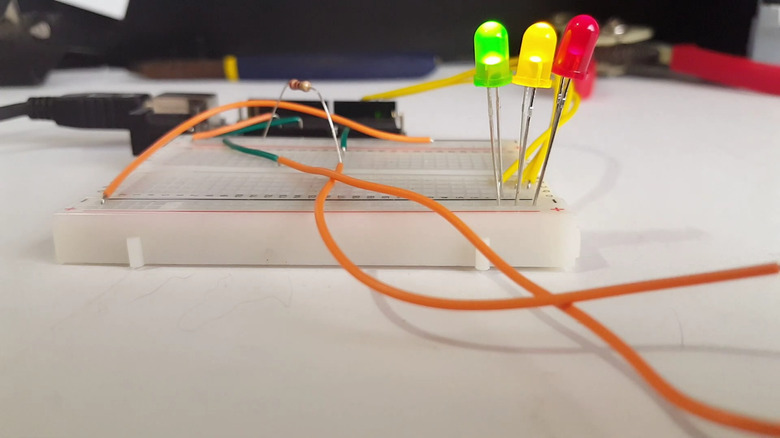
This DIY lie detector project costs you only around $20 to make. Save for the Arduino Nano, it requires pretty basic electronic components you might already have on hand, including three different colored LEDs (green, orange, and red), a 10k-ohm resistor, and a few cables.
The principle behind the project is the fact that the skin reacts to our emotions. Changes in what you're currently feeling can also mean changes in the skin's conductivity, which is then measured and analyzed by the Arduino Nano. These fluctuations in skin conductivity are displayed on the Arduino IDE's Serial Plotter, and indicated by the three LEDs. The green lights up when the conductivity is in the person's normal range, orange when it's starting to spike up, and red when it hits a level that can suggest the person's nervousness.
On the software end, the Arduino code is pretty simple, with only less than 50 lines and basic functions used. Beginners can readily understand and tweak the code to more accurately set the different conductivity ranges.
Laser tripwire alarm
Aside from the dramatic car chases and fighting scenes, another cool thing about spy and action movies is the laser tripwire alarm. Sure, it might look like an overly complex system on screen, but there's actually a basic version you can easily build right at home, even without extensive coding experience.
Powered by an Arduino Uno, this laser tripwire alarm project works much like those in movies. There's a tripwire — made up of a laser directed at a light sensor — that's placed somewhere the intruder can easily trigger, such as a door or hallway. As soon as the light from the laser to the sensor is blocked, the sensor will detect a drop in light intensity and subsequently activate the buzzer. The alarm only stops when you press the push button connected to the Arduino.
For this setup, the program uses only 27 lines, and you'll mostly be dealing with "if" statements, perfect for when you're just starting out with Arduino programming. If, however, you find this too basic, there's a second version of the project with twice as many lines of code.
In this version, you'll be using a keypad instead of a simple push button to deactivate the alarm. After the buzzer goes off, you need to press the star (*) button on the keypad before inputting your four-digit code. As you type the passcode, the buzzer's tone switches to a continuous but still equally annoying sound. If you enter the right code, the alarm will deactivate. Otherwise, it will start blaring again.
Solar tracker sunflower
Sunflowers, particularly the younger ones, like following the sun as it crosses the sky. This DIY solar tracker project mimics this behavior using three simple main components: An Arduino UNO board, a servo motor (with a sunflower paper decoration attached), and two photoresistors facing the opposite direction.
Each of the photoresistors monitors the light inputs coming from the direction they're facing. Once one detects a spike in light intensity, it sends a signal to the microcontroller, which in turn triggers the servo motor to twist toward that light source. If the other photoresistor senses light coming from its respective direction, the board then adjusts the angle of the servo accordingly to point in that new direction. And that's pretty much all there is to it.
The code for the project is self-explanatory and easy for beginners to understand, too. You'll be working with analog readings from the input (photoresistor) and an Arduino library for the output (servo motor). The entire program is just 33 lines long, and you can opt to modify it to add more photoresistors to monitor for light sources from other directions.
Trash bin waste level detector
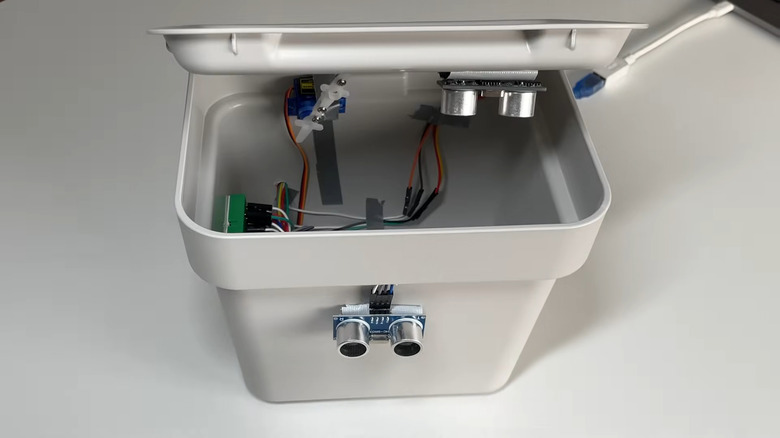
Making an Arduino-powered automatic trash bin that opens and closes the lid for you is a great way to get started with electronics and sensors. If you're looking to make your garbage can even smarter, you might want to take on this trash bin waste level detector as an easy weekend project.
What this project does is pretty straightforward. It continuously monitors the inside of the trash bin and tells you how full it already is by displaying the waste level (measured in centimeters) on the Arduino IDE's serial monitor. It also has a convenient feature that automatically opens the lid once it senses a presence within a 10-centimeter range (about four inches), and closes the lid after a brief interval of four seconds.
Hardware-wise, the garbage can is outfitted with a servo inside the bin for opening and closing the lid, an ultrasonic sensor in front of the bin for sensing approaching people, and another ultrasonic sensor on the inside of the lid for detecting the trash level.
On the software side, things are just as straightforward. The code includes two Arduino libraries: one for the servo and another for the ultrasonic sensors. The main code is a simple 14-line piece with a simple if-else statement you can readily modify. As an upgrade to the project, you can add an LCD monitor to the setup and change the code to display the waste level on the LCD instead of just the Arduino IDE's serial monitor.
Bluetooth-controlled car with LEDs
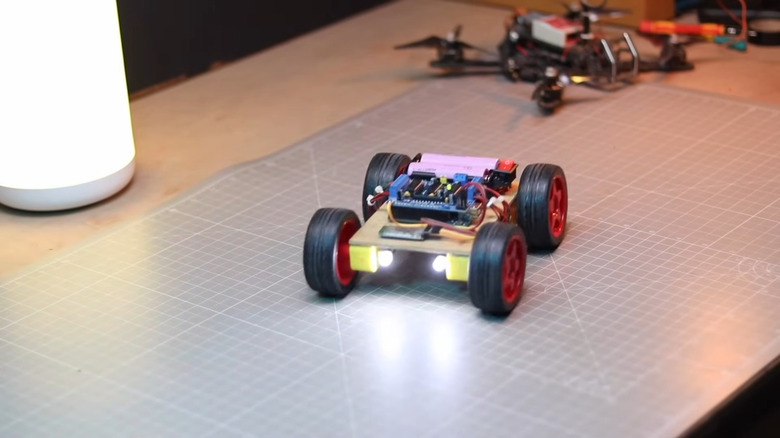
Probably one of the coolest Arduino projects out there is a remote-controlled car, but they're also one of the most daunting projects for beginners to undertake. However, you'll be glad to know that there are RC car versions that don't require being a coding expert.
This Bluetooth-controlled car may seem too ambitious for a beginner project at first glance, but it's actually an easy build. It's run by an Arduino UNO board, and includes several key components: four gear motors with wheels for moving the car, four LEDs for signaling the active status of each motor, a motor driver for operating all the motors, a Bluetooth module for remote control, and a battery for powering the car.
Upon powering up, the car automatically becomes visible to external Bluetooth devices like your phone. You can then connect it to your device using the project developer's Android app, and start controlling the car with the joystick. Press one direction, and the motors for that particular direction will be activated. The LEDs connected to those motors will also light up to show which ones are in action.
Unlike the other projects in this list, the code for this setup is a little over 100 lines, but it's an excellent introduction to working with custom functions that can be called within other functions, like the loop function. You generally wouldn't need to modify anything in the code, except perhaps to change the pin configuration of the motors if they happen to run opposite to your command.
Light-dependent bulb
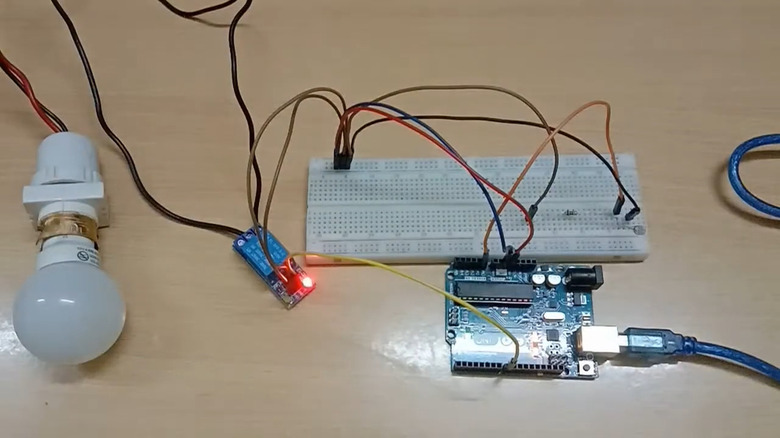
Smart devices are everywhere these days, and when it comes to smart bulbs in particular, they're readily available off Amazon. However, they might be a bit overkill if you're only after something like a bulb that automatically switches on and off depending on the ambient light at certain times of day. In that case, this Arduino-based smart light might be more your cup of tea.
The idea behind this project is to build a lightbulb controller using a light-dependent resistor (LDR). The LDR continuously monitors the intensity of light in the room. When it's dark like at night, or when the blackout curtains are drawn, it triggers the bulb to switch on. In contrast, when the room is well-lit, say during the day, the bulb is kept off.
Aside from the Arduino UNO microcontroller, LDR, and the bulb itself, the hardware for this setup is pretty minimal: a relay for the bulb, a resistor for the LDR, and some wires to connect everything together.
As for the code, it's really straightforward and easy to understand. You have less than 30 lines, with the main code sporting a simple "if-else" logic. You can readily use the project developer's code as is or change the pin configuration and the LDR's threshold to better suit your needs.