How To AirDrop From Your iPhone To A Mac

One of the perks of owning multiple Apple products is the seamless way you can share files between gadgets, thanks to a feature called AirDrop. Available on iPhones, iPads, Mac computers, and Apple Vision Pro, AirDrop lets you quickly transfer all sorts of media from one machine to another, provided that the receiving gadget is within Bluetooth and Wi-Fi range and is near the source device. You also need to have AirDrop switched on for all the devices involved in the file exchange and have the necessary settings and permissions enabled.
Setting up AirDrop so you can send things like photos, videos, documents, websites, map locations, and the like from an iPhone to a Mac is fairly easy. It can even be done between your phone and someone else's computer (and vice versa), as long as you are in the same vicinity and have the correct permissions granted. To facilitate a seamless transfer, check that you have Personal Hotspot turned off for both devices.
Ready to send something from your iPhone to a Mac? Let's make sure the computer is armed and ready to accept any AirDrop files.
How to enable the AirDrop feature on a Mac

Since AirDrop works through Bluetooth connectivity, verify that Bluetooth is switched on for the Mac:
- Hit the Apple menu icon.
- Go to System Settings.
- From the side panel, select Bluetooth.
- Enable the Bluetooth toggle.
Next, make sure the Apple device doing the sending can "see" the Mac computer in AirDrop to select it as the file's destination. Here's what you need to do:
- On the Mac, click on Spotlight search (magnifying glass icon) in the top-right corner of the screen.
- Look up AirDrop and select it from the search results.
- In the AirDrop Window, Click on the "Allow me to be discovered by" dropdown.
- You should see three options. For a hassle-free process, select Everyone. You can change this back later.
At this point, the Mac should be ready to receive a file from any Apple user nearby. Note that this includes yourself and others with an Apple device within Bluetooth and Wi-Fi distance. If you don't want to leave this feature enabled permanently for others to utilize, make sure you secure it again by following the same steps and then selecting either No One — which will shut the AirDrop door to all Apple devices — or Contacts Only. For AirDrop to continue working at this level, the latter option will require the Mac user to have the sender's email address or phone number (associated with their Apple ID) stored in the Contacts app of the machine.
Now that the Mac is ready to receive incoming media, let's go ahead and send that iPhone file.
How to send a file via AirDrop on an iPhone

As the source device, you don't have to enable the AirDrop feature on your iPhone manually. You do, however, need to turn on Bluetooth on it:
- Swipe down from the top-right edge of your iPhone screen to open Control Center.
- Tap on the Bluetooth icon to make it blue (which means it's turned on).
- Alternatively, you can launch the Settings app, select Bluetooth, and enable the Bluetooth toggle.
Next, make sure you're within proximity to the Mac you're sending the file to, and then do the following on the iPhone:
- Open the file you'd like to send, such as a photo or video from the Photos app or a document saved in the Files app.
- Hit Share, signified by the square with an upward arrow icon.
- You should see several share methods available on an iPhone, with AirDrop probably listed as the first option by default. Tap the AirDrop icon.
- Select the Mac you want to send the file to from the list of nearby AirDrop users.
Note that if the Mac is registered to a person you have saved as a contact on your iPhone, you should see an image with their name in the list of nearby AirDrop users. If the Mac is yours, you will see your details. If the Mac is registered to a person that's not in your iPhone contacts, you would just see the owner's name without an image.
With the file now mid-transit, go back to the Mac and accept the file.
How to accept an incoming AirDrop file on a Mac
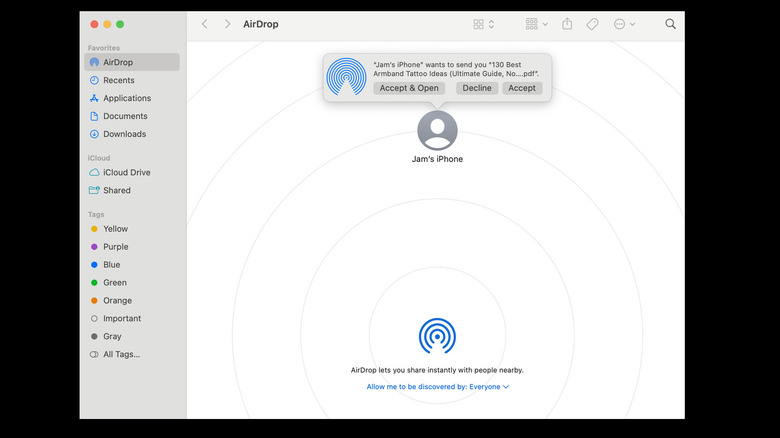
If you own both the iPhone sending the file and the Mac receiving the file, provided that you're signed into iCloud using the same Apple ID on both devices, any item should be automatically accepted and saved without needing to do anything. If the exchange is between different Apple users, the sent file should cause the Finder icon to bounce on the computer, indicating an incoming AirDrop. To accept it:
- Click on the bouncing Finder icon. This should open the AirDrop window.
- You should see a notification bearing the file's name as well as the iPhone's AirDrop name.
- To get the file, select Accept, Accept & Open, or Open in [App].
- If you chose Accept, you should be able to find the file in the Downloads folder or the app you saved the item to.
Again, if the exchange is happening between two different Apple users and the transfer is now done, make sure you set the "Allow me to be discovered by" dropdown menu back to Contacts Only at the very least so you don't inadvertently accept files from random users who happen to be nearby. The good thing about this is you will need to hit Accept for the transfer to go through if the file is from someone other than you.
Now let's learn how to easily transfer a Mac file back to an iPhone through AirDrop.
How to AirDrop from a Mac to an iPhone

Since the iPhone is now on the receiving end in this scenario, you will need to ensure that it's set up to accept any incoming AirDrop files:
- Launch the Settings app.
- Go to General.
- Hit AirDrop.
- Choose either Contacts Only or Everyone for 10 Minutes.
Alternatively, you can swipe down from the top-right edge of your iPhone screen to open Control Center, long-press on the Network Settings card in the top-left corner of the screen, long-press on the AirDrop icon, and make your selection. Again, for a hassle-free transfer, pick the Everyone option so you can receive files from any Mac within the Wi-Fi and Bluetooth range. The beauty of the iPhone receiving the file is that you don't need to remember to revert your AirDrop settings to Contacts Only — it'll automatically happen after ten minutes. You also have the option of picking Receiving Off later on if necessary.
Once the iPhone's AirDrop settings have been properly set, you can now send a file to it from the Mac. Here's one way to do it:
- Use a Finder window to find the file.
- Right-click on it by pressing the Control key while you select the file with your trackpad or mouse.
- Select Share from the menu.
- Pick AirDrop.
- Choose the iPhone you want to send the file to.
You can also use Spotlight to search for and open the AirDrop window and then drag the item toward the AirDrop device you want to send it to. If you're sending a file directly from an app, select the Share button in the app's toolbar, select AirDrop, and choose the iPhone to which you want to send the item.
How to accept an incoming AirDrop file on an iPhone (and use AirDrop on an iPad)
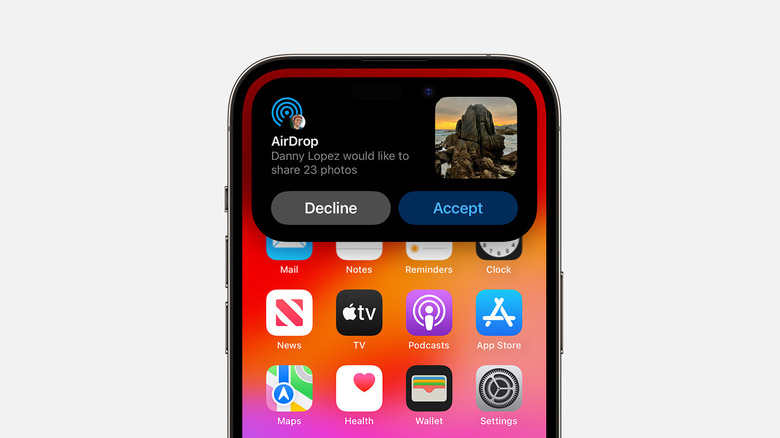
Assuming that Bluetooth is enabled on the iPhone and you rigged AirDrop to receive incoming files from any Apple user, a pop-up notification should appear on the mobile device's screen, with a thumbnail and name of the Mac sending the file. Simply hit Accept to get the file. The saved file will probably be accessible through the most logical app: Photos and videos should show up in Photos, website links in a web browser, app links in the App Store, and so on.
Again, if the exchange is between two Apple devices that you own and both are signed in with the same Apple ID, you may not see the option to accept or decline to receive the file. It will just automatically get sent to your iPhone.
The steps for using AirDrop are the same for both the iPhone and the iPad, so if you are trying to orchestrate a file exchange between a Mac and the latter, you can follow this guide similarly. If you find that AirDrop is failing to detect nearby Apple devices that you want to transmit media to, make sure that you have the latest version of every involved gadget's respective operating systems and that you reboot everything so any updates can take effect if there are any.