6 Tips & Tricks To Edit iPhone Photos Like A Pro In 2024
Thanks to the functionality and performance of cameras in modern-day smartphones, you can take photos that rival those taken on even the best cameras for beginners and amateurs in terms of quality. But that's only the first step. After you take your shot, you get to put your creativity to work by transforming the photo from simply good to great. In the past, you would have had to download a whole bunch of third-party iPhone photo editing apps on your smartphone to edit and adjust the photos on your camera roll to your liking.
But thanks to the built-in editing tools available on most smartphones, especially the new-generation iPhones, you get to take your photos to the next level without leaving the Photos app on your iPhone. From the basics like cropping your photos to more advanced editing techniques like tweaking the color balance and using the right filters, your iPhone pretty much has all the required photo editing tools. While you may, of course, have to use a few other tools and platforms if you're looking to publish your photographs professionally, most people will find that an iPhone's built-in editing suite will serve their photo editing needs just fine.
Crop and flip the image
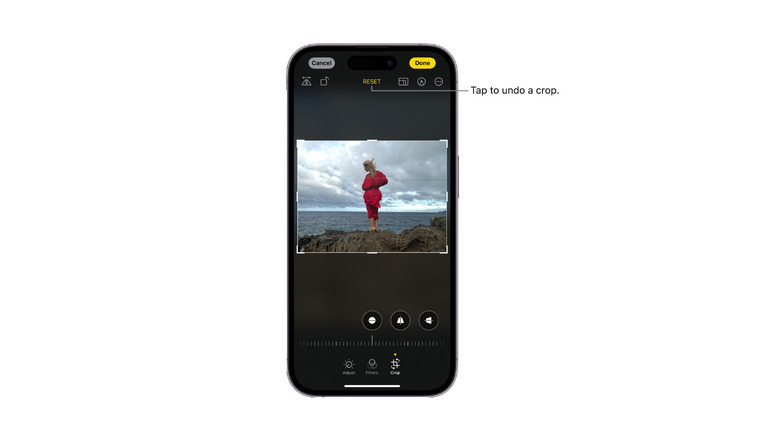
Cropping your image is one of the easiest ways to edit your photo and remove unnecessary elements, bringing the focus to the subject of the photo. This is especially useful if you shoot a photo that isn't perfectly framed or if you notice a lot of background noise in it. Alternatively, you could also resize an image. Given that cropping is such a basic photo manipulation tool, you've likely used it at least a few times in the past. However, there's a way to crop your photo effectively. If you know the best points of interest to highlight, you can do it manually on your iPhone. To do so, launch a photo from your Photos app and tap Edit, which is in the top-right corner of the phone. Then, select Crop and drag the corners of the rectangle to the area you want to focus on.
You can also choose to crop to a preset ratio. To do this, select Crop and tap on one of the options: Original, Square, Freeform, Wallpaper, 9:16, 4:5, or 5:7, to name a few. You can test out a few different cropping dimensions until you find one that best suits what you have in mind. Another way to highlight an image is by flipping it, and this is fairly easy to do using your iPhone as well. Flipping it can be a good way to add a sense of symmetry and create a natural flow. To flip your image, all you need to do is open the image, tap Edit, select Crop, and tap the Flip icon in the top-left corner.
Adjust the light and color
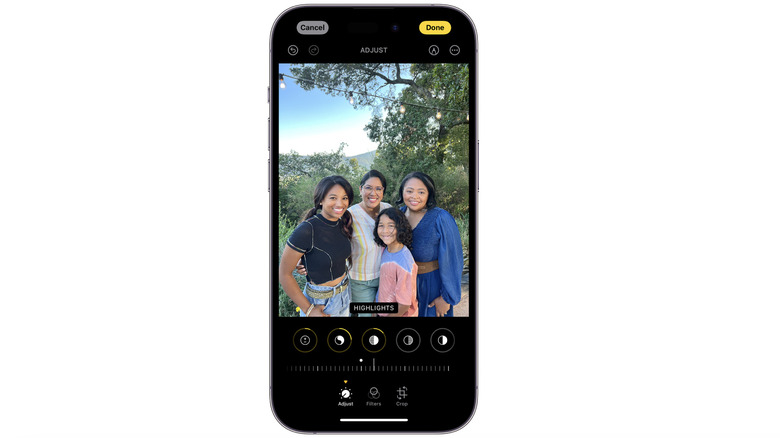
The lighting of a photo can dramatically alter its visual appeal, even if you took the photo on a brand-new iPhone 15 Pro Max. If you didn't take the photo in the most flattering lighting conditions, changing the light and color settings of the image can help you enhance it.
To edit the light and color of a photo, select Edit and swipe left to view the various settings. These should include Exposure, Brilliance, Highlights, Shadows, Contrast, Brightness, Blackpoint, Saturation, and Vibrance to name a few. Each of these settings has a slider under it that you can drag left or right to change the color and light. You'll know how much of an adjustment you've made by the number indicated above the slider. Because there are really no right light and color settings, the ideal settings will vary based on the effect you're aiming for and the existing color scheme of your current photo. Given this, experimentation is key, so be sure to tweak the various settings until you find a balance that works for you.
Use live images
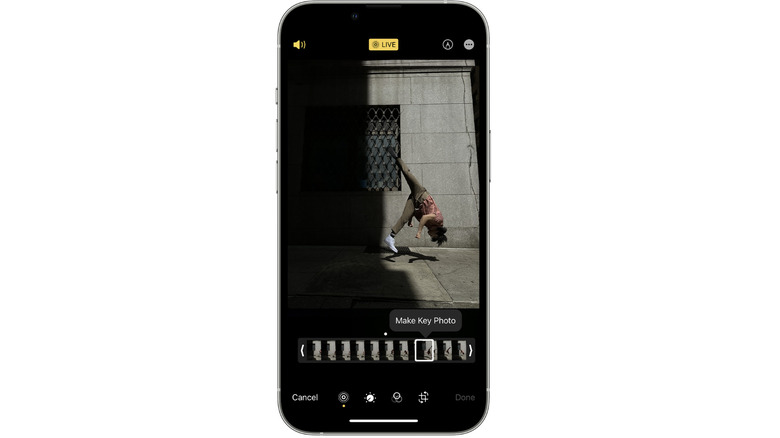
One of the best parts of taking pictures on your iPhone is that you can shoot Live Photos and change the key photo to one that you find most appealing. If you find it difficult to capture the perfect moment or if you don't have too long to capture a variety of shots to pick the perfect one, Live Photos can be a game changer. This feature essentially records whatever happens 1.5 seconds before and after taking a photo, so you have plenty of frames to pick from.
Live Photos is usually turned on by default, provided you've set your camera to photo mode, so any photo you take using this mode will have the shots preceding and following the exact second you took your shot. After you've taken the photo, open it and select Edit. Then, tap Live from the list of editing options you see toward the bottom and drag the slider to change the key photo to a different frame. Release your finger, select Make Key Photo, and then tap Done. Another thing you can do with Live Photos is add effects such as Loop, Bounce, and Long Exposure. These effects are great ways to add a creative touch to your photos.
Tweak the perspective
When snapping pictures with your phone, you might not always be able to align it just right. The good news is that you can adjust the perspective and straighten the angle of your photos to give them a more visually appealing look. To do this, launch the photo, select Edit, and tap the Crop icon. Swiping left will let you view the various options: Straighten, Vertical, and Horizontal. Selecting the Straighten option and dragging the slider will change the angle of the photo. This can be especially helpful if you have horizontal lines in the photo that give it the appearance of being tilted. Similarly, tapping Horizontal or Vertical and dragging the slider can correct distortions and help you adjust the perspective.
The degree to which you adjust a photo is displayed above the slider. This way, you can tweak each setting and view the adjustment level so you know if more or less correction is needed. While straightening and adjusting your photos may not be something you do frequently, it can be an invaluable photo editing hack when your photo includes straight lines.
Use the right filters
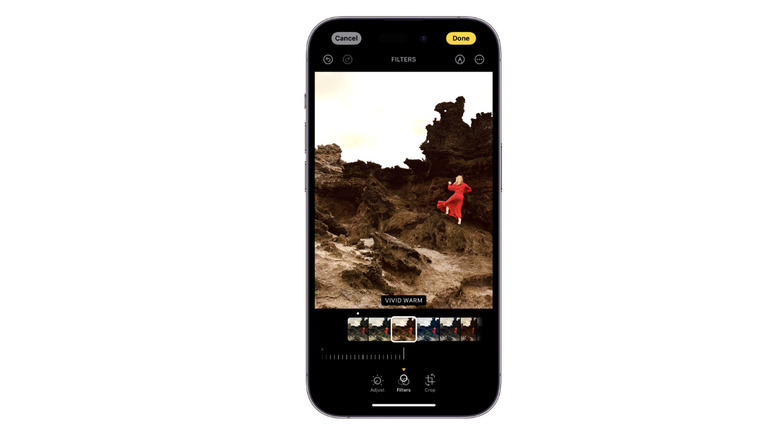
If you're looking to create a more cinematic appearance, the iPhone's built-in filters can help. Depending on the type of filter you choose, you could end up with a warmer or cooler color temperature, creating a more balanced visual aesthetic. To apply filters to your existing photos, launch the photo and select the Edit option.
Now, select Filters from the bottom and swipe left to view the various filters: Vivid (increases the contrast of the photo), Vivid Warm (applies the Vivid filter but makes the photo warmer), Vivid Cool (applies the Vivid filter and makes the color temperature cooler), Dramatic (reduces highlights in the photo and increases necessary shadows), Dramatic Warm (applies the previously-mentioned Dramatic filter, but creates a warm look), Dramatic Cool (applies the Dramatic filter, but creates a cool look), Mono (turns the image black and white), Silvertone (turns the picture black and white but also casts shadows), and Noir (turns the picture black and white and boosts the contrast).
When you select a particular filter, you can drag the slider to increase or decrease the intensity of the color palette or effect associated with that particular filter. If you like what you see, select Done to save your work. Alternatively, select Cancel and Discard Changes to revert to the original picture.
Write or draw on the photo
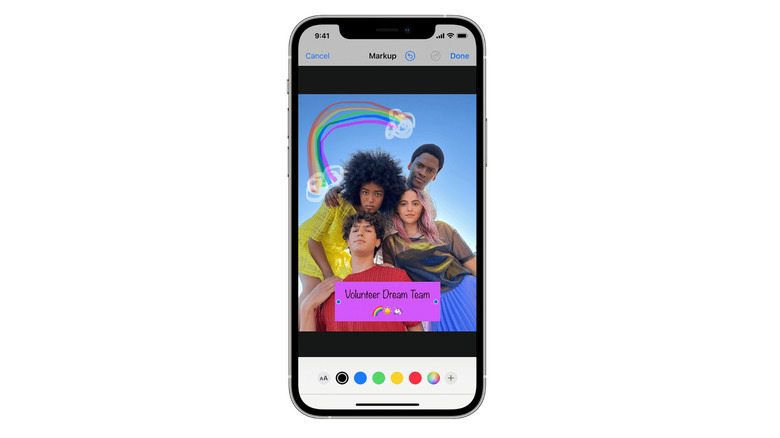
You can write or draw on a photo for fun, to highlight something, or to add a message to the photograph. You can do this right through the Photos app by tapping a photo and selecting the Edit button. Then, tap the marker/Edit icon in the top-right corner of the screen. When you do this, you'll be able to see a variety of drawing and coloring tools, including a pen, highlighter, pencil, and even an eraser. Select any tool of your choice, and choose the size of the stroke and the intensity of the color to adjust the writing to your preferences.
You can change the color of the text or select the plus icon to add a description, text, signature, or shape, apart from just drawing something. If you're happy with your edit, select Done to save the image. If you don't like it, select Cancel to revert to the original image.