10 Hidden Features You Might Not Be Using On Your DSLR
Before you rush to go buy a new-fangled mirrorless camera, take another look at your digital SLR camera to see what features might be hiding amidst the myriad menu options. Yes, that DSLR over there, collecting dust on that shelf. The camera you bought a year or two (or more) ago because you love taking pictures and you wanted to level up your imaging game — and then got stuck in Program mode, overwhelmed by your camera's complexity.
That's okay, we get it: DSLRs (and their mirrorless cousins, for that matter) have a deep, tiered subsystem of menus and a slew of cryptic buttons and graphics. Here we will dig into some of the settings and actions that can totally transform your results, from shooting RAW to adjusting your camera's picture style and understanding the histogram.
All the tips here are valid for DSLRs, and most hold true for mirrorless cameras, too. We vetted these tips on DSLRs dating back to 2011. That said, in some cases you may see less or no support for something we discuss, especially if you have an older or lower-end model (and we've noted this where applicable).
Whether you've had your digital SLR for a couple of years or you just picked one up recently on a deal, these tips can get you shooting — and sounding — like a pro. Not only can you elevate your imaging to a whole new level, but you can find ways to personalize your shooting experience, too.
Learn manual settings, part 1
If you're not already acquainted with terms like aperture and shutter speed, it's high time you were. Understanding these terms is integral to getting off auto or program mode, where the camera chooses these settings (program mode typically gives a little more flexibility than auto). One of the biggest benefits of a DSLR is that you can make creative choices in how to capture an image. All the exposure-related choices discussed here require a basic understanding of aperture and shutter speed. The key thing is to know what to adjust when –- especially if your vision has specific needs.
Aperture refers to the lens' opening, which in turn impacts how much light gets into the camera. A lower aperture of f/1.2 or f/1.8 lets more light into the lens, and it has the effect of blurring the background elements (referred to as bokeh). Higher apertures increase the depth of field. If you want everything in the foreground and background in focus, you need to work with a higher aperture (say f/8 to f/22).
Shutter speed refers to how quickly the shutter cycles to let light in and expose the image. A slow, or long, shutter speed lets in more light, but can trade off sharpness or clarity if you're using the camera handheld (especially if you go above 1/30 of a second). Faster shutter speeds freeze action. If you're trying to capture Simone Biles' Yurchenko Double Pike vault, you want to shoot at a high shutter speed of at least 1/1,600, for example. And if you want to freeze the Blue Angels F/A-18 Super Hornets as they streak overhead, expect to bump your shutter speed to 1/2,500 or more.
Learn manual settings, part 2
Now that we've defined the basic terms, let's show why learning them matters for shooting in manual mode. While there is no single correct permutation of exposure settings, the goal is to find the settings that best capture your artistic vision or intent.
Shooting manual is especially useful for complex images in low light, or for keeping the focus on a specific object. Let's say you want to make sure your image is sharp, even though you're shooting in a dimly lit room. If you use auto, program, or even shutter or aperture priority modes, you don't have full control over the image. So, for example, the camera might bump your shutter speed below the minimum for capturing a sharp image in favor of letting in more light. But if you control the settings in manual mode, you can choose a shutter speed that's higher — say 1/40 or 1/60 of a second — in favor of minimizing motion blur and getting a darker image exposure instead (or a similar exposure by upping your ISO setting). You can always brighten the image in an image editor (especially if you shoot RAW — more on that next), but you can't save a completely blurry frame.
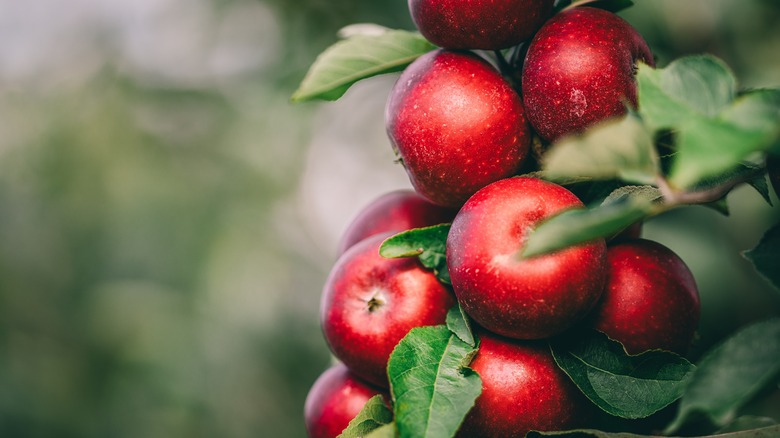
Another example: You want the apples on the tree to stay in focus, with everything behind them blurred out (referred to as bokeh). In manual mode, you can select the lowest aperture of your lens and then adjust the shutter speed (and ISO) around that setting. If the image is dark, again just fix it in post-production.
Shoot RAW
Cameras capture images in a standard JPEG format, with image processing handled by the camera's algorithms. But JPEG is so ordinary. Switch things up and shoot RAW images to open up a whole new world of artistry.
RAW images record the camera sensor's uncompressed and unprocessed information about the scene, which is why this format is often thought of as a digital negative (not to be confused with Adobe's .DNG digital negative format). The advantage of shooting RAW is simple: You get infinitely more creative control in post-production, and you can have an easier time rescuing images that are over- or under-exposed. Since RAW files collect all the information that contributes to making the image, you have full access to adjusting shadows, highlights, and more. Your adjustments are non-destructive, and they won't cause as much banding and noise as you'd get if you made the same adjustments to a JPEG.
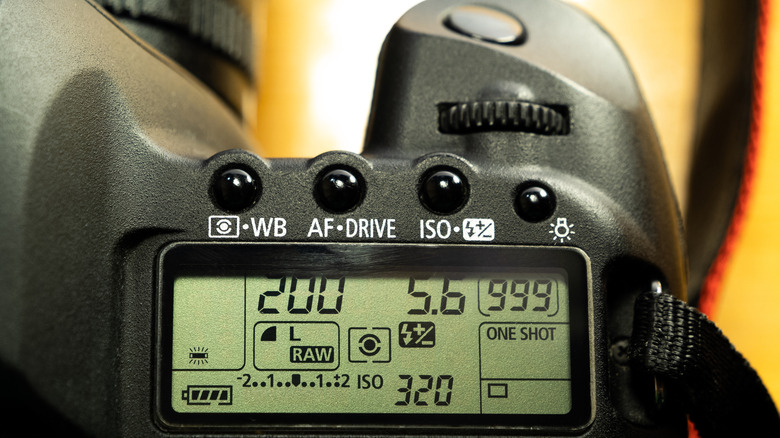
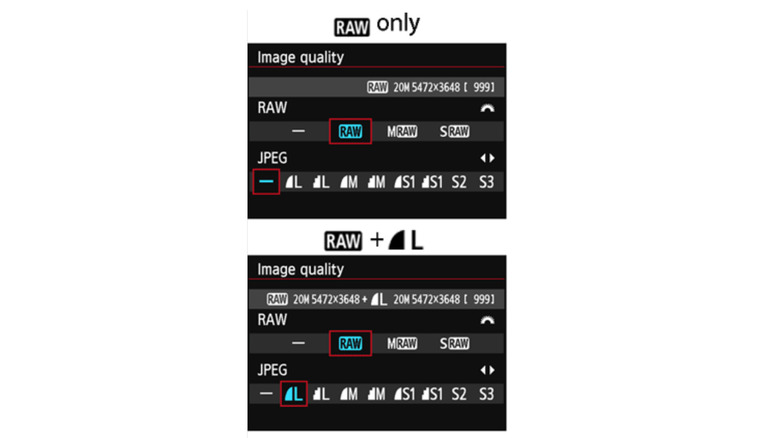
On some cameras, you have to first enable shooting RAW and then select it from the image quality menu. The resulting files have proprietary extensions –- for example, Canon uses either .CR2 or .CR3, while Nikon uses NEF.
One caveat: Since RAW files are lossless and uncompressed, your images are going to require a lot more space on your SD card or CompactFlash card media. Depending upon the camera model and sensor, a typical RAW file on Canon or Nikon can range from 20MB to 30MB, more than four times the size of the highest quality JPEG. Memory cards are less costly than they were, and the benefits of RAW outweigh the fact that you need to keep an extra card or two on hand if you decide to shoot RAW (or RAW + JPEG so you have the convenience of a pre-processed JPEG).
Set a custom white balance
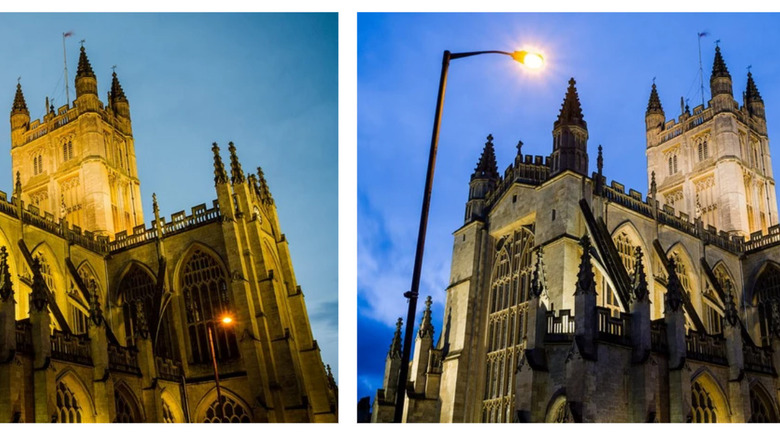
White balance refers to the image's color temperature and how white whites look. The choice of white balance affects more than whites, though: It impacts all colors, including skin tones. Go too warm and images look more yellow and unnatural, as in the example above from Canon-Europe's excellent discussion of white balance; go too cold, and you get more blues in the image — different, but still unnatural. Something in between, with a custom setting, results in a more natural-looking image.
The camera determines white balance based on the color temperature of your environment's lighting, as measured on the Kelvin scale. While auto white balance or the camera's presets may suffice in some circumstances, custom white balance lets you take a more precise measurement that matches your lighting environment. This is especially useful indoors, where lighting can get especially wonky. But it also works well for outdoor images, too.
To set a custom white balance, find the white balance settings in your menu and choose "Custom" (Canon) or Pre (Nikon) to set your white balance. The camera prompts you to snap a picture of a white card (a piece of bright white paper can also work in a pinch), and then you confirm that's the image you want the camera to use as a reference for white balance calibration. With the new custom white balance set, all images you shoot will use that setting. And if the lighting changes, you can simply reset the custom white balance again, or choose from one of the presets, including auto. Auto white balance can be good — especially on newer DSLRs. But custom white balance is better, since it matches your actual lighting.
Use automatic exposure bracketing (and HDR) part 1
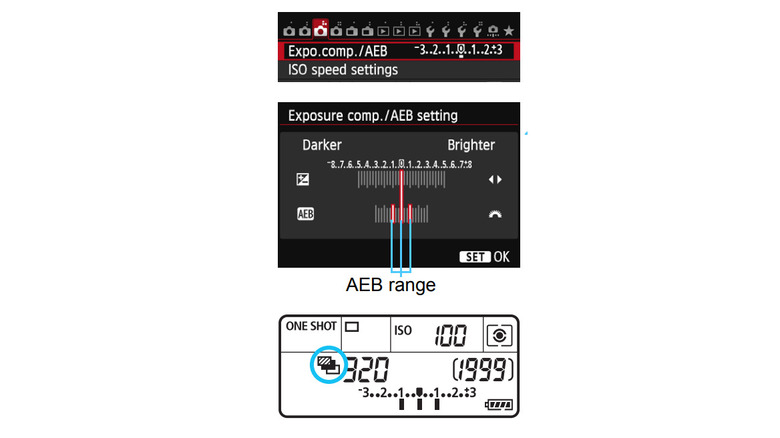
The LCD on the back of your DSLR is only so good at showing detail, color, and brightness. What you see may not be an accurate representation of what you're actually capturing. Or maybe you just can't see the screen clearly in the glare of the sunlight. Enter automatic exposure bracketing (AEB). This feature lets you adjust the exposure settings by interval to capture multiple images, each with different exposures.
While the degree of control may vary by camera model, all DSLRs typically let you set intervals for shutter speed, and some let you get more granular and vary other attributes, like aperture or ISO. Generally, you can find more minute controls on more recent and higher-end DSLRs.
Knowing what setting to tweak and how far apart to set the exposure settings (i.e., by how many stops up or down) depends on a number of factors — including what subject you're trying to capture and to what degree you understand the interplay among shutter speed, aperture, and ISO.
The advantage of AEB is, it simplifies the process of capturing multiple exposures. Once set, you just have to press the shutter once and the camera takes a series of images at the different exposure settings. Three images is the baseline, but some more advanced models can take seven or more images. A disadvantage of AEB: Some camera models may capture brackets in JPEG only, not RAW.
Use automatic exposure bracketing (and HDR) part 2
Another reason to shoot using AEB: You can use this technique to capture sequences you can layer in software to create detailed, vibrant high dynamic range (HDR) images. Some DSLRs have an HDR mode that combines bracketed images in-camera. But an HDR mode is not required to capture HDR images, and we saw plenty of online chatter among photographers that this mode had decidedly mixed value.
Ultimately you can achieve the same effects — varying the exposure — with AEB, and AEB is usually not limited to just three shots (as is often the case with HDR mode capture). By combining these images in post-production, you can extract the highlight and shadow details to produce a high dynamic range image. Often such images look hyper-realistic, with brilliant colors and dark, crisp detail you can't capture in a single shot.
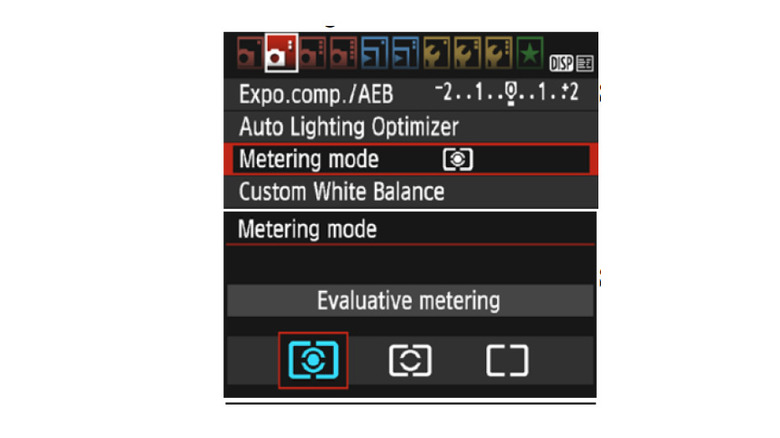
Bonus tip: Adjust your exposure meter to fit your subject. DSLRs have up to four metering modes which govern how the camera's internal light sensor measures available light. The camera automatically sets the exposure based on those measurements; or, you can use the light meter to manually adjust exposure. (The light meter works on a scale from -2 to +2, visible via your LCD or viewfinder.) Your metering mode choice can have a dramatic effect on the overall exposure of your subject, since each mode measures light in a different way.
Capture a multiple-exposure image
The previous section talks about capturing multiple exposures in the context of varying the actual exposure settings (shutter speed, aperture, ISO) on multiple images of the same static subject. Now let's talk about another context, in which multiple exposure means each frame is a separate "exposure" –- legacy lingo from the days of film. Such images are an extension of the double-exposure image, so-called because in the days of film, a photographer wouldn't wind the film and would take a second picture over the first for the effect.
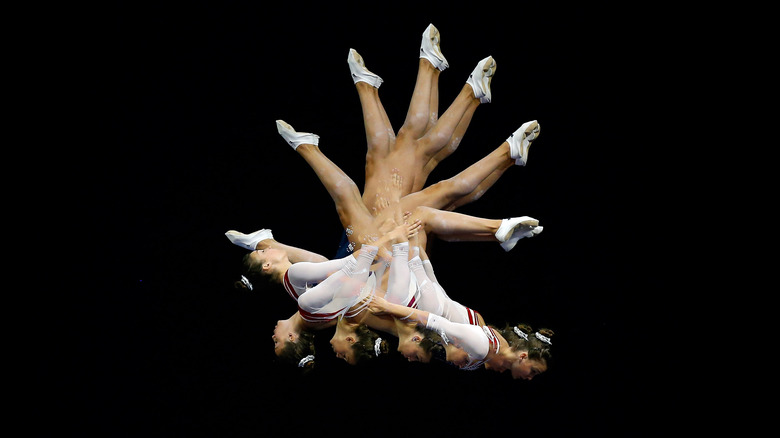
Multiple exposure photography in DSLRs does much the same thing, in that it exposes the sensor to an image more than once. Capturing multiple "exposures" (or image frames) is a terrific technique for conveying the motion of action, with each exposure showing a different point in the movement. Multiple exposures work well in sports images.
Most DSLRs have a dedicated multiple exposure mode that captures a series of images and saves the results to your media card (anywhere from two to 10 images, but again, the options can vary among camera models and manufacturers). With a multiple exposure mode, the camera can then assemble the images into one. Since this feature requires in-camera processing, it follows that advanced multiple exposure modes are on more mid-range to high-end DSLRs like a Canon EOS 90D or EOS 7D Mark II.
Bonus tip: Change your shooting speed. DSLRs have continuous shooting modes that capture more frames per second (fps) than the default. The burst-mode settings vary among models, with more advanced DSLRs supporting higher bursts up to 20 fps. And if your camera lacks a multiple exposure mode, you can achieve the effect manually by shooting multiple frames in quick succession and compositing the images in software.
Learn how to use the histogram
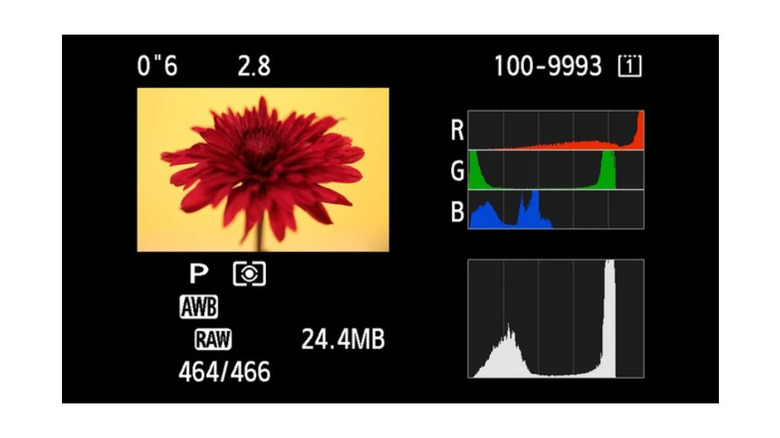
The histogram graphs –- one for brightness, one for color — are another set of tools that can help you determine if your chosen exposure settings hit their mark.
Each histogram graph provides a visual representation of a single image's exposure. Since the histogram analyzes an image you've already shot, it makes sense to access the histogram through the image playback menu. Cycle through the image's info screens to reveal luminance histogram or the RGB color channel histograms (or both on the same screen as your image).
The histogram's design may look intimidating, which is why it's a good idea to familiarize yourself with what its visuals mean. The graph itself shows the black and white levels of your image, with black on the left and white on the right. In between those points are peaks that measure how many pixels are in the image with that tone (color histogram) or brightness (luminance histogram).
Put another way, for the luminance histogram, you can see shadows at left (blacks), midtones in the center, and highlights (whites) at right. A well-exposed image may have a balanced histogram with a bell-shaped curve, though a perfect bell shape is uncommon in the real world. An underexposed image has high peaks in the shadows at left, while an overexposed image has high peaks in the highlights at right. The goal is to move those extremes so the peaks are neither flush left nor flush right.
The RGB color histogram view displays the brightness of red, green, and blue in the image. Once again, the goal is for a more even distribution of the colors across each graph. If a color peaks at either end, that could be a sign that this exposure is losing detail in that color.
Adjust image tone and texture
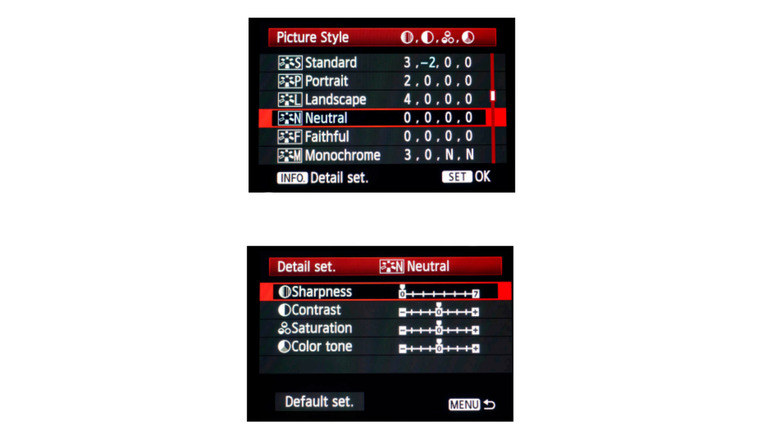
Changing the appearance of an image is not a new concept: After all, we do so all the time with filters on our phone's camera app. But where phone cameras apply the filter on top of the original image (and are not permanent), DSLR picture styles (Canon) or picture controls (Nikon) apply that look to the actual image you're capturing, and it discards the original image data.
At least, that's what happens when you shoot JPEGs. If you shoot RAW, the camera applies the picture style and you can see it in your camera manufacturer's software (for example, Canon's Digital Photo Professional software), but not in third-party image editors. The RAW file preserves the original image data, so you get the best of both worlds.
The picture style settings vary among cameras and manufacturers. Canon and Nikon both have a multitude of picture styles, including standard, portrait, landscape, neutral monochrome. And both manufacturers have ways to download additional styles to the camera.
Turn your DSLR into a webcam
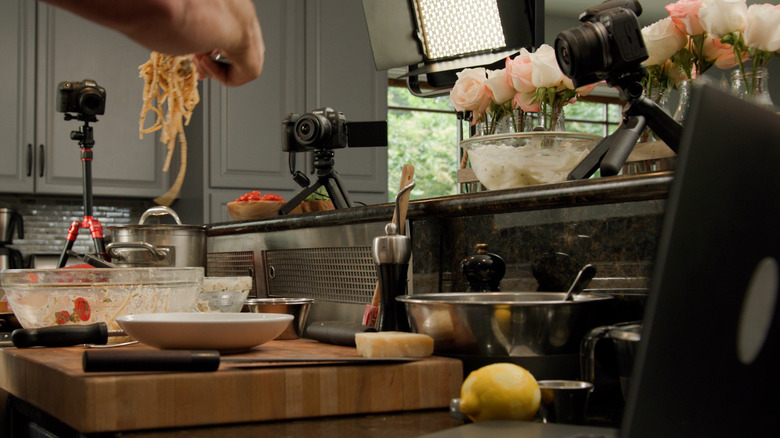
Tired of the grainy webcam on your laptop? Download a free utility to use your DSLR as a webcam. Both Canon and Nikon have free webcam utilities for PCs and Macs that let you connect select DSLR models to your computer. Depending upon the model and service, you can connect the camera using USB, HDMI, or wirelessly.
Each manufacturer and model has its limitations. For example, Nikon's utility supports the D6, D5, D850, D810, D780, D750, D500, D7500, D7200, D5600, D5500, D5300, and D3500 DSLR cameras. However, Nikon also notes that the maximum live view display size is 1,024 x 768 pixels, and seven of those models only use 640 x 480 pixels. All those cameras have a maximum live view frame rate of 15 fps, less than half of the typical 30 fps video uses.
Canon EOS Webcam Utility Pro has wider compatibility with Canon's cameras. It supports 25 DSLRs (with fewer apparent caveats on performance than Nikon cites) as well as newer mirrorless models and some PowerShot point-and-shoot models. The Canon utility is free for webcam-only use at 720p with digital upscaling. For upscaled 1080p at 60 fps video, live streaming, recording, and a slew of other advanced controls, Canon offers a step-up subscription service for $5 per month or $50 annually. The Pro subscription is worth a look if you're a content creator or remote worker and own a compatible DSLR.
If you plan to use your DSLR as a webcam for long periods, you can expect it to heat up over time and possibly require some downtime to cool down. Similarly, if you're using the live view on your camera (useful so you can see yourself in the video frame), expect to drain your camera's battery faster than usual.
Connect to a phone or PC
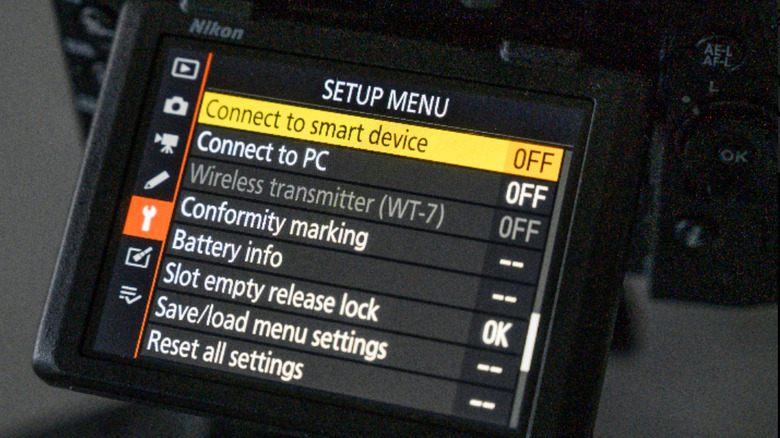
The options for connecting your DSLR to a phone or PC vary depending upon your camera make and model. At the very least, all DSLR cameras have a USB cable you can use to tether your camera to a computer. More compelling, though, is when you have a model that has built-in Wi-Fi, Bluetooth, or near-field communication (NFC) for sending images to phone, computer, or printer.
DSLRs that support wireless communication use an iOS or Android app on your phone or tablet to control the camera wirelessly. You go into the menus to initiate pairing with a device or connecting to a computer. For example, Canon's Camera Connect v3 uses both wi-fi and Bluetooth, and it lets you do everything, from using it as a remote trigger to using your phone screen as an alternate live view, down to adjusting settings like focus and white balance. You can also view images on the camera, save them on your phone, and share them via social media or other apps.
As for apps for use with your computer, Canon cameras typically support Canon EOS Utility, for remote shooting and downloading images from a memory card. Navigate to Canon's support page to find your camera and see the available software downloads.
Nikon has several apps for connecting select DSLR models to your phone or computer. NX Tether and Camera Control Pro 2 are both designed for use with Macs and PCs. NX Tether makes it easy to review images on your camera's internal media, while Camera Control Pro 2 serves as a remote-control trigger. Mobile apps include NX Mobile Air (for quickly sending images from the field), SnapBridge (for using a phone or tablet as a remote trigger, and sharing images via social media).
Customize your menus
DSLRs have deep menu systems with multiple pages beneath each top-level tab. Chances are you've now been exploring your DSLR's features and menus more than you ever have before and you've found settings you'd like to adjust in the future but the trick lies with finding those features again when you want them. That's where customizing your own menu is invaluable. Think of this as creating your own menu favorites or shortcuts screen.
Most DSLRs have a final menu tab (at the far right on Canon cameras, lower left on Nikon cameras) that's left open for you to customize. On Canon DSLRs, a star denotes the My Menu tab, same as we see when bookmarking a webpage on a web browser. Nikon calls its custom menus My Menu as well, but it uses a different graphic.
These custom menus are both convenient and transformative, since you can add menu actions you use frequently. This way, you can ditch the hunting through layers of menus, and instead find all your most important settings accessible in one place.
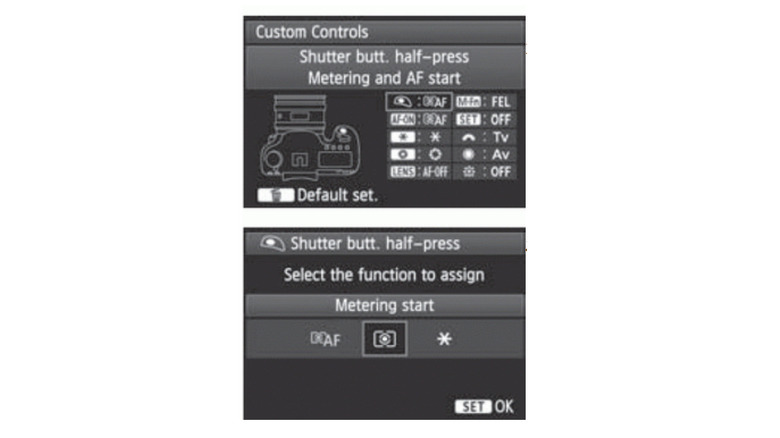
Bonus tip: Customize your DSLR camera's buttons, too. Some DSLRs — especially the higher-end models –- let you assign custom functions to the camera's buttons. This lets you personalize your experience by repurposing existing buttons for actions you use all the time and want have access to without needing to go into a menu. For example, you can set a button to enable back focus (where a button locks the focus and the shutter solely snaps the image). The options aren't limitless: Canon, for example, documents which actions you can assign where. But this form of customization is just one more way to make your camera your own.