6 Things You Probably Didn't Realize Microsoft Word Can Do
Microsoft Word has been gracing our computer screens for four decades now, and it's rare to meet someone who hasn't used, or at the very least heard of it. After all, Word has become an integral part of everyone's life as it caters to a broad spectrum of needs, be it making professional reports or creating eBooks.
If you are a Word user, it's safe to say you're already well-acquainted with its core capabilities. You know that you can use the app to convert your document to a PDF, format your pages just the way you like it, and insert equations and images for better context. However, with the app constantly evolving and new features getting integrated regularly, some of these functionalities might have slipped under the radar of even the most seasoned users. Let's delve into six of the things you probably don't know Word can do.
Reuse the same phrases and sentences
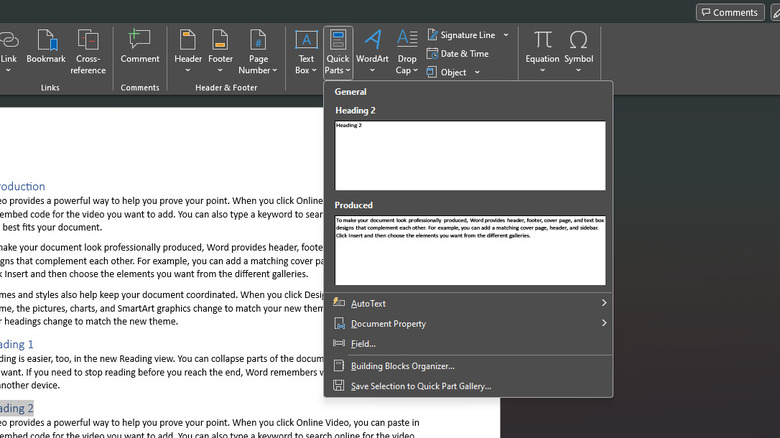
Working with countless documents means you'll be encountering similar pages and paragraphs here and there. Maybe your company uses a standard front page for every report or your math professor insists that you add the same score sheet to all your homework. Retyping such content every time you need it can be pretty time-consuming. This is where Quick Parts come into the picture. Quick Parts is essentially a collection of reusable text — be it words, phrases, or sentences. By saving these snippets, you can paste them into your document without much of a hassle.
- To add your frequently used content to Quick Parts, follow these steps:
- Fire up Word on your desktop.
- Type and highlight the content you want to add to your Quick Part gallery.
- Navigate to the Insert tab.
- In the Text group, press on the Quick Parts option.
- Click on Save Selection to Quick Part Gallery.
- Assign a name for your content.
- Hit OK to save it.
- To insert a Quick Part snippet anywhere in your document, here's what you need to do:
- Open your document in Word.
- Select Insert.
- Expand Quick Parts.
- Pick your content from the saved content.
- To insert the chosen snippet right where your cursor is, simply click on it.
- To insert the snippet in a different location, right-click on the content and select where you want to paste it (e.g., at the end of the document, at the page footer, at the beginning of a section).
Hide certain texts
Have you ever needed to make two versions of the same document because some parts of it aren't meant to be read by everyone? Say, for instance, a quiz where the answers shouldn't be visible, or a contract with sections irrelevant to certain hires. This method might work for others, but it's generally confusing having to manage two almost identical documents. Instead of doing so, there's a neat trick in Word you can use: hide texts. It's the perfect solution for those moments when you need to keep certain information out of the printed version but don't want to clutter your space with similar documents.
Here's a quick guide on how to do it:
- Open your Word document.
- Highlight the snippet you wish to hide.
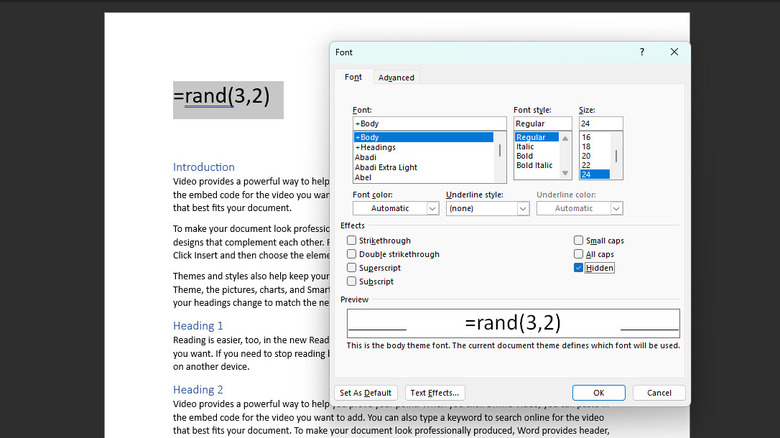
- Press the Word keyboard shortcut Ctrl + D or go to the Font group under the Home tab and click the small arrow in the corner.
- In the Font dialog box, turn on the Hidden box under Effects.
- Press OK.
Your selected text will now disappear from the document, both in the normal reading mode and in the printed version. Should you need to see this text again in the document, just click the Show/Hide button (looks like a backward P) in the Paragraph section of the Home tab. If you decide to include this hidden text in your printout, navigate to File > Options, select the Display tab in the dialog box, and tick Print hidden text.
Generate placeholder texts
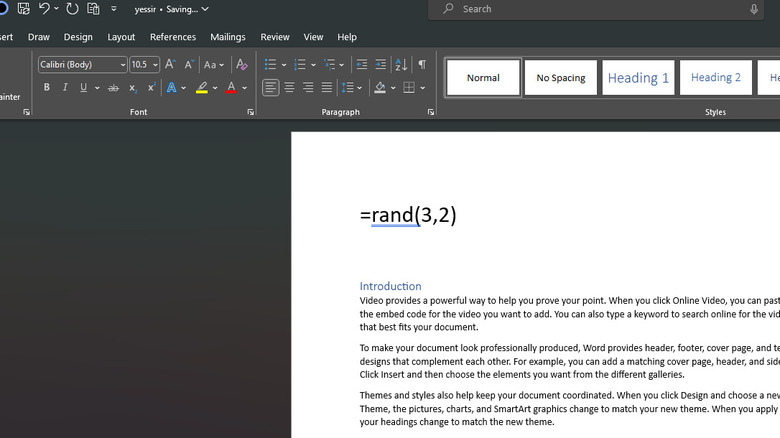
Sometimes, when you're writing a document, you might not have all the data or content yet. However, because you need to finalize the formatting of your document, you'll resort to scouring the internet for random text or hopping on an online Lorem Ipsum generator to create one for you. However, you actually don't need to do those extra steps as Word comes with a built-in feature that generates placeholder text without much fuss.
In your Word document, simply type =rand() to insert a sample text in English or =lorem() to insert a Lorem Ipsum text. Then, press the Enter key. By default, the sample text will consist of three paragraphs. If you're looking for something longer than three paragraphs, you won't have to retype the keyword over and over again. Just modify the command slightly. Use =rand(x,y) or =lorem(x,y) instead. X represents the number of paragraphs you want and Y represents the number of lines per paragraph. So for instance, typing =rand(5,3) will give you five paragraphs, each with three lines.
Shrink multiple pages
Reading long documents on a screen can cause eye strain, so some people prefer having a physical copy instead. If you're the type to do so, then chances are you're all too familiar with the challenge of trying to squeeze your multi-page document into as few pages as possible to save on paper. The problem, however, is that you'd need to spend time experimenting with what font size and spacing to set your text to.
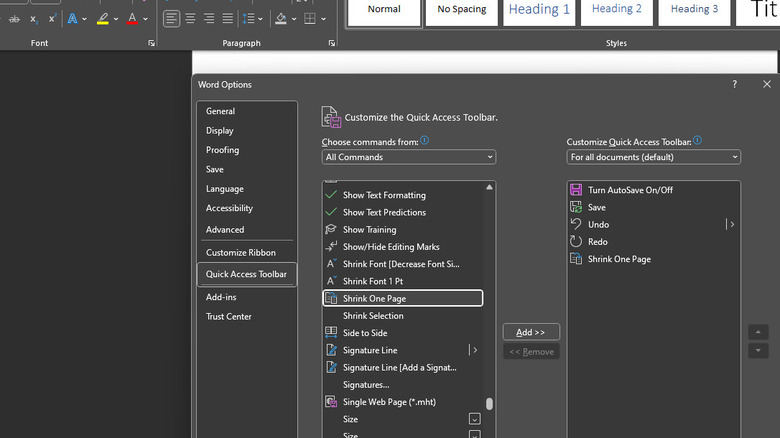
Luckily, Word can automate this process for you with just one click of the Shrink One Page button. This handy tool condenses your document by one page, so your two-page file becomes one page, your three-page document becomes two pages, and so on. It's indeed a time-saver, but it's not enabled by default on the app. Here's how to turn it on:
- Launch Word on your desktop.
- Navigate to the File tab.
- Select Options at the bottom of the page.
- In the Word Options dialog box, go to the Quick Access Toolbar.
- Under Choose commands from, select All Commands.
- Scroll down to Shrink One Page and click on it.
- Select the Add button.
- Press OK to exit the dialog box.
Now, you can conveniently access the Shrink One Page button from your toolbar (the group at the very top of the page with the save button). Just click on it to reduce your document size page by page until you have your ideal number of pages where the text is still readable enough.
Read documents better with Immersive Reader
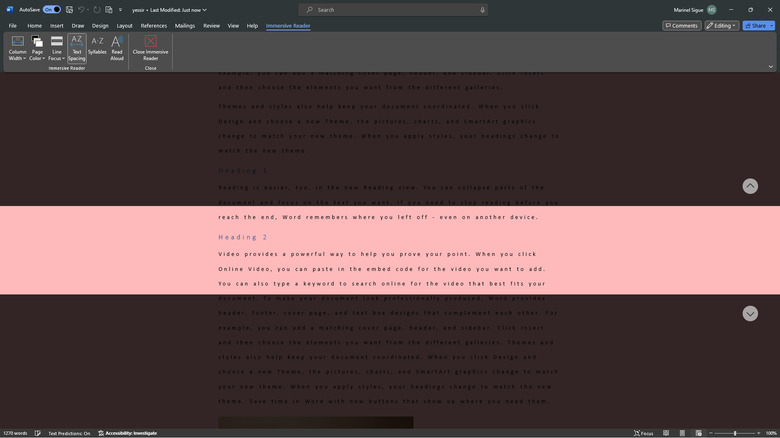
While reading documents on your computer isn't the most fun thing to do, Word makes the experience a little more bearable with Immersive Reader. This feature changes the way your document looks for reading purposes without modifying the actual formatting of the document. It comes with several tools to help you read and focus better:
- Column Width: Adjusts the width of the text columns. Options include Very Narrow, Narrow, Moderate, and Wide. You can choose from Very Narrow, Narrow, Moderate, and Wide. If your document has only one column, selecting Wide stretches the text across the entire screen.
- Page Color: Changes the background color of the page to suit your preference. If you find a white background too harsh on your eyes, you can pick from other options, including sepia, gray, or more eye-popping colors like green and pink.
- Line Focus: Darkens all but a few lines of text to help you concentrate on specific parts of the document. You can choose to focus on one, three, or five lines at a time.
- Text Spacing: Changes the spacing between lines to improve readability.
- Syllables: Breaks all the words into syllables, making it easier to read and pronounce words correctly.
- Read Aloud: A robotic voice will read the text for you. This can be handy if you're unsure how to pronounce certain words or just prefer listening over reading.
To enable Immersive Reader on your desktop app, go to View, and in the Immersive group, click on Immersive Reader.
Turn your document into a PowerPoint presentation
If you frequently convert your Word documents into PowerPoint presentations, then you know how tedious and time-consuming it is. However, there's a game-changing trick you can use to speed up the process: just export the document as a PowerPoint presentation. This works exclusively for the web version of Word and for documents with headings and primarily text. The document's headings will be used as the titles of the PowerPoint slides, and the body will form the content of the slides. Here's how to use this trick:
- Save your document in OneDrive. In the Word desktop app, press Ctrl + S and choose OneDrive as the location.
- Open your browser.
- Go to office.com and sign in if you haven't already.
- Click on Word from the left panel.
- Select your document from the list to open it in the web app.
- Navigate to File > Export.
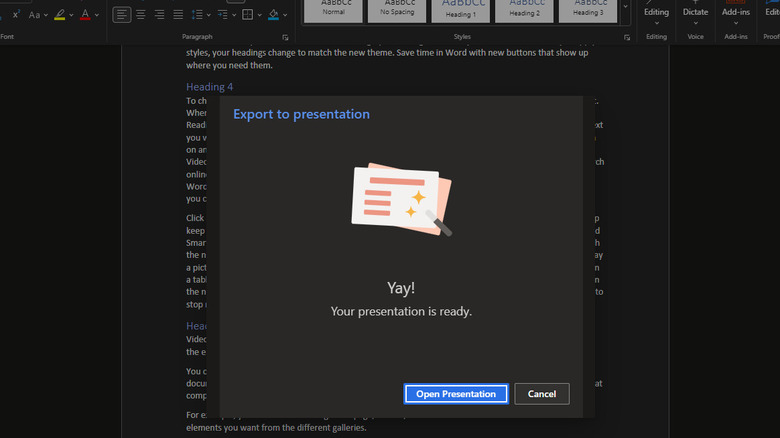
- Click on Export to PowerPoint presentation (preview).
- Pick your theme from the displayed options or hit See more themes for more choices.
- Press the Export button.
- Wait for the process to complete and click on Open Presentation.
You can now browse the presentation, polish the slides, and insert text boxes and images if needed. Do note that if your content is long, PowerPoint will summarize it and pick only certain parts to include in the slides. Be sure to go through each slide to everything you need to include is there.