How To Master The iPhone's ProRAW Feature: A Step-By-Step Guide

First introduced to the iPhone at the tail end of 2020 as part of iOS 14.3, Apple ProRAW has been an consistent feature since the iPhone 12 Pro. Specifically for other Pro iterations — from the 12 Pro and Pro Max up through the 15 Pro and Pro Max.
If this is the first you've heard of it, Apple ProRAW is a photo format that boasts both the uncompressed image data of the more common RAW format while maintaining the kind of straightforward photo editing you've probably come to expect from iOS devices. This means you can take very hefty photos with your iPhone, then perform as many or as few adjustments as you want — exposure, white balance, color correction, etc.
There are some limitations. ProRAW isn't supported by Live Photos, and it won't work in Portrait Mode, and doesn't apply to videos. It's a worthwhile feature if you prefer to capture photos with as little loss between what the camera sees and what the digital file saves as possible. Though if you mostly use your iPhone's camera to take quick pics for social media, document vacations, or anything that you don't really need incredibly high resolution for, the feature likely won't be of much use to you.
Setting up ProRAW on your iPhone
Ordinarily your Pro model iPhone won't utilize ProRAW formats without your say so, but you can turn the option on easily enough.
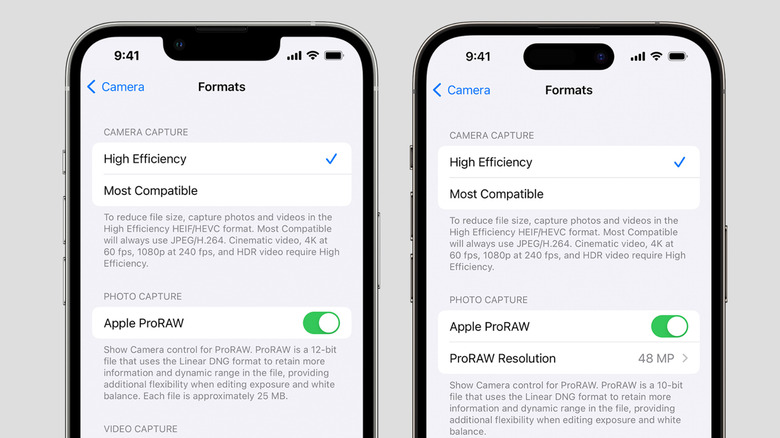
- Open the Settings app and select the Camera option.
- Tap Formats, then in the Photo Capture section tap the toggle next to Apple ProRAW to turn it on (the toggle will turn green).
- Once turned on, you can switch to the ProRaw format from the Camera app by tapping the RAW icon in the top-right corner. A diagonal line through the icon means it's turned off, no line means it's turned on.
- You can also adjust the ProRAW resolution settings on an iPhone 14 Pro and newer Pro model by opening Settings and choosing Camera.
- Select Formats and toggle on Apple ProRAW to reveal resolution options, then tap ProRAW Resolution to choose between 12MP (the default for earlier Pro iPhones) and 48MP.
Be aware that Apple ProRAW images are often much larger in terms of necessary storage space than non-RAW formats, with the standard averaging out to about 25 MB per 12MP photo and around 75 MB at 48MP. That means you could find yourself running out of room unexpectedly if you don't keep a close eye on your photos and available storage space.
Making use of ProRaw images
Despite the fancy "Apple ProRAW" moniker, you don't have to worry about file compatibility with your iPhone Pro photos. Apple ProRAW images save under the same .DNG file format as other RAW photo files, so they should work with any photo viewing or editing apps and software that support it.
- To share the original ProRAW .DNG file after it's been edited in the Photos app (which would normally export as a .JPG), select the photo and tap the three dots (...) in the top-right corner.
- Select Revert to Original to undo your previous changes, then share via AirDrop as usual.
- Alternatively, if you want to keep your changes but still send the original file, tap the three dots (...) and select Duplicate, then select the duplicate photo and tap the three dots (...) followed by Revert to Original.
- To share the unmodified ProRAW file from macOS, select the photo in the Photos app on your Mac.
- Select File, then Export, and click on Export Unmodified Original to share the .DNG file.
Please note that if an app doesn't explicitly support Apple ProRAW, there is a chance the image may not look exactly the same when you load it in. For that reason, Apple recommends sticking with the default Photos app in iOS 14.3 and newer or in macOS 11.1 and later. Edited ProRAW images will export as .JPG files though, so once you make your desired changes the finished product should be more universally shareable.