5 Facebook Privacy Settings You Need To Change
As one of the biggest and still one of the most widely used social media platforms out there, Facebook holds a lot of data on its users. If you have an account, chances are high that you may be inadvertently exposing information that you don't necessarily want certain audiences to see. Because Facebook routinely updates its app with new features — some of them are enabled by default — it's important to make it a habit to check your privacy and security settings, which you can easily do on either a mobile device or a desktop computer.
Facebook has a built-in privacy checkup tool that is conveniently accessible by hitting your profile icon and launching the "Settings & privacy" page (it's the gear icon). It should be able to guide you through crucial settings you should be aware of to keep your account contents secure. Alternatively, you can manually go down the list of every menu listed in Facebook's settings, which is the more thorough and preferred method if you have the time. Do note that the "Settings & privacy" dropdown on the Facebook app looks a bit different when viewed on the desktop platform, so certain pages may be nested under additional menus.
To help you get started, here are some of the more important Facebook privacy settings you should modify — and in some cases, routinely update — according to your preferences.
Profile visibility
The first set of privacy settings that is arguably the most important one you should tweak is the one that controls who can view your personal data. This includes your contact information, birthday, location, work and education history, and your posts, to name some. Below are steps on how to find these details.
Through the app:
- While on the main page, tap your profile photo.
- Hit the gear icon to get to "Settings & privacy."
- Scroll down to the "Audience and visibility" section.
- Select "Profile details."
Through a computer web browser:
- Go to your profile page.
- Select the About tab.
- Go through each menu in the side panel.
Here, you'll see several sections like Work, Education, Places lived, Contact info, and so on. Go through every entry and hit Edit or the pencil icon where it's shown next to it. This will let you tweak each one's privacy settings and change the "Sharing with" option from Public to either Friends, Only me, or any custom group. Hit Save when applicable to retain any modifications made. For Contact info, there's an additional step of choosing Manage contact info to set up each phone number and email address' audience.
If you're accessing Facebook on a computer web browser, each item in your About section should have an audience button next to it, alongside a three-dot icon to edit the entry.
Facebook friends list and searchability
The next set of settings you should get into is the one pertaining to how people can find and contact you. Limiting these permissions can decrease the number of strangers attempting to communicate with you on the platform. Another crucial bit that many Facebook users tend to forget is protecting their friends list from outside view — doing so makes it harder for people to scam your acquaintances by pretending to be you or scam you by pretending to be someone you know. Below are instructions on how to get to these settings.
Via the app:
- While on the main page, tap your profile photo.
- Hit the gear icon to get to "Settings & privacy."
- Scroll down to the "Audience and visibility" section.
- Select "How people find and contact you."
On Facebook via desktop, all these relevant settings are under the Privacy Settings and Tools page, under the "How people find and contact you" section. The following settings for each menu are highly recommended:
- Who can send you friend requests: "Friends of friends."
- Who can see your friends list: "Only me" or "Specific friends." If you choose the latter, pick contacts you trust the most, like your significant other or a couple of in-case-of-emergency friends.
You also have the option of limiting who can look you up using your email address or phone number. For the sake of privacy, pick any audience except Everyone. In addition, you can stop search engines outside of Facebook from linking to your profile when someone tries to Google you by disabling the option.
Posts and tagging permissions
The last set of audience-related settings you should safeguard has to do with the content you share. On the app, you can find these preferences when you tap Posts under the "Audience and visibility" section. On a computer web browser, they will be in the Privacy Settings and Tools page under Your Activity. For "Who can see your future posts," it's recommended that you opt for Friends as your default audience. You can always tweak any specific post's individual audience preferences while composing it.
There's also a nifty tool that lets you limit the audience for past posts in one go. This is especially important if you have shared several entries in the past that are set to Public that you would now like to protect. Do note that in using this, you're automatically setting all your posts on your timeline to Friends only permanently. The only way to undo this is by individually changing the audience of all previous posts. In any case, anyone tagged in posts and their friends may still be able to view the audience-modified entries.
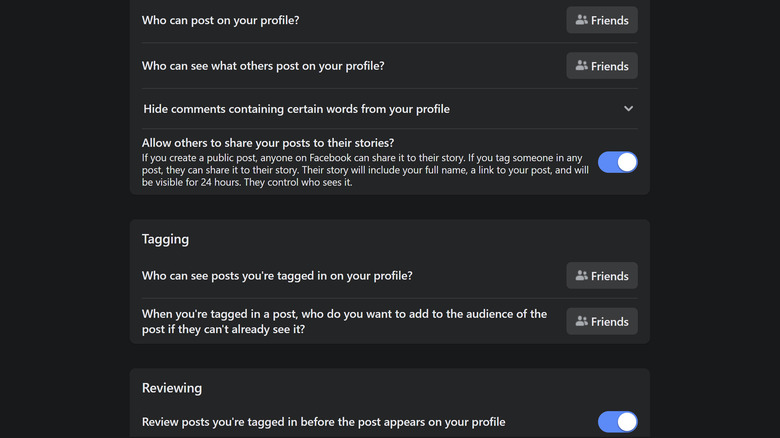
Speaking of, the next step should be to look into who can tag you in posts. On both the app and desktop platforms, this can be found in Profile and Tagging under the "Audience and visibility" settings for the former. On this page, not only can you dictate who can see posts you're tagged in, but you can also modify who gets to post on your profile or who gets to view those entries. If you prefer to be in control of which posts you are tagged in, make sure you enable the options to review tags people add to your posts before they appear on Facebook and on your timeline.
Third-party access
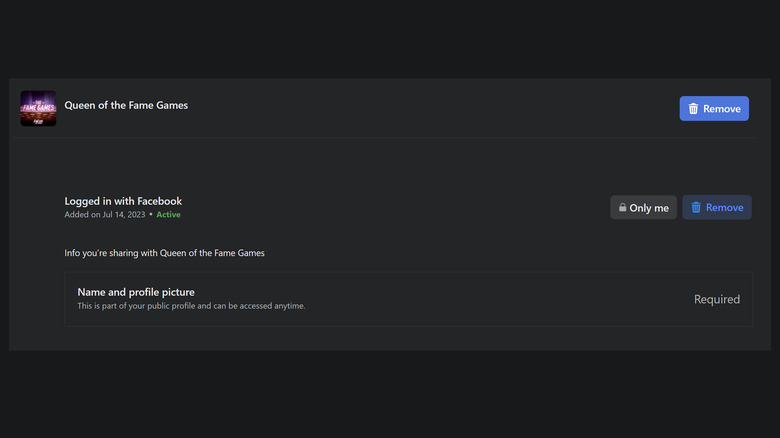
By default, Facebook shares your personal information with websites you log into using your Facebook credentials. This isn't a bad thing to do, but to avoid exposing data to websites you don't use regularly, it's good practice to routinely manage apps with access to your Facebook account. Follow these instructions —
On the app:
- On the main page, tap your profile photo.
- Hit the gear icon to get to "Settings & privacy."
- Scroll down to the "Your information" section.
- Select "Apps and websites."
On a computer:
- Click on your profile photo in the top-right corner.
- Pick "Settings & privacy."
- Select Settings.
- Pick Apps and Websites from the sidebar.
On this page, choose the apps that you no longer use and remove them from the list. This effectively revokes access to your Facebook information.
Similarly, Facebook can glean information from apps and websites you access on your device, provided that they share your activity with the social media app. To review this data, head to "Off-Facebook activity" under the "Your information" section of the Facebook app's settings page. On a desktop, choose "Your Facebook information" from the side panel of the Settings page and hit View next to "Off-Facebook activity."
You'll need to re-enter your Facebook password to clear your activity history or disconnect specific activities on various apps and websites. Clearing the history essentially disconnects all past activities from your account, so to be on the safe side, go through all the apps and individually turn some off, preferably those you find irrelevant to your actual interests.
Facebook's sharing relationship with third-party businesses is meant to produce a more personalized experience on the platform. This ensures that every ad you run into on the app is relevant to your personal preferences.
Ad preferences and security settings
Unfortunately, there is no way to completely turn off all ads on Facebook. Instead of that, you can rig your ad preferences so that you only see endorsements you want to see. Here's how to get there —
Via the mobile app:
- Tap your profile photo and hit the gear icon.
- If you can see Meta's Account Center on the "Settings & privacy" page, tap "Ad preferences" underneath it. Select "Ad preferences" again from the menu panel.
- Otherwise, select Settings, scroll down to Permissions, and select "Ad preferences."
Via desktop:
- Click your profile photo in the top-right corner.
- Select "Settings & privacy," then Settings.
- If you see Meta's Account Center, click "Ad preferences" in that section and again from the "Account settings" panel.
- If you don't, Select Ads from the left menu.
While on this page, you can check out ads you've recently interacted with and view and modify your ad topics. You can also review "Ad settings" and decide if you want Facebook to use your Off-Facebook activity on partner websites to personalize what ads you see or not. Every section should have a brief explainer for what certain setting changes will do to the ads that show up on Facebook — carefully go through each one and disable items you prefer not to be used.
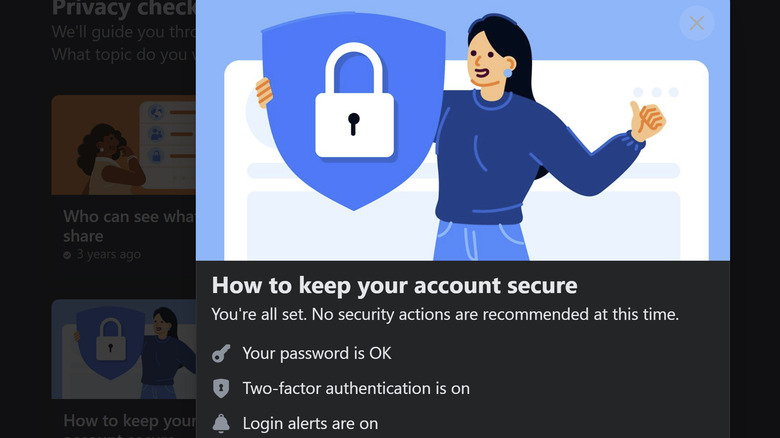
Lastly, it's highly recommended to regularly update your password, enable two-factor authentication, and enable login alerts so that you can deter hackers from taking control of your Facebook account. The quickest way to do all three is by using the Privacy Checkup tool within the "Settings & privacy page" and hitting "How to keep your account secure." If you haven't enabled any of these features, Facebook will guide you through the process for each.