5 MacBook Features That Will Change The Way You Use Your Laptop
macOS is famous for being seamless and minimalist. Part of the attraction for many users is that its clean interface has remained unchanged despite several updates, making for an unobtrusive experience.
Because of this simple exterior, Mac users might miss the line of handy features that Apple has added to macOS over the years. Most of these bells and whistles are under the hood, so you'll have to do some digging to discover and maximize them, but you'll be glad you did.
We'll walk you through five hidden features and show you how to use them to improve your workflow and productivity and make your life easier. Even better, these tips work even if you're not running the latest version of macOS (although there are several benefits of upgrading). It also doesn't matter which model you have — MacBook Pro or Air, iMac, or Mac Studio, you can still do these things to make the most of your device.
Handoff
One of the perks of Apple's remarkable ecosystem is the seamless integration between its devices. Part of this is the homogenous communication system called Continuity, which powers features like the Universal Clipboard that lets you access the same clipboard from multiple Apple devices, so you can copy and paste items from your Mac to your iPhone and vice versa.
Handoff is one such Continuity feature, and with it, you can start work on one Apple device, then continue on another. It only works when your devices are near each other. According to Apple, you can use it on proprietary apps like Safari, Mail, Maps, Reminders, Calendar, Contacts, Pages, Numbers, Keynote, and some third-party apps. FaceTime is also compatible, but only on macOS Ventura and later or mobile devices with iOS/iPadOS 16.
To use Handoff, you must be signed in to all the devices with the same Apple ID, and each device must have Bluetooth and Wi-Fi turned on. You'll also have to enable Handoff on each device. Here are Apple's instructions for doing so:
-
On an iPhone or iPad, head to Settings > General > AirPlay & Handoff, and turn on Handoff.
-
For Apple Watch, open the Watch app on your iPhone, tap General, and enable Handoff.
-
On a Mac, open the Apple menu > System Settings > General, then turn on "Allow Handoff between this Mac and your iCloud devices." On newer versions of MacOS, it may be under its own subsection.
Hot Corner shortcuts
Hot Corner allows you to use the corners of your Mac screen as shortcuts to trigger specific actions. Instead of fumbling around your System Preferences menu to access features like Mission Control, Application Windows, Desktop, Launchpad, Notification Center, or Sleep Screen, you can assign any of these features to any of the four corners of your Mac. This is especially useful for Mac owners with cluttered desktops or infinite open tabs who might find navigation difficult.
According to instructions by Apple, to set up Hot Corners, you have to open the Apple Menu > System Preferences > Desktop & Screen Saver. Switch to the Screen Saver tab and select Hot Corners at the bottom of the screen. Click the pop-up menu for each corner to assign it a function, then click Done.
Convenient as Hot Corners are, they can become a bit of a bother because it's easy to trigger them by accident. Luckily, there's a simple way to prevent this. You can add modifier keys like Command, Shift, Option, Control, or any combination of those keys to a Hot Corner while viewing the pop-up menus. You must press your selected modifier keys while swiping to a Hot Corner to activate the shortcut.
Customize trackpad

You can also customize trackpad gestures to trigger specific actions, unlocking higher efficiency on your Mac.
Per Apple, you can change the direction of your scrolling, use the trackpad to zoom in and out, look up words, and more. Open the Apple Menu > System Settings > Trackpad to see the options available, then check the three tabs, Point and Click, Scroll and Zoom, and More Gestures, and check the boxes for the features you want.
You can adjust tracking speed, click firmness, and even turn off the click sound. You can also select trackpad gestures that'll let you swipe between apps on your Desktop or between pages in a document and access Mission Control, Notification Center, Launchpad, and your Desktop.
Some of these features might be missing depending on which Mac model and OS version you're on, but we tested on models as early as the 2015 MacBook Pro running Catalina, and all the options mentioned above are present.
Sign documents with Preview

You'll love this if you frequently have to sign many PDF emails. Instead of going through the hassle of uploading the documents to online e-signature tools or printing them out to sign and scan them back in manually, you can sign anything via the Preview app.
To get started,
-
Open the PDF or image file in Preview. You can do this with a double click or right-click and select Open With > Preview.
-
Next, click the Show Markup icon in the Toolbar — it's the one that looks like a small marker inside a circle.
-
Click the box at the top that looks like a signature — it's in between the Text and Note feature; if you hover, you should see it tagged "Sign."
-
Select "Trackpad" to sign your name with strokes on the trackpad, or click Camera to take a photo of a signature you've signed on white paper with your Mac's webcam. You can save a signature to reuse later.
Screenshot and screen recording
Most people are unaware of Mac's built-in tool screenshot and screen-record tool. It's fully-fledged, with an interface that provides a few screen-capturing options and any specifications you might want for the recording.
You can capture the entire screen, a selected portion of the screen, or a window. You can also record the whole screen or a selected part and use a timer or show your Mouse pointer.
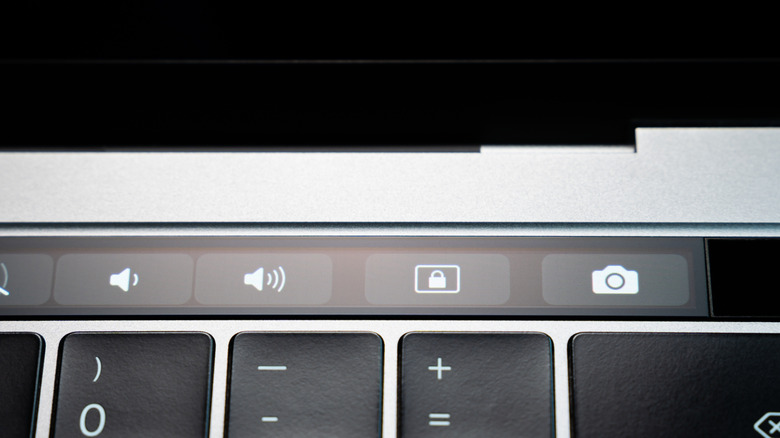
You can access the screenshot or recording from your Finder when it's done — you can choose the folder where you want it saved before you begin. To use the Screenshot tool, open the Launchpad and select it from the "Other" folder. A quicker alternative is the "Command + Shift + 5" shortcut. On models with a touchbar, you'll find the screenshot tool on there.
There are also a bunch of other keyboard shortcuts you could use for screen capturing, and you can customize them in the Apple menu > System Settings > Keyboard > Shortcuts > Screenshots.