Microsoft Outlook: Why Your Email View Changed (And How To Fix It)

Did you open Outlook today and think, "Why does everything look different?" Maybe the message list looks squashed, the reading pane is in the wrong place, or the whole layout feels unfamiliar. Happily, there are several fixes you can try to restore the familiar view. The first thing to establish is whether you're using Classic Outlook or New Outlook. New Outlook was released in 2023. It has more AI and integration tools than its predecessor. It also has a different layout. You can tell if you're using New Outlook because it has a gear icon for Settings in the upper right, whereas the Classic version has a File tab on the ribbon.
It comes pre-installed on newer Windows devices, or you may have clicked a button to switch to the shiny new version with intelligent tools, AI, Microsoft 365 integration, and a whole different layout from its predecessor. So one reason that everything may look different is because you're used to Classic Outlook, and your Outlook has switched to the newer version. If you've found yourself using New Outlook and you don't like it, you can switch back by selecting "Help" on the top toolbar and clicking "Go to classic Outlook".
However, a switch from Classic to New is just one reason that your email view may have changed. If you're using Classic and you need help sorting out your view, check out our guide to sorting out the view in Outlook from a couple of years ago. If you're using New Outlook, read on. The following fixes should get your Outlook back to looking the way you want it.
Try adjusting your View settings
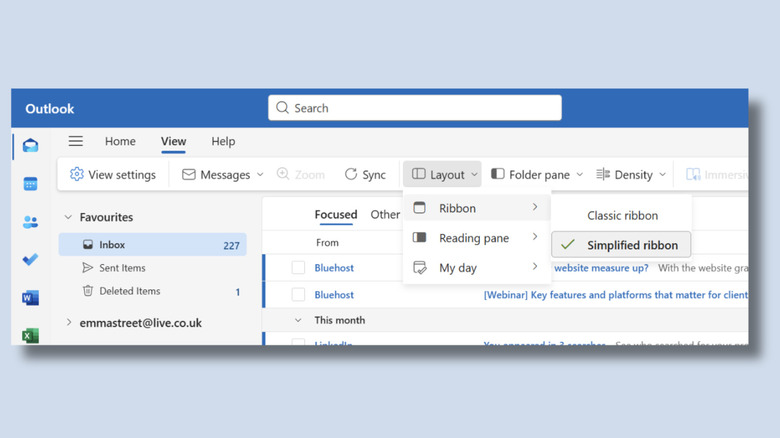
Sometimes issues can be fixed simply by signing out and signing back in again. If that doesn't work, you should be able to fix it by adjusting your view settings. For example, your reading pane — the preview area where emails open — can be on the right, at the bottom, or hidden altogether. If this has moved or disappeared, you can fix it by clicking View on the top toolbar and then Layout. You will see options next to Reading Pane, to Show on the right, Show on the bottom or Fill screen, which removes the reading pane altogether. Select the one you want.
If your email list suddenly feels cramped or overly spaced, the message density setting may have been changed. This controls how much space each email takes up in your list. In View, select Density, then choose Compact, Cozy, or Roomy until it looks like you want it to. If your Outlook view seems strange because group emails have started (or stopped) showing as a conversation rather than separate emails, you can adjust this setting by navigating to View, Messages, Conversations, and changing your group messages option. You'll be able to find fixes for other viewing issues, like whether it's displaying preview text or displaying your folder list, by playing around with the View settings. There's an option to select View settings from the View menu to see more options.
Other fixes you can try
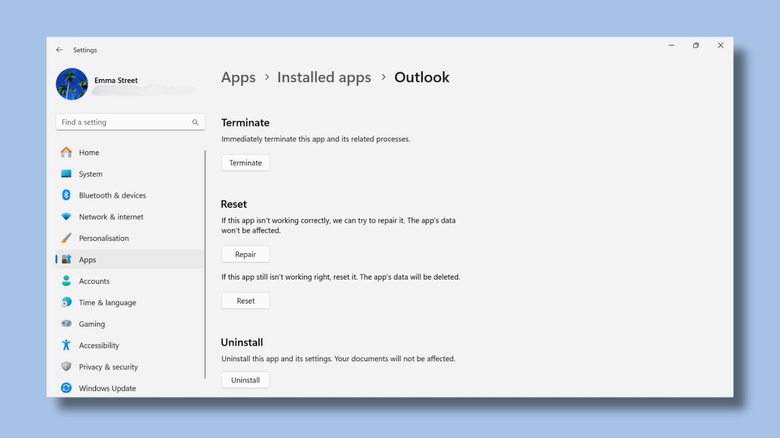
If you've adjusted your view settings and it's not helping, there are a few other things you can try. As Outlook is a Microsoft product, you can use the main settings if you're accessing Outlook as an application on a Windows device and not via the web. Select settings on your device (from the main toolbar not from within Outlook) and select apps, then go to installed apps. On the apps list, find Outlook, click on the three dots to the right and select "Advanced Options". From here, you can repair, reset, or uninstall.
Selecting "Repair" means Microsoft will try to resolve problems within the application, which could include issues with settings, configuration, or corrupted files. If this app still isn't working right, try the "Reset" option. Although you are warned that the app's data will be deleted, don't panic. This is standard text for all installed applications. It won't delete your actual emails or contacts, which are stored on the server. However, it will remove cached data and custom settings, which could fix your issues, but means you might need to reconfigure some preferences. Your next option is to try uninstalling and reinstalling it. Select "Uninstall" and then reinstall Outlook by downloading it again from the Microsoft Store. If you are still having problems, reach out to Microsoft Support or raise the issue on its forum.
If you're using the Microsoft Outlook app on a Mac, there are other fixes you can try, like updating the app, fixing your profile, and using Apple's First Aid process. If you access Outlook as a web application, try clearing your cache or deleting cookies to see if that resolves the problem.