The Best Ways To Clean Laptop Keyboards

We may receive a commission on purchases made from links.
Cleaning your keyboard is one of the many ways in which a few minutes of work can lead to a significantly lengthened life for your laptop. The occasional cleaning regimen is not only sanitary, but it can improve the keyboard's responsiveness. Dust and debris can get caught beneath the keycaps and cause keystrokes to not register — this, in turn, can lead to weird typos or a misstep while gaming.
Luckily, cleaning the keyboard is a relatively simple activity, and you can clean your laptop keyboard with everyday items. There are some specialty tools you can buy specifically for this, but they aren't necessary. Likewise, you can thoroughly clean the keyboard, but the occasional wipedown is usually just fine.
The tools you may need
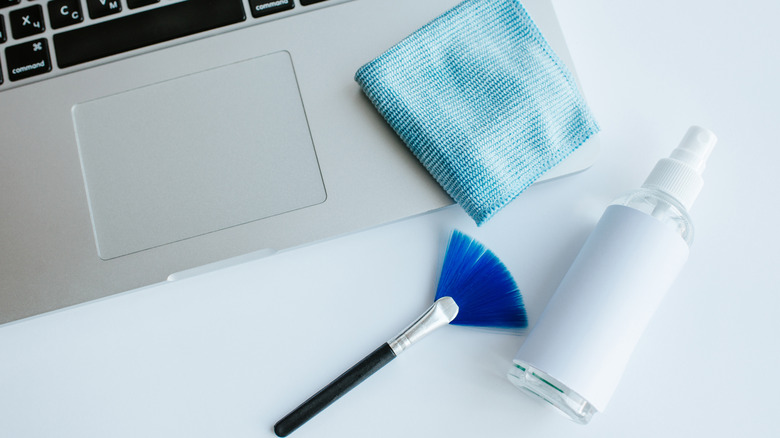
There are a few things you will need to do this right. For one, you will want some sort of latex or vinyl gloves. The oil from your fingers is part of what will be cleaned, and you don't want to deposit it right back on the keys during the cleaning process. Plus some of these methods use isopropyl alcohol, which can irritate the skin. Best to stay on the safe side.
Next, you will want some sort of soft brush to wipe away any dust. Something like a cheap synthetic paintbrush is perfect for this. You will also want a microfiber cloth because they are absorbent and its surface area is great for picking up dirt and debris. You won't want to use a paper towel because it may break apart and get caught in the keycaps.
Another option is compressed air, which can quickly blow away any dirt. This is a great option if you're looking to do the job quickly.
Before all else: Unplug/turn off the laptop

The first thing you will want to do is disconnect your laptop and power it down. This is especially true if you plan on disassembling the laptop to any degree. You don't want to accidentally short something or shock yourself.
Once you have the device powered down, it's time to turn the laptop upside down. Gravity is your worst enemy during this process, so flipping the laptop upside down is the best way to prevent dirt and debris from going deeper beneath the keycap.
If you plan on using compressed air, holding the laptop upside down in one hand while you spray is the easiest way to access all the keys. You can also use the paintbrush in this method. Alternatively, you can set it on a table standing upright like a tent. You can still easily access all the keys for brushing, and you don't risk accidentally dropping the laptop. You will still want to hold the laptop if you plan on spraying it with compressed air.
The brush and compressed air clean: Just the basics
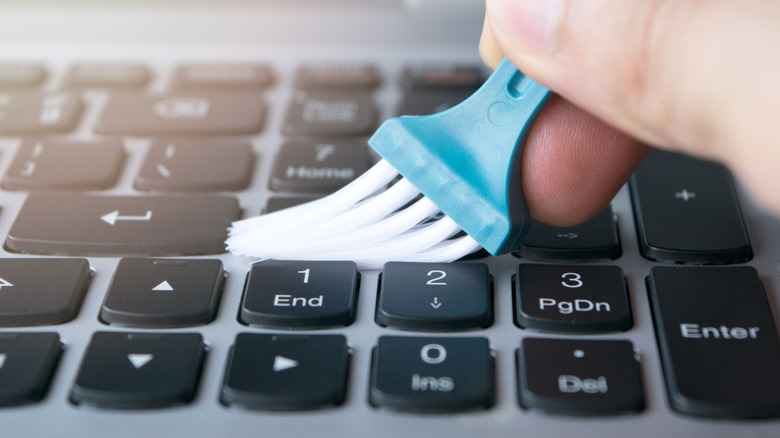
Using the brush, gently run it along the keys in order to pick up any dust. You'll also want to work the bristles in between the keys so you can get any debris that has accrued there. Don't be too forceful, though, because you can still push dirt beneath the keycaps even with the laptop upside down.
For compressed air, you will want to hold the laptop in your free hand. If it's a Macbook, Apple recommends holding it at a 75-degree angle. Make sure you attach the nozzle and hold the can so that the nozzle is an inch or so away from the keyboard. Gently press the release on the head of the can and move your hand in a left-to-right "Z" pattern. Flip your laptop 90 degrees and repeat the process.
This should send any dust flying away from the keys. The whole compressed air method should take about two minutes to complete.
The microfiber cloth clean: For detailing
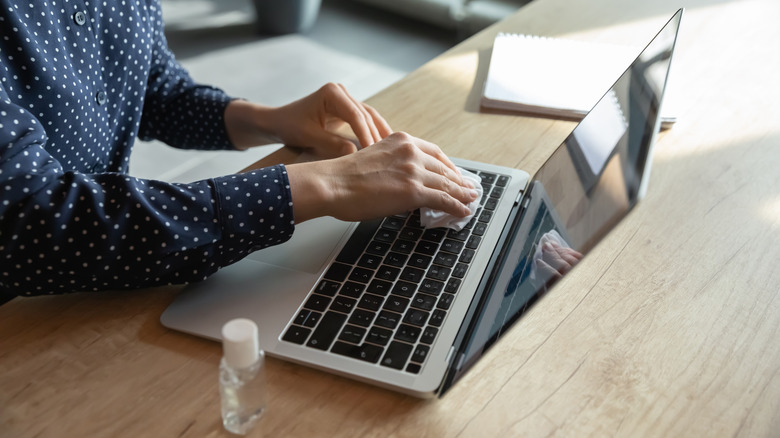
After you have cleaned your keyboard with a brush or compressed air, you can gently wipe the keyboard with a microfiber cloth. The cloth will pick up any other debris hanging around, and it will help remove oils from your skin off the keys.
If you want to disinfect the keys, or if there are some particularly tough oil stains, you can use isopropyl alcohol. Isopropyl kills bacteria and germs on the surface, and it evaporates quickly, so there's little risk of it sticking around and causing any harm. However, for this, you will want to use a solution that is no more than 70% isopropyl. Anything higher runs the risk of taking off any protective coatings and may even take the paint off the keycap.
Dab the isopropyl on the microfiber cloth and gently wipe down the keys. It shouldn't take much pressure at all. Avoid pressing down hard on the keys, because you don't want the alcohol to leak under the keys. It evaporates quickly, but it's still better to err on the side of caution.
Your keys should be thoroughly clean now.
The keycap removal clean: Long-term buildup
If you're looking to go the extra mile – or you're having ongoing performance issues – you can remove the keycaps and clean them that way. Before you start prying keys off, though, double-check to make sure the keys on your laptop model can actually be removed. You also won't want to do this very often, because constantly removing the keys can cause performance issues too.
Once you have confirmed the keys can be removed, you will want to use a tool like a flathead screwdriver to gently pry the key up and off the membrane beneath. You could use tweezers, but you'll want to be cautious and make sure you don't bend or snap the key while trying to wiggle it off.
Once you have the keycap removed, use the microfiber cloth to clean any dirt caked underneath. If it's particularly stuck, you can dap the cloth in the alcohol and wipe it away. Just make sure the key is dry before you replace it. You can also use alcohol to clean the membrane beneath the key. Just don't overdo it — and wait for everything to dry.
The towel and gravity clean: A simple water spill
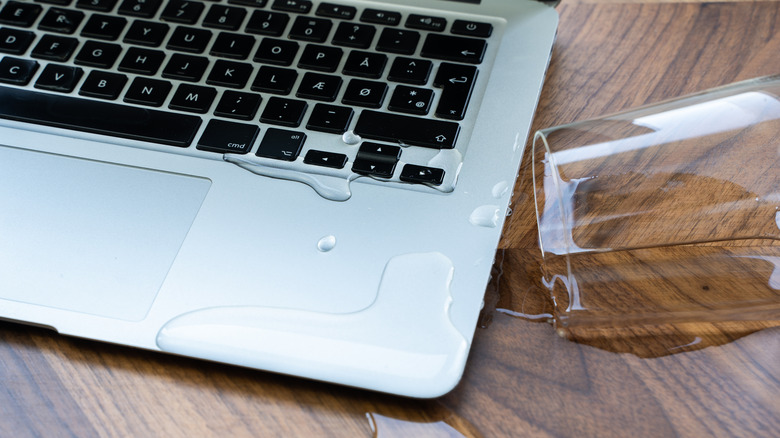
Spilling a drink on a keyboard certainly seems like a disaster, but if you keep a cool head and act quickly you can mitigate most of the damage, and there's a chance your laptop will come out of the situation unscathed.
First, you will want to unplug the device and turn it off. Next, flip it upside down just like you would in the steps above. This time, though place a towel underneath the laptop in a way where the towel is flat up against the keyboard. You may need to get creative, here, if you have a traditional laptop that does not fold back flat.
Gravity is your friend in this situation, and the moisture will be pulled down and out of the laptop. Leave it like this for at least 24 hours so there is time for all the liquid to evaporate.
It can be stressful to sit and wait for this to happen but just trust the process. If you let the computer sit flat (right side up) for too long, the liquid can work its way under the keys and eventually into the chassis. That's going to cause way more issues than you want to deal with, so just flip it upside down and leave it be.
There's no absolute guarantee this method will result in a still-operational computer, but it's certainly worth a shot.
Time for a pro clean: A sugary drink spill

If the drink in question was something really sugary like soda, that's a whole other ballpark. Your laptop will almost certainly need some level of disassembly before it gets a full clean.
At this point, it's usually best to take your laptop to a professional repair shop and have them do it. Cleaning your laptop is a bit more finicky than cleaning your tower PC, and it requires specialized tools.
If you're tech-savvy and confident, though, you can do it yourself. Many laptops these days — especially high-end models, ironically – don't come apart very easily. So again, it's best to leave this to someone who really knows what they are doing.
The best way to clean these spills, though, is to avoid them entirely. There are plenty of convenient desk cup holders that clamp to the side of the desk, as well as keyboard skins if you're especially prone to spills. Cheap accessories like this are a great way to keep your setup clutter-free and prevent any unfortunate accidents.